
Growing potatoes in your backyard or even on your patio is an incredibly rewarding experience. However, if you’re tight on space, you may wonder if you can still enjoy a bumper potato harvest. The answer is yes, and it’s simpler than you might think! By using a barrel as a container, you can grow up to 45 kg of potatoes in a small space. This method is perfect for urban gardeners, small yards, or even balconies, as it allows you to maximize your growing area vertically. In this article, we’ll guide you through the simple steps to grow a massive potato crop in a barrel.
Why Grow Potatoes in a Barrel?
Growing potatoes in a barrel is an excellent choice for several reasons:
- Space-Saving: If you have limited space, a barrel lets you grow potatoes vertically, making it ideal for small gardens, patios, or balconies.
- High Yield: A barrel can provide a surprisingly high yield compared to traditional in-ground methods. With the right care, you can harvest up to 45 kg of potatoes.
- Pest Control: Growing potatoes in a barrel minimizes the chances of pests like aphids, slugs, and beetles attacking your crops. The confined space makes it harder for pests to reach the plants.
- Ease of Harvesting: Harvesting from a barrel is less labor-intensive compared to digging them up from the ground. Simply tip the barrel, and your potatoes will be waiting to be collected.
Now, let’s walk through the process of growing 45 kg of potatoes in a barrel step by step.
Step 1: Choose the Right Barrel
The first step to growing potatoes in a barrel is selecting the right container. Here’s what you need to consider:
- Size: Choose a barrel that’s large enough to accommodate the number of potatoes you want to grow. Ideally, it should be at least 3 feet tall and 18 inches in diameter. This size allows ample space for root growth and ensures your plants get enough nutrients.
- Material: Plastic or metal barrels work well for growing potatoes. They retain moisture and can be easily moved around if needed. Avoid wooden barrels, as they can absorb too much moisture and may not last as long.
- Drainage: Make sure the barrel has good drainage. You can drill several holes in the bottom of the barrel to ensure water doesn’t collect and rot your potatoes. Proper drainage is essential for healthy root development.
- Location: Choose a sunny spot for your barrel. Potatoes need at least 6–8 hours of sunlight per day to thrive. Ensure the barrel is placed in an area that receives consistent sunlight.
Step 2: Prepare the Base Layer
Once you have your barrel, it’s time to prepare the base layer for your potatoes. This step is essential for the roots to establish themselves and grow well.
- Soil: Use a high-quality, well-draining potting mix. You can mix your potting soil with compost to improve the soil’s nutrient content and moisture retention.
- Layering: Start by placing a 6-inch layer of soil at the bottom of the barrel. This will provide a good foundation for your seed potatoes. Make sure the soil is loose and fluffy, as potatoes require well-aerated soil to develop healthy tubers.
- Choosing Seed Potatoes: Select certified seed potatoes from a garden center or nursery. Avoid using store-bought potatoes, as they may carry diseases. Choose seed potatoes that are firm with multiple “eyes” (the small buds where new shoots will grow). You can cut larger seed potatoes into smaller pieces, ensuring each piece has at least one eye.
- Spacing: Place the seed potatoes on top of the soil, ensuring they are spaced at least 6–8 inches apart. If you’re growing multiple layers, stagger the potatoes to give them room to grow. With a 3-foot tall barrel, you should be able to fit 2–3 layers of potatoes.
Step 3: Layer and Grow
As your potatoes start to grow, you’ll need to add more soil to cover the stems. This is a critical step that encourages the potatoes to form multiple tubers.
- Add Soil as the Plants Grow: Once the shoots start growing and reach about 6–8 inches high, cover them with another 4–6 inches of soil. Make sure the top leaves remain exposed above the soil level. Continue adding soil as the plants grow, until you fill the barrel up to the top.
- Encourage Tubers: Potatoes grow from the stems buried in the soil. By covering the plants as they grow, you’ll increase the chances of forming more tubers along the buried sections of the stem. This layering process is key to maximizing your potato yield.
- Watering: Keep the soil moist but not soggy. Potatoes need consistent moisture, especially when they’re forming tubers. However, avoid overwatering, as this can lead to rot. Ensure the barrel has proper drainage to prevent waterlogging.
- Fertilizing: Potatoes are heavy feeders and benefit from regular feeding. Use an organic fertilizer every 4–6 weeks, or you can add compost to the soil for additional nutrients. Avoid using too much nitrogen, as it can result in leafy growth at the expense of tuber formation.
Step 4: Care and Maintenance
Once your potatoes are growing, you’ll need to take care of them to ensure they reach their full potential.
- Mulching: Adding a layer of mulch around the potato plants helps retain moisture, suppresses weeds, and keeps the soil temperature stable. Use straw, grass clippings, or wood chips as mulch. Avoid using thick mulch, as it may block sunlight from reaching the plants.
- Pest Control: While potatoes grown in barrels are less susceptible to pests, you still need to keep an eye out for common potato pests such as aphids, Colorado potato beetles, and blight. Hand-pick any visible pests or use organic pest control methods like neem oil or insecticidal soap. Ensure proper airflow around the barrel to reduce the risk of fungal diseases.
- Staking: If the potato plants grow tall, you may need to stake them to prevent them from falling over. Use bamboo sticks or garden ties to support the plants as they mature.
- Temperature: Potatoes grow best in cooler temperatures, ideally between 60°F and 70°F (15°C and 21°C). If you live in a hot climate, ensure your potatoes are in a location that gets some afternoon shade to prevent heat stress.
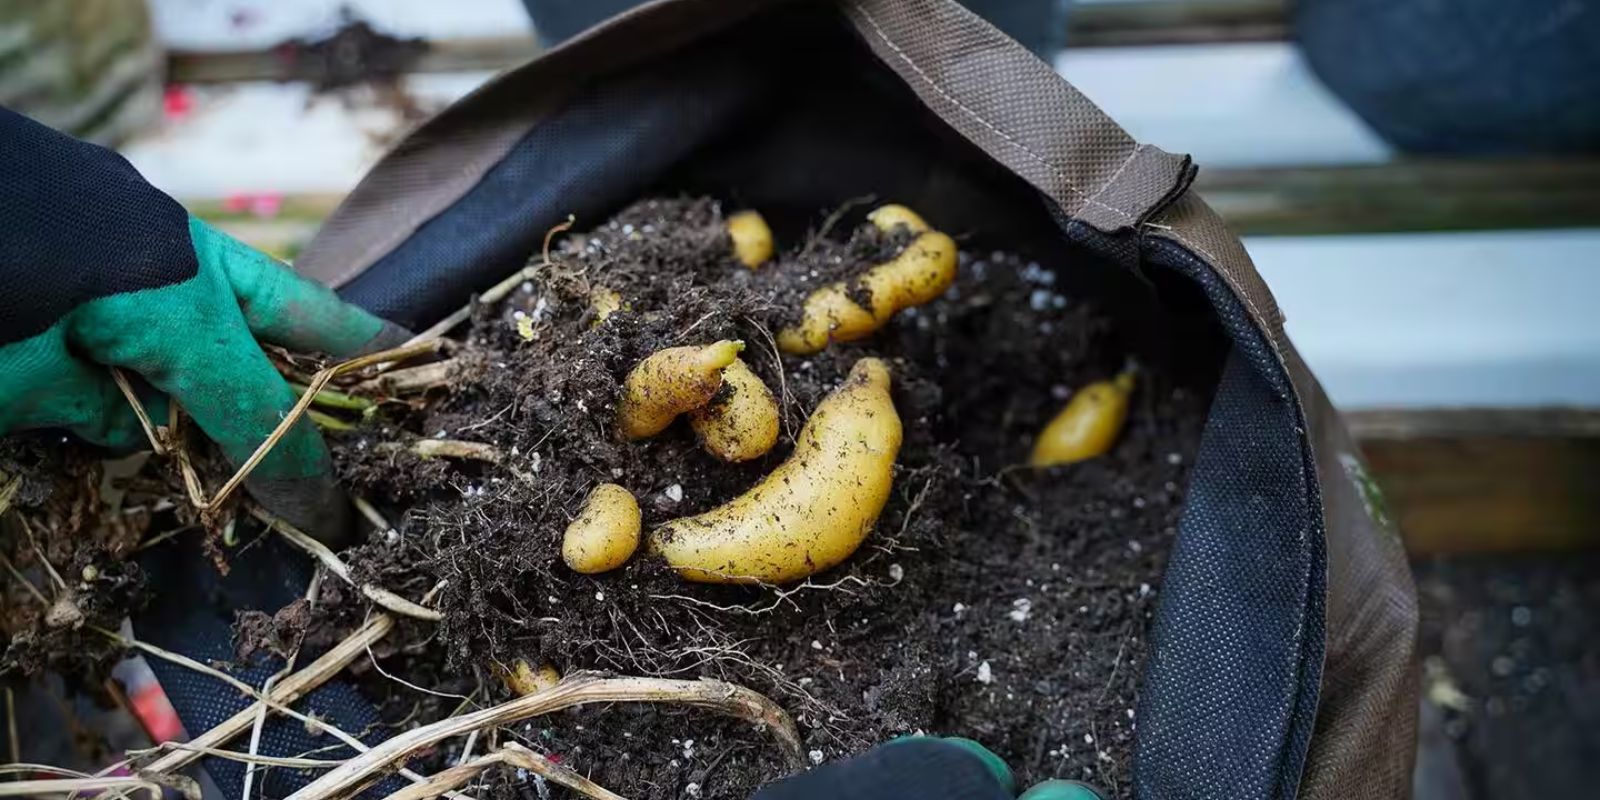
Step 5: Harvest Time
After several months of growing, it’s finally time to harvest your potatoes! Potatoes typically take 70–120 days to mature, depending on the variety. Here’s how to know when to harvest:
- Leaves Yellowing: The plant’s leaves will start to yellow and die back when the potatoes are ready for harvest. This signals that the tubers are fully grown and ready to be dug up.
- Test the Soil: If you’re unsure, you can carefully dig around the base of the plant to check if the potatoes are large enough. If they are, it’s time to harvest!
- Harvesting: To harvest, simply tip the barrel over and gently pull out the potatoes. Be careful not to damage the tubers as you handle them. You should find a treasure trove of potatoes, ranging in size from small new potatoes to larger ones.
Conclusion:
Growing potatoes in a barrel is a fantastic way to enjoy a bountiful harvest in a small space. With just a few simple steps, you can yield up to 45 kg of potatoes from a single barrel. Not only will you have a fresh supply of potatoes for your meals, but you’ll also experience the joy of growing your own food and reducing your carbon footprint.
Give this method a try, and you’ll be amazed at the results. Whether you have a small garden, a balcony, or just want to maximize your backyard space, growing potatoes in a barrel is a fun, easy, and rewarding way to get started. So grab a barrel, get planting, and enjoy the satisfaction of harvesting your very own homegrown potatoes!
Hashtags: #GrowYourOwnFood #PotatoBarrel #HomeGardening #UrbanGardening #SustainableLiving #GardeningTips #PotatoHarvest #BackyardGardening #FreshFood #GardeningInContainers