
Chestnuts are a delightful and nutritious nut, beloved by gardeners, food enthusiasts, and nature lovers alike. If you’ve ever wanted to grow your own chestnut tree, you may be wondering how to germinate chestnuts from seeds. While it may seem daunting at first, with a little patience and the right technique, germinating chestnuts from seeds is actually quite straightforward.
In this guide, we’ll take you through the entire process, from collecting fresh chestnuts to planting them and watching them grow into healthy trees. Whether you’re an experienced gardener or a beginner, this article will provide you with all the essential information to get started.
Why Grow Chestnuts from Seeds?
Before we dive into the germination process, let’s take a moment to understand why you might want to grow chestnuts from seeds. While chestnut trees can be purchased as saplings from nurseries, growing them from seed has its own set of benefits:
- Cost-Effective: Growing chestnuts from seed is much more affordable than buying established trees.
- Genetic Diversity: Starting from seed allows you to grow a genetically unique chestnut tree, which may have characteristics that are different from the parent trees.
- Satisfaction and Connection with Nature: There’s something deeply satisfying about nurturing a tree from its seed, watching it sprout, and knowing that you’ve been part of its growth journey.
So, if you’re ready to start your own chestnut tree, let’s go over the steps to successfully germinate chestnuts from seeds.
Step 1: Collecting Fresh Chestnuts
The first step in germinating chestnuts is to gather fresh, high-quality seeds. Chestnuts are typically harvested in the fall, so this is the best time to begin collecting them. When collecting chestnuts, look for these key indicators of quality:
- Freshness: Fresh chestnuts will be firm and heavy, not dried out or shriveled.
- Shell Integrity: The outer shell should be intact and free of cracks or holes. A damaged shell can lead to a lower chance of successful germination.
- Appearance: Choose chestnuts that are plump and shiny. Avoid nuts that have visible mold or are soft to the touch.
Once you’ve gathered your chestnuts, you’ll need to prepare them for the germination process. It’s important to note that chestnuts need to go through a period of cold stratification before they can germinate.
Step 2: Soaking the Chestnuts
Before you start the cold stratification process, it’s a good idea to soak your chestnuts for 24 hours. Soaking helps to soften the hard outer shell, making it easier for the seed to break through when it begins to germinate.
To soak the chestnuts, simply place them in a bowl of water for a full 24 hours. Make sure that the chestnuts are completely submerged. After soaking, drain the water, and your chestnuts will be ready for the next step.
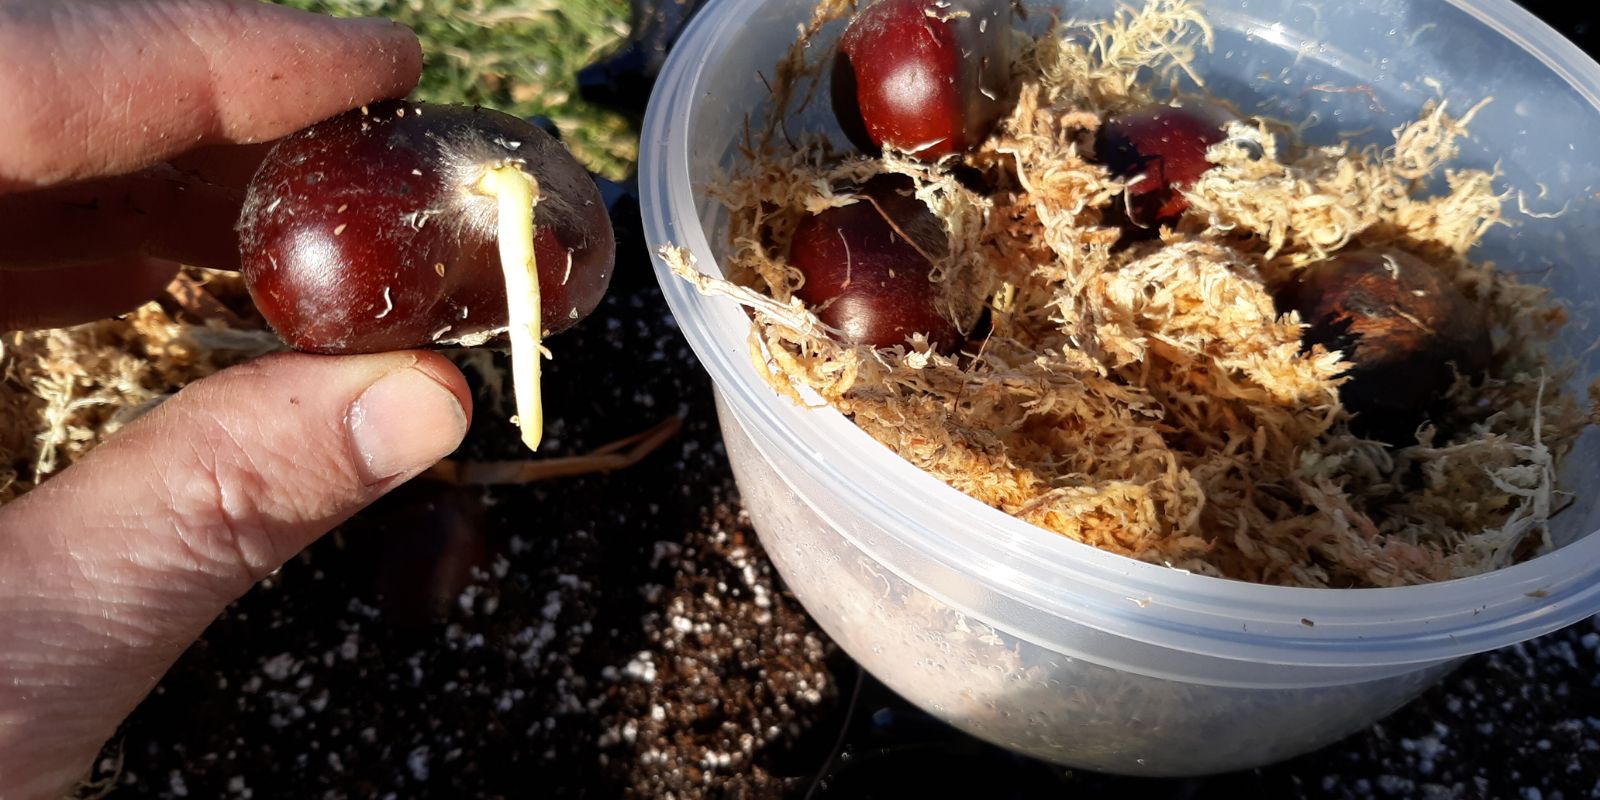
Step 3: Cold Stratification
Chestnuts are a type of nut that requires a period of cold stratification to mimic winter conditions. This process helps to break the dormancy of the seeds and prepare them for germination in the spring.
How to cold stratify chestnuts:
- Prepare the Stratification Medium: You will need a medium to keep the chestnuts cool and moist during the stratification period. This can be done by placing the chestnuts in a plastic bag with a moist material, such as sand, peat moss, or vermiculite. Make sure the medium is damp but not soggy.
- Place the Chestnuts in the Refrigerator: Once the chestnuts are in the moist medium, seal the bag and place it in the refrigerator. The temperature should be between 34°F and 40°F (1°C to 4°C).
- Wait 6-8 Weeks: Leave the chestnuts in the refrigerator for 6 to 8 weeks. During this period, the cold temperatures will simulate winter and trigger the process of breaking seed dormancy.
After the stratification period, your chestnuts should be ready to begin germinating.
Step 4: Planting the Chestnuts
Once the chestnuts have gone through the cold stratification process, it’s time to plant them. Chestnuts should be planted in a well-draining, nutrient-rich soil mix to give them the best chance at healthy growth.
How to plant chestnuts:
- Choose the Right Container or Location:
- If you’re starting chestnuts in containers, choose a deep pot (at least 8-10 inches) with good drainage. This will give the roots enough space to grow.
- If you’re planting chestnuts directly in the ground, choose a spot that receives full sunlight and has well-draining soil.
- Prepare the Soil: If planting in a pot, fill it with a high-quality, well-draining potting mix. You can also amend the soil with compost to provide extra nutrients. If planting in the ground, make sure the soil is loose and well-draining.
- Plant the Chestnuts:
- For containers: Plant the chestnut with the pointed end facing down. Bury the seed about 2-3 inches deep.
- For ground planting: If you’re planting directly in the ground, create a small hole and plant the chestnut seed with the pointed end facing down, about 2-3 inches deep.
- Water the Chestnuts: After planting, water the chestnuts thoroughly to settle the soil. Keep the soil moist, but not soggy, during the germination period. Be sure not to let the soil dry out.
Step 5: Providing the Right Growing Conditions
Once your chestnuts are planted, you’ll need to maintain the right conditions for them to germinate and grow. Here are a few tips:
- Temperature: Chestnuts need warmth to germinate, so ensure that the temperature is consistently between 60°F and 75°F (15°C to 24°C). If planting outdoors, be mindful of the weather conditions and avoid frost, which could harm the seedlings.
- Sunlight: Chestnut trees require full sunlight to thrive. Make sure the planting site receives at least 6 hours of sunlight per day.
- Watering: Keep the soil consistently moist but not waterlogged. Overwatering can lead to root rot, while underwatering can stunt growth. If planting in containers, ensure there is good drainage.
- Fertilizing: After the chestnuts germinate and begin to grow, you can add a slow-release fertilizer to support their growth. However, chestnuts generally do well in nutrient-rich soil, so heavy fertilizing may not be necessary.
Step 6: Transplanting the Seedlings
After a few weeks to a few months, your chestnut seedlings will begin to sprout. At this point, you may need to transplant them into a larger container or directly into your garden.
- Transplanting in Containers: If you’ve been growing your chestnuts in containers, you can move them to larger pots as they grow larger. If you’re ready to plant them in the garden, ensure that the outdoor temperatures are suitable, and choose a spot with well-draining soil and plenty of sunlight.
- Transplanting Outdoors: Chestnut trees prefer full sun and need a space where they can spread their roots. If you’re planting your chestnut trees outdoors, make sure to space them at least 20-30 feet apart, as chestnut trees grow large.
Step 7: Caring for Your Chestnut Tree
Once your chestnut tree is planted, caring for it is relatively simple. Here’s what you need to do:
- Water regularly: Keep the soil around your tree moist, especially during the dry summer months. Young chestnut trees require regular watering to establish a strong root system.
- Pruning: Trim back any dead or damaged branches and shape your tree as it grows. Chestnuts can grow quite tall, so regular pruning is essential for maintaining a manageable shape.
- Protect from Pests: Watch out for pests like chestnut weevils or deer. You may need to use natural pest control methods or fencing to protect your tree.
Conclusion
Germinating chestnuts from seeds is a rewarding process that allows you to grow your own chestnut tree. With a little patience and the right technique, you can watch as your chestnut seedling grows into a robust tree that produces delicious nuts. Whether you’re growing chestnuts for personal use or just for the joy of planting, it’s an experience that brings you closer to nature.
So why wait? Start your chestnut-growing adventure today and enjoy the satisfaction of growing your very own tree from seed!
#Chestnuts #GrowYourOwnFood #TreePlanting #SustainableLiving #GardeningTips #HomeGardening #GreenThumb #OrganicGardening #NatureLovers #SeedStarting