
Gardening is not just about planting flowers, vegetables, and herbs—it’s also about nourishing the soil and creating a sustainable ecosystem that helps your garden thrive. One way to achieve this is through composting, a practice that returns essential nutrients to the earth. While there are many methods of composting, one of the most efficient and space-saving techniques is the creation of a worm tower, also known as an in-ground composter. In this article, we’ll dive into how to build your own worm tower, why it’s an excellent choice for your garden, and how it can promote soil health and sustainability.
What is a Worm Tower?
A worm tower is a vertical, in-ground composting system designed to attract earthworms and other beneficial organisms that help break down organic matter into rich, nutrient-dense compost. Unlike traditional compost piles or bins, worm towers are placed directly in the soil, where worms can easily access the waste you add, accelerating the composting process and enriching the surrounding soil. They are especially ideal for small gardens, raised beds, or areas with limited space.
The concept of a worm tower is simple. It’s essentially a vertical container (like a PVC pipe, large plastic bottle, or similar structure) that you bury in the ground. Kitchen scraps and other organic materials are added to this container, providing food for worms and microorganisms. Over time, the composting process takes place, and the surrounding plants benefit from the nutrient-rich soil that is generated.
Benefits of a Worm Tower
Before we dive into the steps of creating your own worm tower, let’s explore some of the key benefits that this innovative composting method offers:
- Space-Saving: Worm towers are ideal for gardens with limited space, as they don’t require a large area like traditional compost piles or bins.
- Improved Soil Health: As worms consume organic matter, they release castings (worm manure) that are rich in essential nutrients like nitrogen, phosphorus, and potassium—helping to boost the fertility of your soil.
- Better Drainage: The aeration created by worms and beneficial microorganisms improves soil structure, leading to better drainage and healthier root systems for your plants.
- Minimal Maintenance: Once your worm tower is set up, it requires very little maintenance. Simply add kitchen scraps as needed, and let nature do the rest.
- Reduces Waste: Worm towers provide an excellent way to recycle kitchen scraps, reducing waste sent to landfills. You can compost vegetable peels, fruit scraps, coffee grounds, eggshells, and more.
- Encourages Healthy Worm Populations: Worms are natural tillers, and their presence in the soil helps break down organic matter, aerate the soil, and promote plant growth.
- Prevents Pests: Because the composting process is contained within the tower, there’s a reduced risk of attracting pests like flies or rodents.
How to Make a Worm Tower (In-Ground Composter)
Building a worm tower is a simple, DIY project that can be completed in just a few hours. Follow these steps to create your own worm tower and start reaping the benefits of composting in no time.
Step 1: Choose the Right Location
The first step in creating your worm tower is to choose a location in your garden. Select an area with easy access for adding scraps, and one where plants can benefit from the nutrient-rich compost. Ideally, the tower should be placed in a spot where plants grow vigorously, such as near your vegetable or flower beds.
Avoid placing your worm tower in areas that get too much direct sunlight or heavy foot traffic, as worms prefer cool, shaded environments. Make sure the area is well-drained so that excess moisture doesn’t accumulate around the tower.
Step 2: Gather the Necessary Materials
To create a worm tower, you’ll need a few basic materials. Here’s a list of what you’ll need:
- A vertical container (such as PVC pipe, plastic bottle, or a similar structure)
- A drill or sharp object for making holes
- A shovel for digging the hole
- Kitchen scraps (vegetable peelings, fruit scraps, coffee grounds, eggshells, etc.)
- Garden waste (grass clippings, leaves, small plant cuttings)
- Worms (red wigglers are the best choice for composting)
Optional: You may also want to add a mesh or netting at the bottom of your container to keep larger pests out while still allowing worms to enter.
Step 3: Prepare the Hole
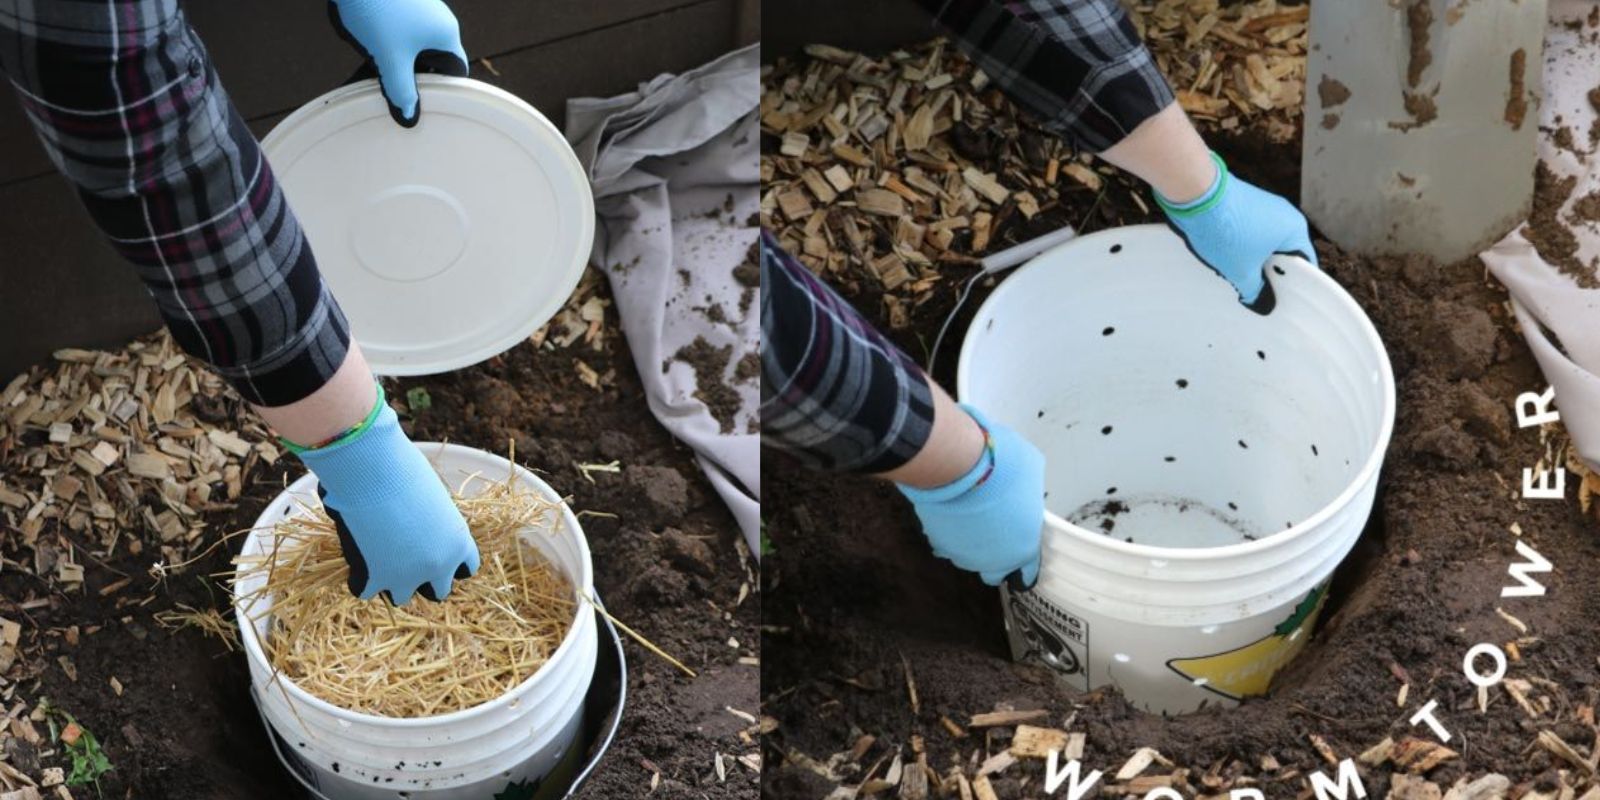
Once you’ve gathered your materials, it’s time to prepare the hole for your worm tower. Use a shovel to dig a hole that’s slightly wider than your container and deep enough to bury it securely. The depth of the hole should be about 18 to 24 inches, depending on the size of your container. Make sure the hole is deep enough to ensure that the tower won’t shift over time.
If you’re using a large container like a PVC pipe, make sure the top of the container is level with the ground surface so it’s easy to add scraps and maintain.
Step 4: Insert the Container
Now it’s time to place your container in the hole. Whether you’re using PVC pipe, a plastic bottle, or any other vertical structure, simply lower it into the hole. Ensure that it’s standing upright and secure, with the top of the container exposed above ground level. You may want to surround the base of the container with soil to keep it stable.
If you’re using PVC pipe, be sure to drill plenty of holes along the sides of the pipe to allow air and moisture to circulate. This will help speed up the composting process and ensure proper aeration.
Step 5: Add Organic Matter
With the container in place, it’s time to start adding organic matter. Begin by layering kitchen scraps like vegetable peels, fruit scraps, coffee grounds, and eggshells. You can also include garden waste like grass clippings, leaves, or small plant trimmings. Be sure not to add any meat, dairy, or oils, as these can attract pests and disrupt the composting process.
As you continue to add organic material, layer it with small amounts of soil or compost to encourage decomposition. This will help keep the tower moist and provide a balanced environment for the worms.
Step 6: Introduce the Worms
After you’ve added your first layer of organic matter, it’s time to introduce the worms. Red wigglers are the best choice for composting, as they thrive in moist, organic environments. You can order red wigglers online or purchase them from a local garden center.
Simply add the worms to the top of the container, and they will begin burrowing into the compost. Over time, they will break down the organic matter and convert it into nutrient-rich worm castings.
Step 7: Maintain the Worm Tower
One of the best things about worm towers is that they require very little maintenance. To keep the composting process going, simply continue to add organic matter on top of the worms. You can add kitchen scraps as needed, but try to avoid overloading the tower with too much at once. Worms need time to break down the material, so balance is key.
Make sure to keep the tower moist but not waterlogged. If the tower becomes too dry, the worms may struggle to thrive, so you may need to add water occasionally. On the other hand, too much moisture can lead to anaerobic conditions, which can harm the worms.
If you live in a particularly cold climate, you may need to insulate your worm tower during the winter months to protect the worms. A simple solution is to cover the top of the tower with straw or leaves.
Conclusion
Building a worm tower is a simple and effective way to compost your kitchen scraps, improve your soil’s health, and reduce waste. With minimal effort, you can create a thriving ecosystem that benefits your garden for years to come. Whether you’re an experienced gardener or just starting out, adding a worm tower to your gardening routine is a great way to cultivate healthier plants and contribute to a more sustainable environment.
Start building your own worm tower today and enjoy the fruits of your labor—a garden that’s not only beautiful but also nutrient-rich and eco-friendly!
#SustainableGardening #Composting #WormTower #EcoFriendlyGardening #GreenThumb #SoilHealth #OrganicGardening #GardeningTips #GardenHacks #SustainableLiving