
In a world where the global food supply chain is increasingly uncertain, the ability to grow your own food year-round is becoming a necessity for many. The Walipini greenhouse offers a revolutionary way to cultivate crops, even in the harshest climates, by leveraging the earth’s natural energy. By constructing a Walipini, you can ensure a consistent and abundant supply of fresh produce regardless of the season.
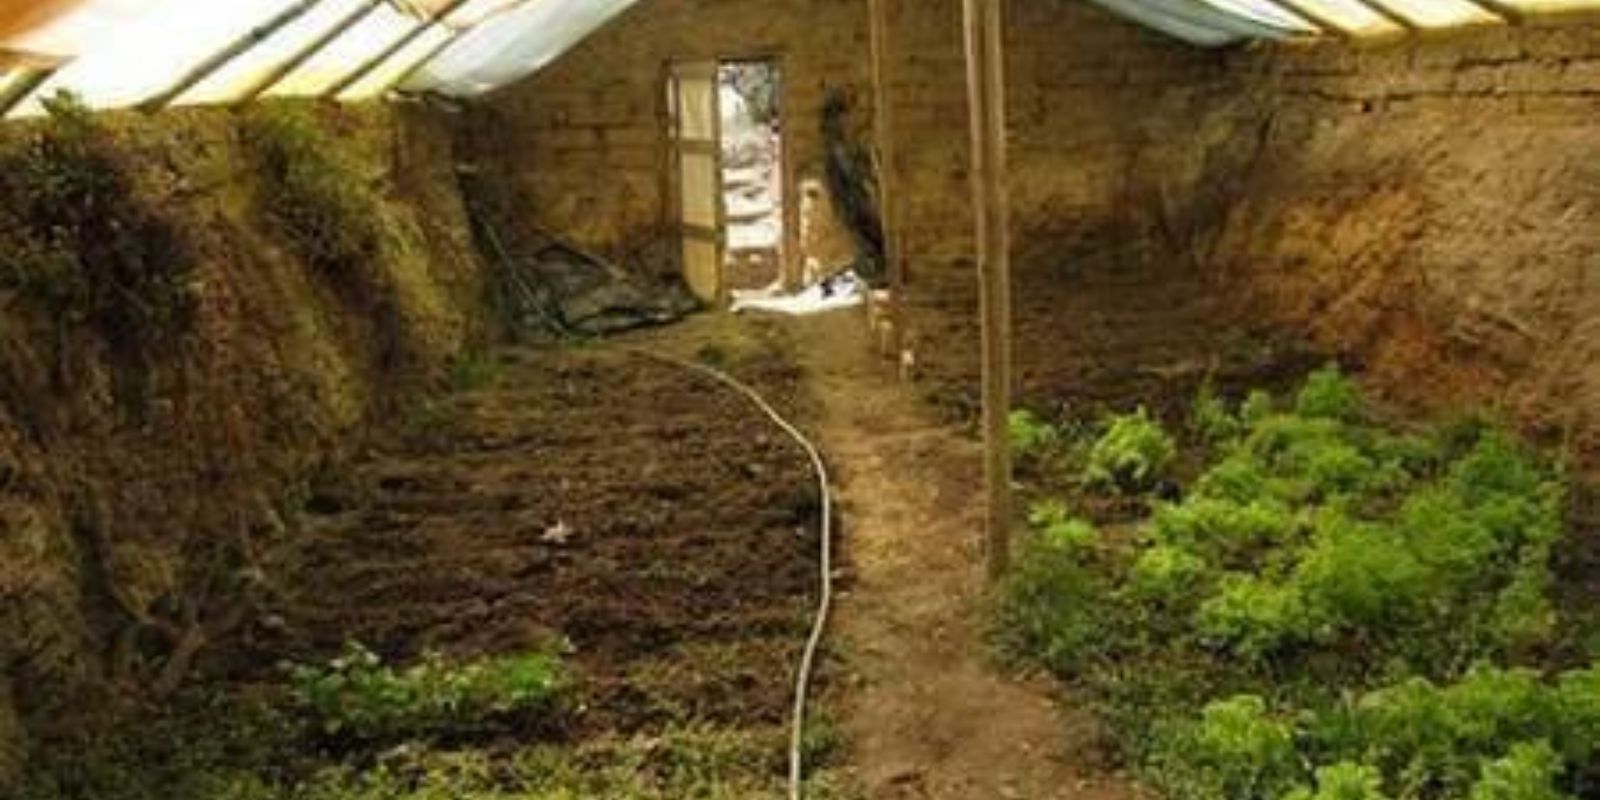
A Walipini greenhouse, often called an “earth-sheltered greenhouse,” is built partially underground to harness the earth’s thermal mass. The structure is designed to trap heat during the day, which is then slowly released at night, keeping the environment warm enough to grow crops even during the winter months. This innovative, sustainable building technique makes it possible for gardeners to harvest fresh food year-round, reducing dependency on external food sources and offering a sustainable, eco-friendly alternative for growing crops.
The Benefits of Building a Walipini Greenhouse
Before diving into the construction process, it’s important to understand the key benefits that come with a Walipini greenhouse:
- Year-Round Growing: One of the most significant benefits is the ability to grow food all year, regardless of external weather conditions. The underground environment protects plants from frost, heavy winds, and extreme temperatures, which is perfect for regions with harsh winters.
- Energy Efficiency: The earth’s natural thermal mass keeps the greenhouse warm in winter and cool in summer. This reduces the need for artificial heating or cooling systems, making it an energy-efficient solution for growing food.
- Cost-Effective: Once built, Walipinis require minimal ongoing maintenance and energy, making them a cost-effective option in the long run. The materials used are often locally available and inexpensive.
- Eco-Friendly: By using natural resources such as the earth’s warmth, Walipinis reduce the need for synthetic fertilizers and the carbon footprint associated with shipping food long distances.
- Space-Efficient: Since the structure is partly underground, it doesn’t require a large footprint above ground. This makes Walipinis ideal for small urban spaces, rural areas, or regions with limited land.
Steps to Build a Walipini Greenhouse
Building your own Walipini greenhouse is a rewarding and sustainable project that anyone with some basic construction skills can take on. Here’s a step-by-step guide to help you get started on your Walipini greenhouse.
Step 1: Planning and Location
The first step in building a Walipini greenhouse is choosing the right location. To get the most sunlight and warmth, the greenhouse should be positioned with the long axis running east to west, with the greenhouse’s opening facing south (in the Northern Hemisphere). This orientation ensures the structure receives maximum sunlight exposure throughout the day.
Consider the following factors when selecting your location:
- Sunlight Exposure: The site should receive full sun, especially during the winter months. Avoid places shaded by large trees or buildings.
- Wind Protection: A location that is shielded from strong winds is essential. You can plant windbreaks or use fences to reduce wind impact on the greenhouse.
- Drainage: A well-drained site is critical to avoid waterlogging. Ensure the location has good natural drainage or is slightly sloped to allow water to drain away from the greenhouse.
Step 2: Excavation
Once you’ve chosen the site, it’s time to dig the pit. The depth of the pit will depend on your climate and soil conditions. Generally, a depth of 4-6 feet is ideal for most regions. The pit acts as a thermal mass, absorbing heat during the day and releasing it slowly at night to maintain a stable temperature.
You can either dig the entire pit by hand with a shovel or use a backhoe for larger projects. The width of the pit should be wide enough to accommodate the size of the greenhouse you want to build, with additional space for plants to grow comfortably.
Step 3: Constructing the Frame
The next step is constructing the frame of the Walipini. The frame is the part of the greenhouse that will hold the glazing material (plastic, polycarbonate, or glass) and provide structure. You can use materials such as wood, metal, or rebar to build the frame. The frame should be strong enough to withstand the weight of the glazing material and the forces of wind and snow.
Here are the basic materials needed for the frame:
- Wood or Steel: These materials provide durability and strength for the frame.
- Rebar: A good alternative to wood for framing, as it is inexpensive and rust-resistant.
- Brackets and Screws: To secure the frame together.
Construct the frame so that it’s angled, allowing sunlight to penetrate deeply into the greenhouse. The frame should be about 6-8 feet high at the center to allow for enough growing space and air circulation.
Step 4: Installing Glazing Materials
The next step is to cover the frame with glazing material. The most commonly used materials for Walipinis are clear plastic sheeting, polycarbonate panels, and glass. Polycarbonate is the most energy-efficient option, as it insulates better than plastic, but plastic sheeting is a more affordable choice.
- Plastic Sheeting: Clear plastic sheeting is the most economical option, but it may need to be replaced after a few years due to wear and tear from UV rays.
- Polycarbonate Panels: Polycarbonate is more durable and offers better insulation. Twin-wall or multi-wall polycarbonate sheets are ideal because they help trap heat, making your greenhouse more efficient.
Ensure that the glazing material is securely attached to the frame, leaving no gaps that would let heat escape. You can also double up the glazing for extra insulation, especially in colder climates.
Step 5: Creating Ventilation
While it’s important to trap heat during the winter, you’ll also need ventilation to avoid overheating in the summer. This can be achieved by installing vents at both ends of the greenhouse.
- End Vents: These should be placed at the top of the structure and can be either manual or automatic. The purpose of these vents is to allow hot air to escape and cool air to enter during warm weather.
- Side Vents: You can also install side vents near the ground to allow fresh air to circulate through the greenhouse.
Proper ventilation helps maintain a balance in temperature and humidity levels, which is critical for plant health.
Step 6: Soil and Planting
Once the structure is built and the glazing is in place, it’s time to prepare the soil. You can either fill the pit with soil or use raised beds inside the greenhouse for better drainage and soil management. Adding organic compost or other amendments to the soil will help improve its fertility and support healthy plant growth.
Consider the types of plants you want to grow. Walipinis are ideal for growing a variety of crops, including vegetables, herbs, fruits, and even flowers. In colder climates, plants like leafy greens, kale, spinach, carrots, and radishes thrive in the consistent temperature provided by a Walipini greenhouse. For those in warmer climates, tomatoes, peppers, cucumbers, and even tropical fruits like bananas can grow well.
Step 7: Maintenance and Harvesting
After your Walipini is fully constructed, it’s important to maintain it throughout the year. This includes:
- Watering: Use a drip irrigation system or water manually to keep the soil moist but not waterlogged.
- Pruning and Training: Regularly prune your plants to encourage healthy growth and to make the best use of space.
- Temperature Monitoring: Keep an eye on the temperature inside the greenhouse, especially during the summer months. Use shade cloth or fans if necessary.
With regular maintenance, your Walipini will provide a bountiful harvest of fresh food throughout the year.
Conclusion
Building a Walipini greenhouse is an excellent way to take control of your food production and ensure a consistent supply of fresh produce, no matter the season. By harnessing the earth’s natural warmth and creating an environment that supports year-round growing, the Walipini offers a sustainable and cost-effective solution for gardeners around the world.
This project may take time, but the rewards—fresh food at your fingertips, energy savings, and a reduced environmental footprint—are well worth the effort. Whether you’re looking to grow vegetables in the winter, extend your growing season, or create a self-sustaining garden, the Walipini greenhouse is the ultimate tool to transform your gardening experience.
So, what are you waiting for? Start planning your Walipini greenhouse today and enjoy fresh food every season!