
Gardening is a rewarding and therapeutic activity, offering numerous benefits, from fresh produce to enhanced mental well-being. One increasingly popular method is using raised garden beds, particularly those made from metal. Raised metal garden beds not only look sleek and modern, but they also provide practical advantages such as improved drainage, soil warmth, and accessibility. This article will guide you through the process of building your own raised metal garden bed, ensuring you create a beautiful and productive space for your plants.
The Benefits of Raised Metal Garden Beds
Before diving into the construction process, let’s explore why you might choose a raised metal garden bed over traditional gardening methods:
- Improved Drainage: Metal beds allow excess water to drain away easily, reducing the risk of root rot and other moisture-related issues.
- Soil Temperature Control: Metal retains heat from the sun, helping to keep the soil warm in cooler climates. This can extend your growing season, allowing for earlier planting and extended harvests.
- Accessibility: Raised beds reduce the need to bend over, making gardening easier on your back and knees. This is particularly beneficial for elderly gardeners or those with mobility issues.
- Pest Control: Metal beds can deter certain pests like slugs and snails, which prefer to crawl along the ground.
- Aesthetic Appeal: Metal garden beds have a modern, polished look that can enhance the beauty of your outdoor space.
- Durability: High-quality metal can withstand harsh weather conditions, ensuring your investment lasts for years.
With these benefits in mind, let’s get started on building your own raised metal garden bed.
Materials and Tools Needed
Materials:
- Metal Sheets: Corrugated steel, galvanized steel, or aluminum sheets (choose a thickness of at least 1/8 inch for durability).
- Corner Brackets: Metal brackets to connect the corners and provide stability.
- Wood (optional): For a wooden frame or base if desired.
- Soil and Compost: A high-quality mix for planting.
- Landscape Fabric (optional): To prevent weeds from growing up into the bed.
Tools:
- Measuring Tape: To measure your dimensions accurately.
- Saw: A metal saw or grinder for cutting the metal sheets to size.
- Drill: To secure the brackets and attach components.
- Screws: To connect the metal sheets and brackets.
- Level: To ensure your bed is even and stable.
- Safety Gear: Gloves, goggles, and a mask for protection while cutting metal.
Step-by-Step Instructions
Step 1: Choose Your Location
Selecting the right location for your raised metal garden bed is crucial for plant success. Look for a spot that receives at least 6-8 hours of sunlight daily. Ensure the area has good drainage to prevent water pooling around the bed. Avoid areas with heavy tree roots or dense vegetation that could compete for nutrients and water.
Step 2: Determine Your Dimensions
Decide on the size of your raised metal garden bed. Common dimensions are 4 feet by 8 feet, but you can customize this based on your space and preferences. A width of 4 feet allows you to reach the center easily from either side, while a height of 12 to 24 inches is typically suitable for most plants.
Step 3: Gather Materials
Purchase the necessary materials from a local hardware store or garden center. Choose high-quality metal sheets that are resistant to rust and corrosion. Galvanized steel is a popular choice for its durability and longevity. You can also consider using recycled metal to give your garden a unique character.
Step 4: Cut the Metal Sheets
Using your measuring tape, mark the metal sheets according to your desired dimensions. If you’re building a rectangular bed, you’ll need two long pieces (length) and two shorter pieces (width). Cut the metal sheets carefully using a metal saw or grinder. Always wear safety gear when cutting metal to protect yourself from sharp edges and debris.
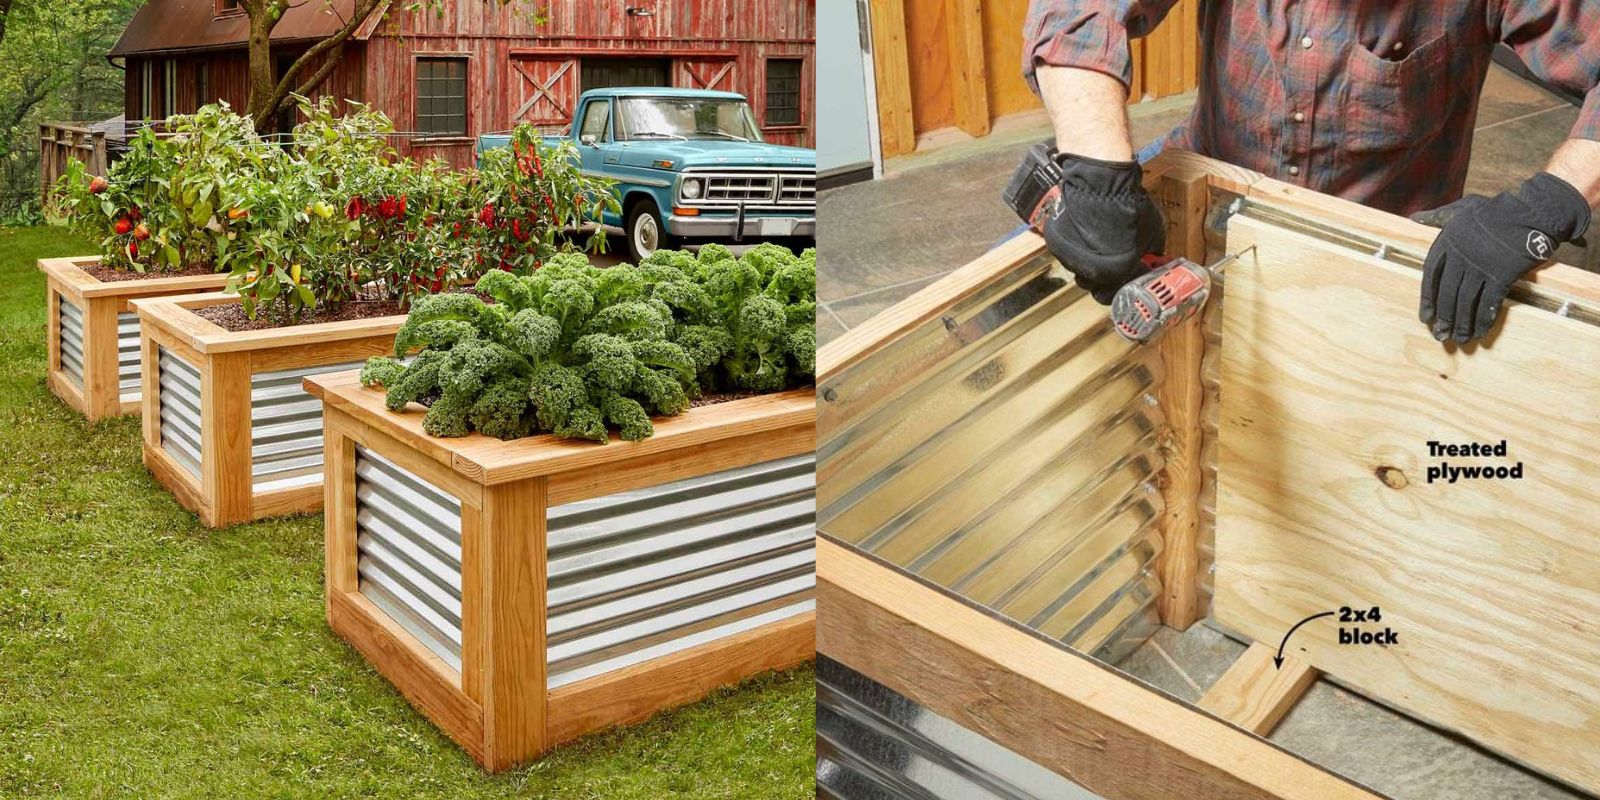
Step 5: Assemble the Frame
Once your metal sheets are cut, it’s time to assemble the frame. Use corner brackets to connect the ends of each metal piece. This will form a sturdy rectangular frame. Secure the brackets with screws, ensuring everything is tightly fastened. If desired, you can add wooden boards to the top edges for a more finished look.
Step 6: Level the Ground
Before placing your bed, ensure the ground is level. You can do this by digging out any high spots and filling in low areas. A level bed promotes even drainage and prevents pooling of water.
Step 7: Position the Raised Bed
Carefully lift the assembled frame and position it in your chosen location. Use a level to ensure that the bed sits evenly. Adjust the position as necessary.
Step 8: Secure the Frame (Optional)
To add extra stability, consider anchoring the frame to the ground using metal stakes or screws. This can help prevent movement during strong winds or heavy rain.
Step 9: Add Landscape Fabric (Optional)
If you’re concerned about weeds, you can line the bottom of the bed with landscape fabric before adding soil. This will help prevent weeds from growing up into your garden bed while still allowing for drainage.
Step 10: Fill with Soil and Compost
Now it’s time to fill your raised metal garden bed with a high-quality soil mix. A combination of topsoil, compost, and well-rotted manure works well for most plants. Aim for a depth of at least 12 inches of soil to provide adequate space for root growth.
Step 11: Plant Your Seeds or Seedlings
Once your bed is filled, it’s ready for planting. Choose plants that are suitable for your climate and season. Consider companion planting to maximize space and deter pests. Follow the recommended spacing and depth for each plant type.
Step 12: Water and Mulch
After planting, water your garden bed thoroughly to help settle the soil around the roots. Consider adding a layer of mulch on top to retain moisture, suppress weeds, and maintain an even soil temperature.
Maintenance Tips
Maintaining your raised metal garden bed is essential for a successful growing season. Here are some tips to keep your plants healthy and thriving:
- Regular Watering: Check the moisture level of the soil regularly, especially during hot weather. Water deeply and consistently, as raised beds can dry out more quickly than traditional gardens.
- Fertilization: Use organic fertilizers or compost to replenish nutrients in the soil throughout the growing season.
- Pest Control: Keep an eye out for pests and diseases. Implement organic pest control methods as needed, such as introducing beneficial insects or using insecticidal soap.
- Seasonal Cleanup: At the end of the growing season, remove any dead plants and debris from your raised bed. This helps prevent disease and pests from overwintering.
- Covering in Winter: If you live in a colder climate, consider covering your raised bed with a tarp or cloth during winter to protect the soil from freezing and thawing cycles.
Conclusion
Building a raised metal garden bed is a rewarding project that can enhance your gardening experience. With their aesthetic appeal and practical advantages, raised metal beds are a fantastic choice for both novice and experienced gardeners. By following the steps outlined in this guide, you can create a beautiful and functional space for growing your favorite plants.
Are you excited to build your own raised metal garden bed? Share your thoughts and plans in the comments below! 🌱 #RaisedGardenBed #MetalGarden #GardeningTips #GrowYourOwnFood #SustainableGardening #UrbanGardening #GardenDesign