
Gardening is a rewarding hobby that allows you to connect with nature while creating a vibrant, green space in your home. Whether you’re a seasoned plant lover or a beginner, propagating plants is a fantastic way to expand your garden without spending a lot of money. One of the most effective methods to propagate plants is through cuttings, and setting up a propagation station is an easy, inexpensive way to do it.
A propagation station provides an ideal environment for plant cuttings to root and develop into mature plants. In this article, we’ll take you through the steps to build your own propagation station, share tips for successful propagation, and explain how to care for the new plants as they grow.
What Is a Propagation Station?
A propagation station is a designated area where you can propagate plant cuttings. It’s a small space or setup where you keep your cuttings submerged in water or planted in soil until they develop roots and begin to grow. While propagation stations come in all shapes and sizes, the key feature is that they allow you to create a controlled, optimal environment for the cuttings to grow and develop into new plants.
This DIY project is ideal for anyone looking to grow a variety of plants—from houseplants to herbs to flowers—at no extra cost. You can use simple materials like glass jars, mason jars, or even recycled containers to set up your station. It’s an easy way to multiply your plants, enhance your garden, and even create gifts for friends and family.
Benefits of Building a Propagation Station
- Cost-Effective Gardening: Propagating plants allows you to grow new plants without purchasing them from a nursery. You can take cuttings from your existing plants and create a new generation of beautiful greenery, which can save you money over time.
- Grow More Plants: Propagating is a great way to expand your garden. Whether you want to increase the number of houseplants or grow more flowers and vegetables, a propagation station helps you get started.
- Learn New Gardening Skills: Creating a propagation station is a fantastic way to learn about plant care and propagation techniques. You’ll develop a better understanding of how plants grow and how to nurture them from cuttings.
- Sustainability: By reusing containers and propagating your own plants, you reduce your carbon footprint and contribute to a more sustainable, eco-friendly lifestyle.
Materials You Will Need for Your Propagation Station
To create your propagation station, you don’t need to spend much money. Here’s a list of the basic materials you’ll need:
- Containers: You can use a variety of containers to hold your cuttings. Glass jars, mason jars, small vases, or even plastic bottles work well. The key is to choose containers that are clean, clear, and large enough to hold the cuttings submerged in water.
- Water: Clean, room-temperature water is essential for rooting your cuttings. You can use tap water, but if you have hard water, distilled or filtered water may be better for some plants.
- Racks or Shelves: Depending on your space, you may want to create a small rack or shelf where your containers can sit. It should be in a location with indirect sunlight and away from direct heat.
- Small Scissors or Pruning Shears: You’ll need a sharp tool to take clean cuts from your parent plants. Make sure the scissors are sanitized to prevent disease transmission.
- Optional: Rooting Hormone: While not necessary, a rooting hormone can encourage quicker root development for some plants. This is especially helpful for harder-to-root plants.
- Optional: Decorative Materials: If you’d like your propagation station to be more aesthetically pleasing, you can add decorative elements like stones, pebbles, or driftwood in the containers.
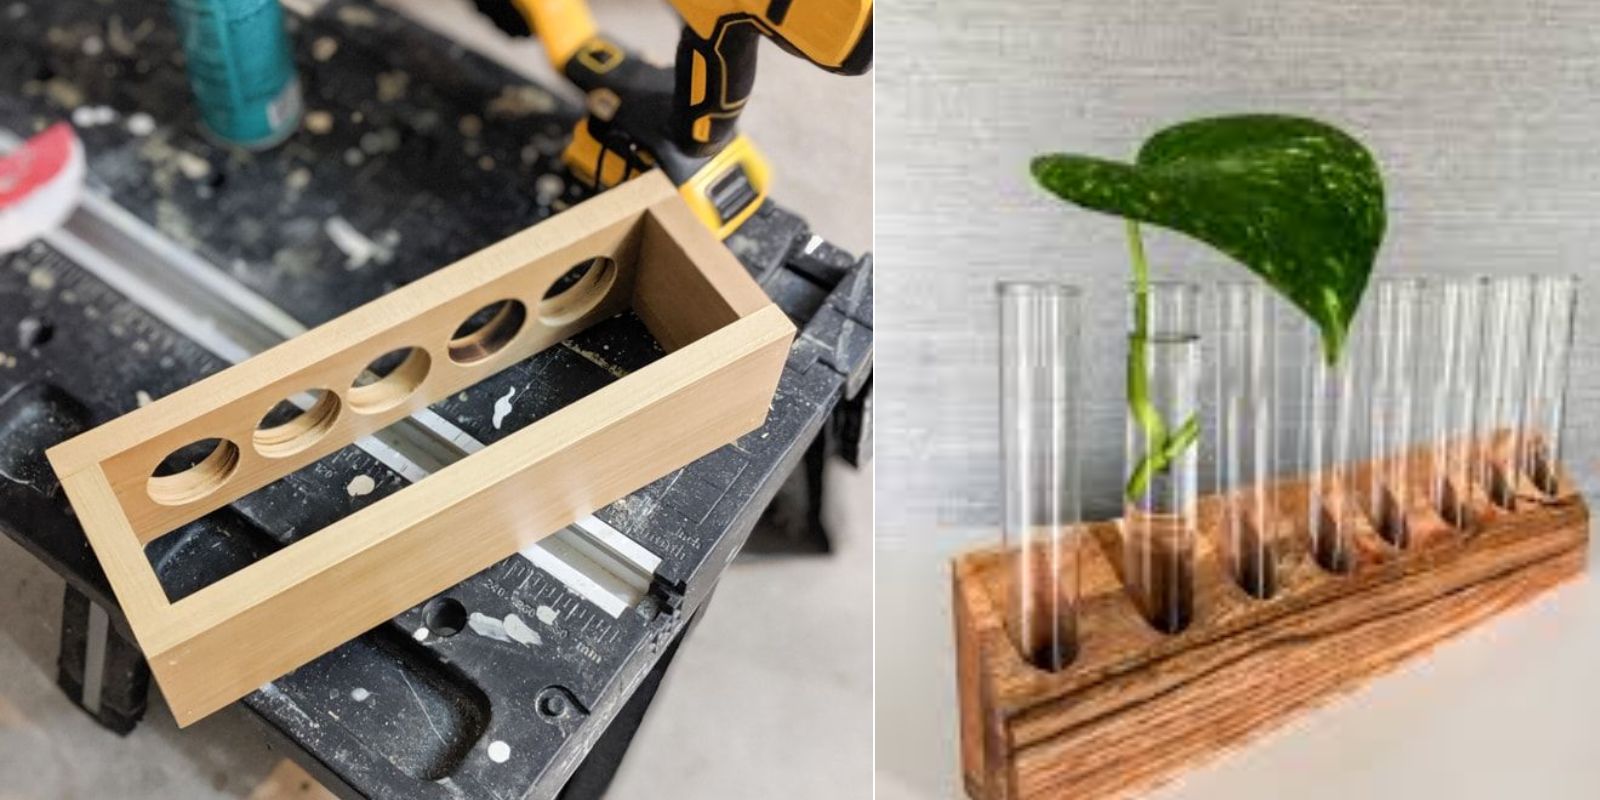
Step-by-Step Guide to Building Your Propagation Station
Step 1: Choose a Location
The first step in building your propagation station is selecting the right location. Cuttings need indirect sunlight to thrive. Direct sunlight can cause them to dry out or even scorch the delicate roots. A spot near a window with filtered light or in a well-lit room is ideal.
If you have limited space, you can place your propagation station on a small table, shelf, or windowsill. You can even use a small shelf to stack your containers, ensuring that each cutting has enough light and space to grow.
Step 2: Gather Your Containers
Next, choose the containers you’ll use to hold your plant cuttings. Clear containers, such as glass jars or mason jars, are perfect for this purpose because they allow you to see the progress of the roots as they develop. You can repurpose containers you already have at home, such as old jam jars or wine bottles.
Ensure the containers are clean and free of any dirt or chemicals that could harm the cuttings. Rinse them well before use.
Step 3: Prepare Your Cuttings
To propagate plants from cuttings, use a sharp pair of scissors or pruning shears to snip a healthy stem from a parent plant. Cut just below a node (the area where leaves or branches grow from the stem). Remove any excess leaves or flowers from the lower part of the cutting to prevent them from rotting in the water.
For plants like succulents, you can leave the cuttings to dry out for a day or two before placing them in water to help prevent rot. For plants like pothos, ivy, and philodendrons, you can place them directly in water right after cutting.
Step 4: Place Cuttings in Containers
Place your cuttings in the containers, making sure the bottom of the cutting (where the roots will grow) is submerged in water. For plants that root quickly, such as pothos or ivy, the cutting may begin to root within a few weeks. For slower rooting plants, it may take longer, so be patient.
Be sure not to overcrowd the containers. Each cutting should have its own space to grow without competing for resources.
Step 5: Maintain Your Propagation Station
Once your cuttings are in place, maintain your propagation station by keeping the water clean and fresh. Change the water every few days to avoid stagnation and mold growth. If you notice that the water level is dropping, simply top it up with more water.
Additionally, be sure to monitor the growth of your cuttings. If roots begin to form, you can move the cuttings to a larger container or even plant them in soil. If the cutting hasn’t developed roots after a few weeks, it might not be successful—don’t be discouraged! Keep experimenting with different plants.
Step 6: Transplant Rooted Cuttings
Once your cuttings have developed a strong root system, it’s time to transplant them. Carefully remove the cutting from the water and gently rinse off any excess water. Place the rooted cutting in a pot with well-draining soil or a larger container to give it space to grow. Make sure the plant is in a spot that gets indirect sunlight and is protected from extreme temperature fluctuations.
Tips for Successful Propagation
- Use Clean Containers: Keeping your containers clean is essential to prevent the spread of mold and bacteria that can kill the cuttings.
- Maintain Consistent Light: While you don’t want your cuttings to be exposed to harsh sunlight, they still need light to stimulate growth. A bright room with indirect sunlight works best.
- Be Patient: Rooting takes time. Some plants root quickly, while others can take weeks or even months. Don’t be discouraged if you don’t see results right away.
- Choose the Right Plants: Not all plants propagate well in water. Some common plants that root easily in water include pothos, philodendrons, ivy, spider plants, and coleus. Try experimenting with different plants to see what works best for you.
Conclusion
Building a propagation station is an easy and rewarding way to multiply your plants, save money, and improve your gardening skills. With just a few simple supplies, you can create a system that allows you to grow new plants from cuttings right at home. Whether you’re propagating houseplants, herbs, or flowers, this DIY project is perfect for gardeners of all levels.
Not only does propagation give you more plants, but it also provides you with the joy of watching new growth emerge. So why wait? Start your propagation station today and watch your garden flourish!
Happy propagating, and enjoy the satisfaction of growing plants from cuttings! 🌿✨