
Propagation stations are one of the most rewarding DIY projects for plant lovers, gardeners, and anyone interested in expanding their plant collection. A propagation station is a simple setup where you can grow new plants from seeds, cuttings, or seedlings. By providing the perfect environment for your plants to take root and flourish, you can create a steady supply of new greenery for your home or garden.
In this article, we will explore the benefits of having a propagation station, how to build one, and the key tips for success. Let’s dive into the step-by-step process of building a propagation station that will help you grow a variety of plants from scratch!
Why Build a Propagation Station?
Before we get into the details of building a propagation station, it’s important to understand the benefits:
- Cost-Effective: Growing new plants from cuttings is far cheaper than purchasing new plants from a nursery.
- Sustainability: Propagation reduces waste by allowing you to reuse plant clippings or seeds.
- Creative Gardening: Propagation allows you to experiment with different plants, offering a fun and engaging gardening experience.
- Customization: By propagating plants yourself, you can grow exactly what you want, whether it’s rare houseplants, beautiful flowers, or vegetables for your garden.
How to Build Your Own Propagation Station
Follow these easy steps to create a functional and aesthetically pleasing propagation station.
1. Choose the Right Location
The first step in creating a propagation station is selecting the right spot. Most plants thrive in areas with indirect sunlight, which allows them to get the light they need without the risk of sunburn. Ideally, your station should be close to a window that receives bright, indirect light.
If you plan to keep your propagation station outside, make sure it’s placed in a shady area to avoid excessive heat and direct sunlight, which can dry out the cuttings.
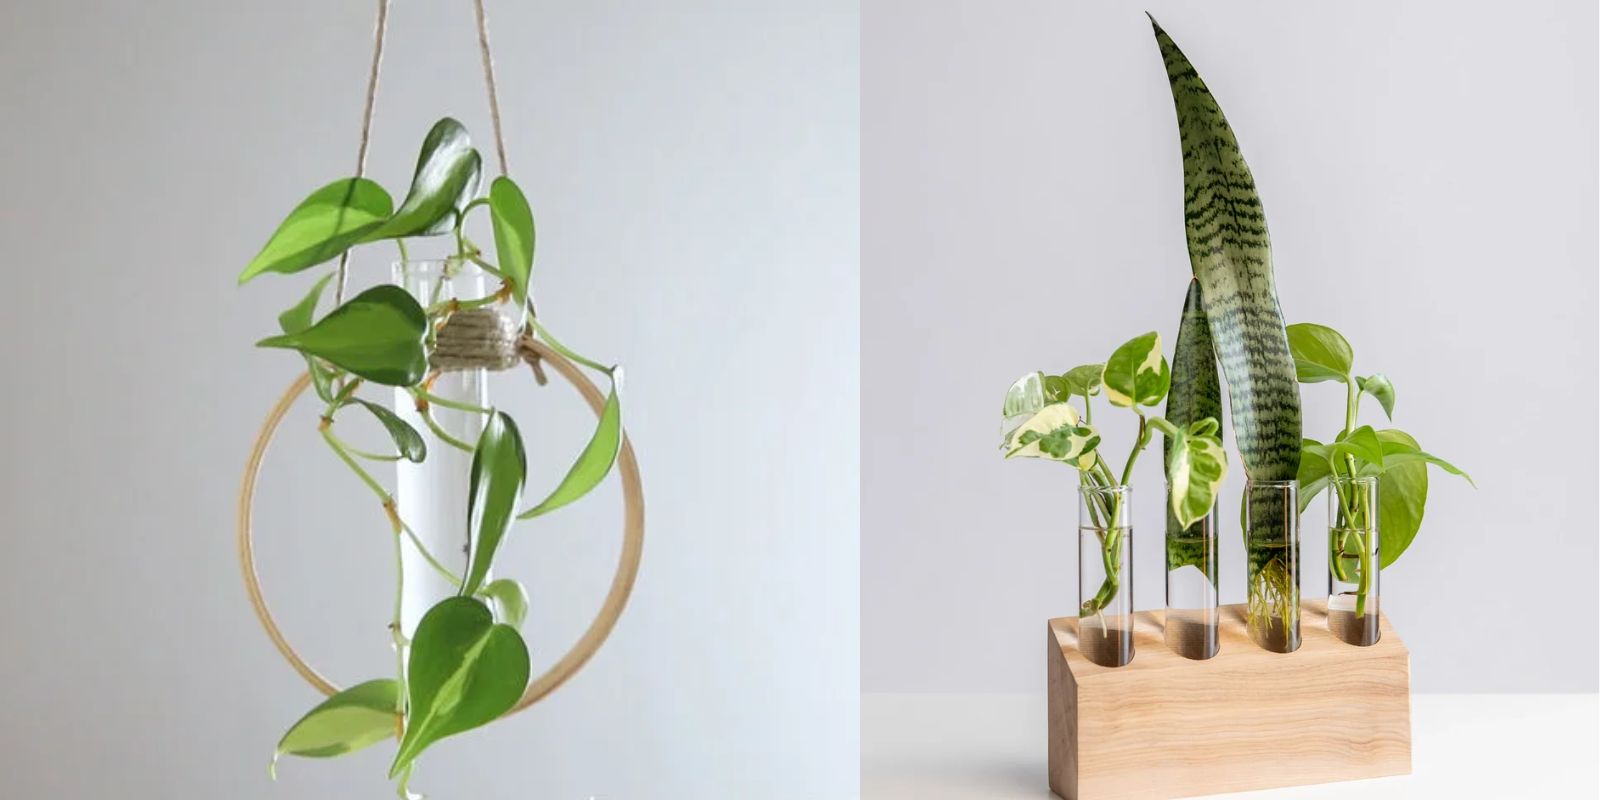
2. Select the Perfect Containers
One of the key elements of your propagation station will be the containers you choose to hold your cuttings or seeds. Here are a few options:
- Jars and Glass Vases: Transparent containers are ideal for water propagation, allowing you to monitor root development.
- Small Pots: For soil propagation, choose small pots with good drainage to prevent waterlogging.
- Test Tubes or Bottles: These are great for saving space and can add a decorative touch to your station.
- Repurposed Containers: Reuse old plastic bottles, cups, or even egg cartons for a sustainable approach.
Transparent containers are particularly helpful for tracking root growth, but if you prefer more decorative options, you can paint or decorate them to match your style.
3. Prepare the Propagation Medium
Depending on the type of plants you’re propagating, you will either be using water or soil as the propagation medium.
- Water Propagation: For plants like pothos, philodendrons, or herbs, simply fill your containers with clean water. Change the water every few days to prevent stagnation and keep it oxygenated.
- Soil Propagation: Plants that root best in soil, such as succulents or some vegetable plants, will require a well-draining potting mix. You can also use coco coir or perlite to improve drainage and airflow.
4. Set Up a Support System
If you’re planning to propagate multiple plants, consider creating a tiered shelving system to hold the containers. You can use a simple wooden frame, a small shelf, or even hang the containers from a wall or window frame using hooks or macramé hangers.
This not only helps you save space but also creates an organized and visually appealing display.
5. Insert Cuttings or Seeds
Once your station is set up, it’s time to start propagating!
- Water Propagation: Take healthy cuttings from your desired plants (usually 4-6 inches long) and remove the leaves from the bottom half. Place the cut end in water, ensuring that at least one node (the part where leaves were attached) is submerged. Over the course of a few weeks, roots will begin to grow from the node.
- Soil Propagation: For soil-based propagation, dip the cutting end in rooting hormone to encourage growth, then plant it in the soil. Keep the soil moist but not waterlogged, and make sure the container has adequate drainage.
For seeds, follow the specific requirements for depth and spacing as indicated on the seed packet. Most seeds will need a warm, well-lit environment to germinate.
6. Create a Humid Environment
Humidity is key for many plants during propagation, as it helps cuttings retain moisture and encourages root growth. You can create a mini greenhouse effect by covering your containers with plastic wrap, a clear plastic bag, or a glass dome.
Ensure there is some airflow to prevent mold and mildew growth.
7. Label Your Containers
If you’re propagating multiple types of plants, labeling each container is essential. Write down the plant species and the date you started propagating. This will help you track progress and identify which plants are ready for repotting.
You can use small sticks, stickers, or even decorative plant markers to label your cuttings or seedlings.
8. Monitor and Maintain the Right Conditions
Check on your propagation station regularly to ensure everything is progressing smoothly. Here are a few things to keep an eye on:
- Water: Change the water in the containers every few days to prevent algae growth and oxygenate the cuttings.
- Moisture Levels: For soil propagation, keep the soil slightly damp but not soggy. Overwatering can lead to root rot.
- Light: Ensure that your plants are receiving enough light without being exposed to direct sunlight.
9. Be Patient
Propagation takes time, and some plants root faster than others. For example, plants like pothos can root in as little as a week, while slower growers like fiddle-leaf figs can take a month or more.
Be patient and don’t rush the process. Once your cuttings have developed strong roots (at least a few inches long), they will be ready to transfer to soil or a larger pot.
10. Transplanting Your New Plants
When your plants have established roots, it’s time to transplant them. Carefully remove the cutting from the propagation container, ensuring you don’t damage the new roots. For water-propagated plants, gently rinse the roots before planting them in well-draining soil.
Place the newly transplanted plants in a spot with indirect sunlight and continue watering them regularly until they fully establish themselves in their new home.
11. Long-Term Care
Once your plants are transplanted and thriving, continue to care for them as you would any other plant. Ensure they receive the right amount of water, light, and occasional feeding with a balanced fertilizer.
Congratulations! You’ve successfully built a propagation station and grown new plants from cuttings or seeds.
The Benefits of a Propagation Station
Building a propagation station offers numerous benefits. Not only does it allow you to expand your plant collection inexpensively, but it also gives you a greater connection to your plants and the process of their growth. Additionally, it’s a great way to share the love of gardening with friends and family by gifting them propagated plants.
Conclusion
Building a propagation station is an easy and rewarding way to grow plants from scratch. Whether you’re looking to fill your home with greenery or start your own garden, this simple project can help you achieve that goal. Plus, it’s a sustainable, cost-effective way to nurture plants.
So why not start today? Get creative with your setup and enjoy the beauty of watching new life take root.
#PlantPropagation #DIYPropagationStation #GrowYourOwn #GardeningHacks #IndoorGarden #PropagatePlants #GreenThumbGoals #PropagationDIY #RootingCuttings #EasyGardeningTips