
A thriving garden begins with a solid foundation: a nutrient-rich bed designed to nourish plants over time. Traditional gardening often focuses on adding fertilizers and watering, but with the right preparation, you can create a self-sustaining garden bed that conserves nutrients, retains moisture, and promotes plant growth season after season. This comprehensive guide will take you through the process step-by-step, ensuring your garden bed becomes the cornerstone of your gardening success.
Why Build a Nutrient-Rich Garden Bed?
Before diving into the process, it’s essential to understand the benefits:
- Sustainable Growth: Layers of organic materials decompose slowly, providing a continuous supply of nutrients.
- Improved Soil Health: Organic matter enriches the soil, fostering beneficial microorganisms and improving texture.
- Water Retention: The layers help retain moisture, reducing the need for frequent watering.
- Pest Control: Incorporating materials like neem cake naturally deters pests, creating a healthier growing environment.
With these benefits in mind, let’s move on to the steps for building your garden bed.
Step 1: Prepare the Garden Bed Area
Start by selecting an ideal location:
- Choose a Spot: Pick an area that receives at least 6-8 hours of sunlight daily.
- Excavate the Area: Dig the bed to a depth of 7-10 cm (or deeper if you plan to include large logs). This depth creates stability and allows for better moisture retention.
- Level the Ground: Ensure the area is even and free of weeds.
Step 2: Add a Weed Barrier
Weeds compete with your plants for nutrients and water. To prevent their growth:
- Use Cardboard: Lay down overlapping pieces of cardboard to cover the entire bed area.
- Why Cardboard? It blocks sunlight, preventing weed germination, and decomposes over time, adding organic matter to the soil.
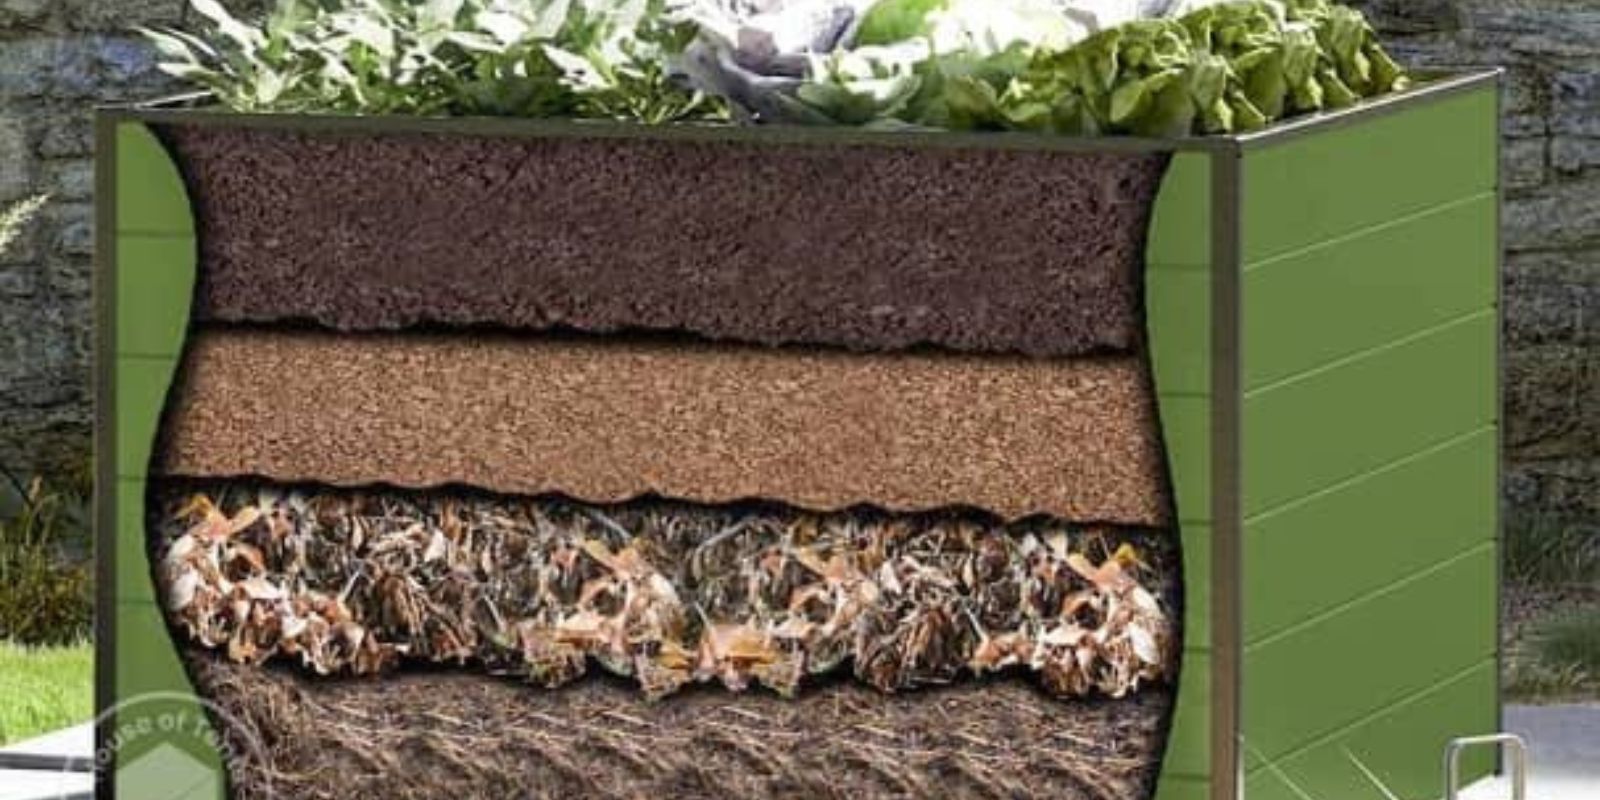
Step 3: Layer Natural Materials
This step involves creating a base of decomposing organic matter that provides nutrients over time.
- Twigs and Branches: Start with a thick layer of small branches and twigs. These provide structure and improve drainage.
- Kitchen Scraps: Add vegetable peels, fruit scraps, and other compostable kitchen waste. These materials decompose quickly, enriching the soil.
- Large Logs (Optional): Include large logs at the bottom for long-term nutrient release and enhanced water retention.
Step 4: Enrich the Base with Bone Meal
Bone meal is a natural source of phosphorus, crucial for root development and overall plant health.
- Sprinkle a Thin Layer: Evenly distribute bone meal over the organic base layer.
- Benefits: Phosphorus improves flowering, fruiting, and root strength, ensuring plants thrive.
Step 5: Add Quality Soil
Now it’s time to add the main growing medium for your plants.
- Topsoil or Clay Soil: Use nutrient-rich topsoil or clay soil to cover the organic layer.
- Depth: Spread the soil evenly to a depth of 10-15 cm, ensuring a stable planting surface.
Step 6: Apply Compost or Manure
To provide immediate nutrients for plant growth, add:
- Well-Decomposed Compost: Compost enriches the soil with essential nutrients and promotes microbial activity.
- Manure: Use aged manure for additional nitrogen, essential for leaf and stem development.
Step 7: Add Neem Cake and Bone Meal
Neem cake is a natural pesticide and soil conditioner, while bone meal adds phosphorus.
- Sprinkle a Thin Layer: Distribute both neem cake and bone meal over the compost layer.
- Benefits: This combination deters pests, improves soil fertility, and supports plant health.
Step 8: Let the Bed Rest
Allowing the bed to rest ensures that all layers decompose and settle properly.
- Duration: Leave the bed undisturbed for 6-8 weeks.
- Timing: Start this process in winter so the bed is ready for spring planting.
- What Happens During Resting? Microorganisms break down organic matter, releasing nutrients and improving soil structure.
Why This Method Works
This nutrient-rich garden bed functions on the principles of slow decomposition and natural layering, creating a self-sustaining ecosystem. Key benefits include:
- Balanced Nutrition: The combination of fast- and slow-decomposing materials provides both immediate and long-term nourishment.
- Healthy Soil Microbiome: Organic layers support beneficial microbes, which play a vital role in nutrient cycling.
- Moisture Retention: The layers trap water, reducing evaporation and the need for frequent watering.
Maintaining Your Nutrient-Rich Garden Bed
To keep your garden bed in top condition, follow these maintenance tips:
1. Watering
- Ensure the soil remains consistently moist, especially in the first few weeks after planting.
- Avoid overwatering, which can lead to root rot.
2. Weed Control
- Monitor the bed regularly and remove any weeds that sprout.
- Adding mulch can further suppress weed growth and conserve moisture.
3. Nutrient Renewal
- At the end of each growing season, refresh the bed by adding a thin layer of compost or manure.
- This keeps the soil fertile and ready for the next planting season.
4. Crop Rotation
- Rotate crops annually to prevent soil nutrient depletion and reduce pest buildup.
Tips for Success
- Test Your Soil: Before planting, test the soil’s pH and nutrient levels to ensure optimal conditions for your crops.
- Choose Suitable Plants: Select plants that thrive in nutrient-rich soil, such as tomatoes, peppers, and leafy greens.
- Incorporate Mulch: Adding a layer of mulch helps retain moisture and regulate soil temperature.
Final Thoughts
Building a nutrient-rich garden bed is an investment in your garden’s future. By following these steps, you create a sustainable growing environment that minimizes maintenance and maximizes plant health and yield.
🌱 Are you ready to build your dream garden bed? Share your experience or tips in the comments! 🌿