
Water drainage issues can wreak havoc on your garden, lawn, or property, causing everything from soggy patches of grass to foundation damage. A French drain is an effective solution to this problem. It’s a simple yet efficient method to redirect water away from areas where it tends to accumulate, preventing flooding, soil erosion, and water damage. The best part? Building a French drain is a relatively easy DIY project that can save you both time and money in the long run.
In this guide, we’ll walk you through the process of building your own French drain, step by step. By the end of this article, you’ll have all the knowledge you need to tackle this project with confidence and transform your yard into a healthier, more resilient space.
What is a French Drain?
Before diving into the how-to, let’s clarify what a French drain actually is. A French drain is a trench filled with gravel or rock, containing a perforated pipe that directs excess water away from problem areas. It’s typically installed in areas with poor drainage, like soggy lawns, basements, or areas that collect runoff after heavy rain.
The perforated pipe within the drain allows water to enter and flow through the trench, which is sloped to guide the water toward a designated area like a dry well, storm drain, or a part of the yard that slopes downward. Over time, the French drain helps to prevent standing water, soil erosion, and unwanted flooding by effectively managing surface water and groundwater.
Benefits of Building a French Drain
Building a French drain in your garden or yard comes with numerous benefits:
- Improved Drainage: It helps reduce standing water and redirects excess water, preventing flooding and pooling around your home or garden.
- Preventing Soil Erosion: Excess water can erode your soil, but a French drain can stop that from happening by directing the flow away from vulnerable areas.
- Foundation Protection: Poor drainage around your home can lead to foundation damage. Installing a French drain can safeguard your foundation by ensuring water is directed away from it.
- Healthier Plants: Standing water can suffocate plants by depriving their roots of oxygen. With proper drainage, your plants can thrive without the risk of root rot.
- Easy to Install: French drains are relatively simple to build, and many homeowners can complete the project on their own with the right tools and a little patience.
Materials You Will Need
Before you begin building a French drain, you’ll need to gather the necessary materials. Here’s a list of everything you’ll need:
- Shovel or Post Hole Digger: For digging the trench.
- Gravel: This will serve as the base and covering for the pipe to help with water flow.
- Perforated Drain Pipe: This is the core of the French drain, allowing water to flow through it.
- Landscape Fabric: Used to line the trench and prevent soil from clogging the drain.
- Pipe Connector (if necessary): To connect sections of pipe if you have a longer trench.
- Level: To make sure your trench has the right slope.
- Wheelbarrow: For transporting gravel and other materials.
- Sod or Mulch: To cover the drain after installation and keep the surface looking tidy.
Step-by-Step Guide to Building a French Drain
Now that you have your materials ready, let’s get started with the step-by-step guide for building a French drain.
Step 1: Choose the Right Location
The first step in building a French drain is selecting the right location. Ideally, you want to install the drain in an area that collects excess water, such as low spots in your yard, near the foundation of your house, or along pathways that flood after heavy rainfall.
To determine the best path for your French drain, observe how water flows across your yard during a rainstorm. Identify areas where water tends to pool and mark the highest point where water accumulates. Your drain should be sloped toward a designated water exit, such as a dry well or storm drain.
To avoid disrupting any existing underground utilities, it’s essential to contact your local utility company before digging. They can mark any buried lines to ensure you don’t accidentally hit them while digging the trench.
Step 2: Plan the Drain Path and Slope
French drains rely on gravity to move water, so it’s important to ensure the trench has the right slope. The trench should slope at about a 1% grade, which means the trench should drop 1 foot for every 100 feet of length.
Use a level or a string line to mark the trench’s slope before digging. This will ensure the water flows toward the desired exit point.
Step 3: Dig the Trench
Once you have planned the path and slope of the trench, it’s time to start digging. Using a shovel or post hole digger, dig a trench that’s about 6 inches wide and 18-24 inches deep, depending on your specific drainage needs. Make sure the trench has a consistent slope so water can flow smoothly from one end to the other.
As you dig, check the depth and slope periodically with a level to ensure accuracy. You may need to adjust the trench slightly to maintain the correct angle.
Step 4: Add a Layer of Gravel
Once the trench is dug, add a 2-3 inch layer of gravel to the bottom. This layer of gravel will serve as a foundation for the perforated pipe, allowing water to flow freely and easily into the pipe. It also helps to keep the pipe from becoming clogged with dirt over time.
Spread the gravel evenly and make sure it’s level throughout the trench.
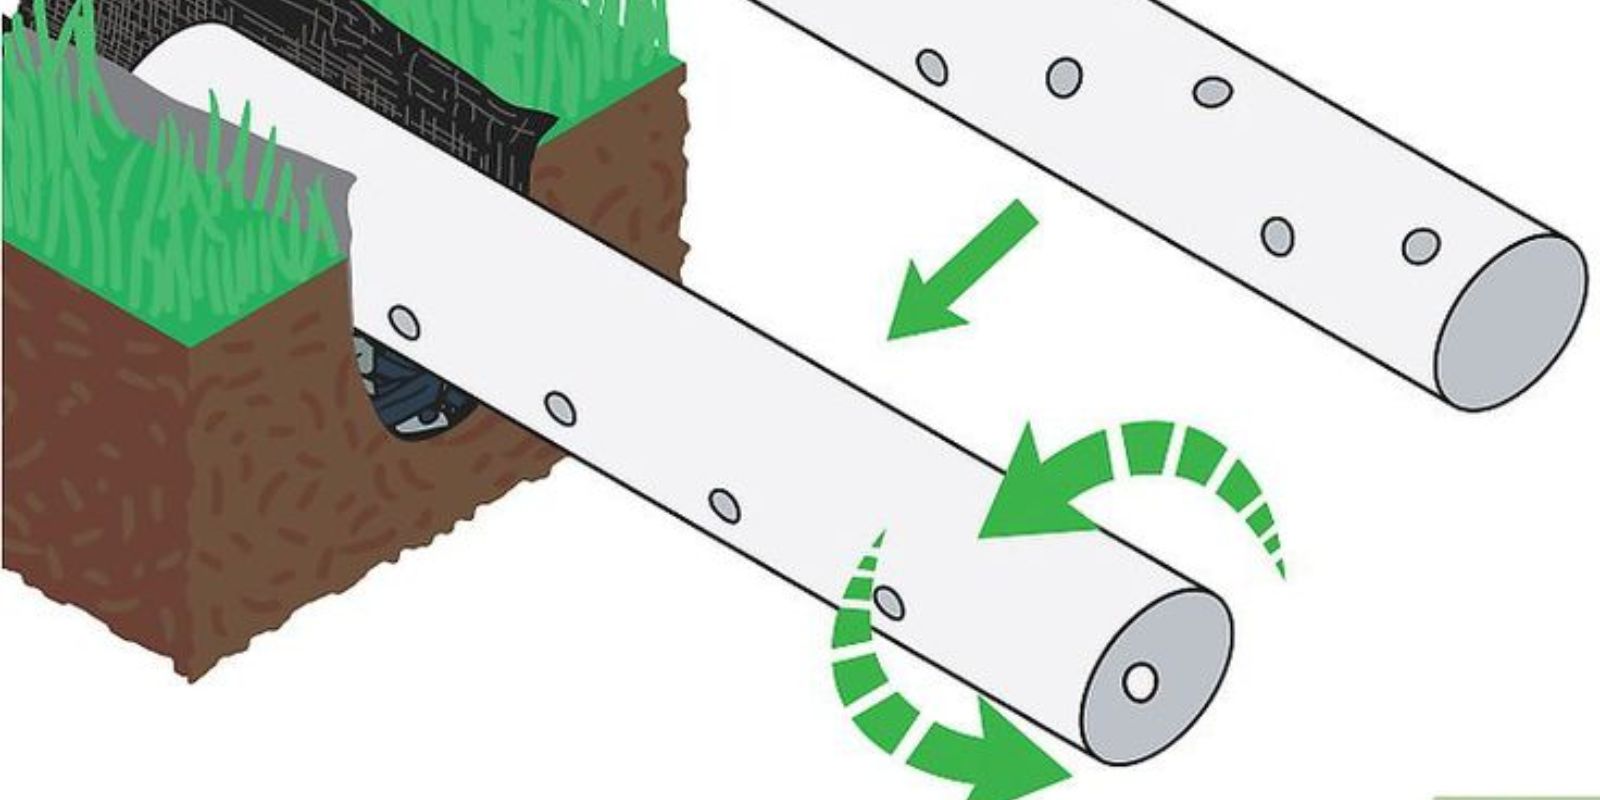
Step 5: Lay the Perforated Drain Pipe
Next, lay the perforated pipe on top of the gravel layer. Make sure the holes in the pipe face downward to allow water to enter the pipe. Place the pipe gently in the trench, ensuring it follows the slope you’ve set.
If you’re using multiple sections of pipe, connect them using pipe connectors. Ensure that the sections fit tightly together to prevent leaks.
Step 6: Cover with Gravel and Landscape Fabric
After laying the pipe, cover it with another layer of gravel. This helps further filter and channel the water, ensuring it doesn’t clog the pipe. Fill the trench up to just below the surface level with gravel.
Next, cover the gravel with landscape fabric. This fabric helps prevent soil and dirt from mixing with the gravel and potentially blocking the pipe. The fabric will allow water to pass through but keep soil and debris out.
Step 7: Backfill the Trench
Once the gravel and landscape fabric are in place, backfill the trench with soil. You can use the soil you dug up or purchase additional soil if needed. If you prefer, you can also cover the trench with mulch or sod for a clean and neat finish.
Step 8: Test the Drain
Finally, test your French drain to make sure it’s working properly. Pour water at the top of the trench and observe how it flows through the pipe and exits at the designated drainage point. If the water flows smoothly and doesn’t pool in the trench, your French drain is functioning correctly.
Maintenance Tips for Your French Drain
While French drains are relatively low-maintenance, it’s still important to keep an eye on their condition over time. Here are a few tips to ensure your French drain continues to perform well:
- Regularly check for clogs: Over time, debris can build up in the gravel or pipe, causing blockages. Occasionally inspect the drain to ensure water is flowing freely.
- Clean the pipe: If you notice slow drainage, clean the perforated pipe to remove any sediment or debris.
- Check the slope: Ensure the slope remains consistent and that the drain still leads water away from problem areas.
- Trim plants near the drain: Keep plants and roots away from the drain to prevent them from clogging the pipe.
Conclusion
Building a French drain is an effective way to manage drainage issues in your yard or garden. By following this step-by-step guide, you can create a functional and long-lasting solution that prevents water damage, promotes healthy plant growth, and protects your property. Whether you’re tackling the project yourself or enlisting help, a French drain is an investment in your yard’s health that will pay off for years to come.
Ready to take on the challenge? Let us know how your French drain project goes!