
Transforming your garden into a visually appealing and functional space often involves adding pathways. A brick walkway can not only enhance the beauty of your garden but also make it easier to walk through, especially during wet conditions. Whether you’re aiming for a formal garden or a more casual backyard, building a brick walkway is a relatively simple DIY project that anyone can undertake with a little time and effort. This article will guide you through the process of constructing a brick walkway that suits your outdoor space.
Why Choose a Brick Walkway?
Before delving into the “how-to” of building a brick walkway, it’s worth discussing why bricks are an excellent choice for your garden. Bricks offer several advantages:
- Durability: Bricks are strong, long-lasting, and resistant to weather conditions. They will stand the test of time.
- Aesthetic Appeal: With a variety of colors, shapes, and sizes, bricks can be arranged in various patterns to complement the design of your garden.
- Maintenance: A brick walkway requires minimal maintenance. With occasional sweeping and occasional resetting of the bricks, your path will last for many years.
- Functionality: Bricks provide a firm, level surface that’s perfect for walking and prevents muddy patches in your garden.
Now that you understand the benefits, let’s get into the specifics of building your own brick walkway.
Materials You’ll Need
To get started, gather the following materials:
- Bricks or Pavers: Choose bricks that suit the style of your garden. You can select traditional red bricks, modern concrete pavers, or even reclaimed bricks for a rustic look.
- Gravel or Crushed Stone: This serves as the base layer for the walkway and helps with drainage.
- Sand: Used to level the surface and fill gaps between bricks.
- Landscape Fabric (Optional): Prevents weeds from growing through the walkway.
- Shovel and Rake: For digging the trench and leveling the ground.
- Rubber Mallet: To tap the bricks into place without damaging them.
- Measuring Tape and Stakes: To measure the walkway’s length and width, and to mark the path.
- Level: To ensure the walkway remains even and flat.
- Edge Restraints (Optional): These help keep the bricks in place and prevent them from shifting over time.
Steps to Build Your Brick Walkway
Follow these steps to create your perfect brick walkway:
1. Planning Your Pathway
Start by deciding the path your walkway will take through the garden. Walk around the space and consider how the walkway will flow with the rest of your landscape. Consider curving paths if your garden is more informal, or straight lines if you prefer a formal design.
Once you have a rough idea of the path, measure the length and width of the walkway using a measuring tape. Mark the path using stakes and string or spray paint. This will provide a clear outline of where you will dig and lay your bricks.
2. Prepare the Ground
The next step is to prepare the ground where the walkway will go. Start by digging out a trench along the marked path. The trench should be about 4 to 6 inches deep, depending on the size of your bricks and the height of the walkway you want. Use a shovel to remove any grass, roots, or debris from the area.
After digging out the trench, use a rake to level the surface and remove any high spots. It’s important to create a smooth, even base for the walkway to ensure the bricks sit flat.
3. Add Gravel or Crushed Stone Base
Once the ground is level, it’s time to add the foundation. Spread a layer of gravel or crushed stone along the trench. This will provide a stable base for your walkway, allowing water to drain through and preventing the bricks from shifting over time.
Level the gravel using the rake, making sure it’s evenly distributed throughout the trench. The gravel should be about 2-3 inches deep. You may want to compact the gravel lightly using a tamper to create a solid base.
4. Install Landscape Fabric (Optional)
To prevent weeds from growing through the walkway, you can lay down a layer of landscape fabric. This step is optional but highly recommended if you want to reduce maintenance in the future. Simply roll out the fabric along the trench, making sure it covers the gravel evenly. Cut the fabric to fit the length of the path and secure it in place with landscape pins.
5. Add Sand Layer
Next, spread a thin layer of sand over the landscape fabric (or directly on the gravel if you’re not using fabric). The sand will help level the surface for the bricks and provide a smooth, even foundation. Use a rake to spread the sand evenly and then run a board over the surface to level it.
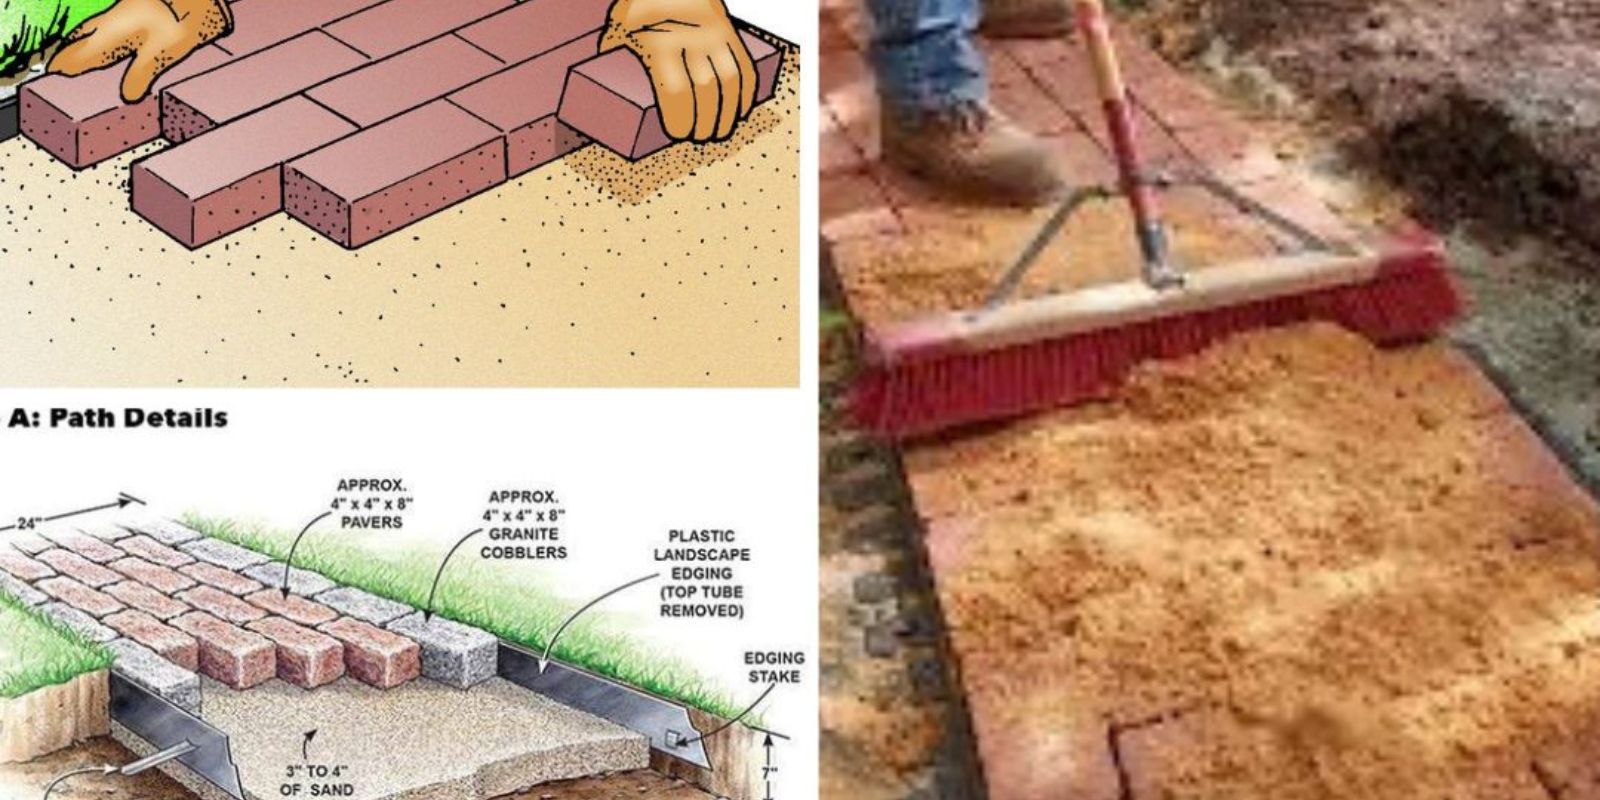
6. Lay the Bricks
Start laying the bricks at one end of the walkway, working your way along the path. Lay the bricks closely together, leaving a small gap between them for the sand to fill. You can lay the bricks in various patterns, such as a herringbone, basketweave, or running bond pattern, depending on your design preference.
As you lay the bricks, use a rubber mallet to gently tap them into place, ensuring they are level and seated properly. Check the level regularly to make sure the walkway stays flat. If the bricks are slightly uneven, adjust them as needed.
7. Fill the Gaps with Sand
Once all the bricks are in place, it’s time to fill the gaps between them with sand. Sweep the sand into the joints using a broom, making sure the gaps are fully filled. This helps stabilize the bricks and prevents them from shifting. After filling the gaps, use the broom to sweep away any excess sand from the surface.
8. Edge the Walkway (Optional)
To prevent the bricks from shifting over time, you can install edge restraints along the sides of the walkway. These can be made of plastic, metal, or stone, and they will help keep the bricks in place. Simply lay the restraints along the edges and secure them in place using stakes.
9. Water the Walkway
After completing the walkway, water the sand lightly to help it settle and compact. This will ensure that the sand fills all the gaps and holds the bricks in place. You may need to add a little more sand in the joints after watering to fill any gaps that appear.
10. Final Touches
Once the sand has settled, check the entire walkway for any uneven spots and adjust the bricks if necessary. If you’re happy with the layout, your brick walkway is now complete! You can enhance its appearance by planting flowers or low-growing ground cover along the edges or adding garden decorations.
Maintenance Tips for Your Brick Walkway
To keep your brick walkway looking great for years to come, follow these simple maintenance tips:
- Regular Cleaning: Sweep the walkway regularly to remove leaves, dirt, and debris. For a deeper clean, use a pressure washer or hose to rinse the bricks.
- Weeding: While landscape fabric can help with weed prevention, you may still encounter a few weeds. Pull them up by hand or use a weed killer to keep the walkway clear.
- Replenishing Sand: Over time, the sand between the bricks may settle or wash away. Replenish it as needed to maintain the stability of the walkway.
Conclusion
Building a brick walkway in your garden is a rewarding project that adds both beauty and function to your outdoor space. By following these steps, you can create a durable, attractive path that enhances the landscaping of your garden. Whether you’re an experienced DIYer or a beginner, this project is achievable and offers a great way to spend time outdoors while improving your garden.
So, grab your tools and get started on building your dream brick walkway today! Share your progress and designs with us – we’d love to see how your garden transforms! 🌿👣 #BrickWalkway #GardenPath #DIYProjects #OutdoorDesign #Landscaping #GardeningGoals #GardenInspiration