
Grapes are one of the most beloved fruits worldwide, known not only for their delicious taste but also for their versatility in cooking, winemaking, and snacking. While many gardeners purchase young plants or established vines, growing grapes from seeds can be a fulfilling and rewarding experience. This comprehensive guide will take you through every step of the process, from seed selection to harvesting your first bunch of grapes.
Understanding the Basics of Grape Seeds
Types of Grapes
Before you dive into the growing process, it’s essential to understand the different types of grapes. There are two main categories:
- Table Grapes: These are the grapes we typically eat fresh. They are usually sweet and seedless.
- Wine Grapes: These grapes are smaller, sweeter, and often have seeds. They are used for winemaking and have unique flavor profiles.
For growing from seeds, wine grape varieties are more commonly used, as they tend to produce better results in terms of flavor and adaptability.
Seed Viability
Not all grape seeds are created equal. Seeds from hybrid grapes may not produce plants that resemble their parent. It’s generally best to use seeds from well-known varieties that are suited to your local climate and soil conditions. Look for seeds from healthy, ripe grapes to ensure the highest chance of germination and growth.
Step-by-Step Guide to Growing Grapes from Seeds
Step 1: Gather Your Materials
Before you begin, make sure you have the following materials:
- Grape Seeds: Choose seeds from a reliable source or extract them from fresh, ripe grapes.
- Water: For soaking the seeds.
- Damp Paper Towels: For the stratification process.
- Plastic Bags: To create a mini-greenhouse effect during stratification.
- Well-Draining Potting Soil: For planting the seeds.
- Pots or Seed Trays: To start your seeds.
- Labels: To keep track of different varieties.
Step 2: Selecting and Preparing Seeds
- Choose the Seeds: If you’re using seeds from fresh grapes, select ripe, juicy grapes from healthy vines. Avoid any grapes that show signs of disease or damage.
- Clean the Seeds: Remove the seeds from the grapes and rinse them thoroughly to eliminate any pulp or residue. This is crucial for preventing mold during the germination process.
- Soak the Seeds: Place the cleaned seeds in a bowl of water for 24 hours. Soaking helps soften the seed coat and encourages germination.
Step 3: Stratification Process
Grape seeds require a cold stratification period to simulate winter conditions. This step is essential for breaking dormancy.
- Prepare the Seeds: After soaking, drain the seeds and place them on a damp paper towel. Fold the towel over the seeds to keep them moist.
- Seal in a Plastic Bag: Place the damp paper towel with the seeds into a plastic bag, sealing it tightly to retain moisture.
- Refrigerate: Store the bag in the refrigerator for 4-6 weeks. This mimics the natural winter cycle and helps prepare the seeds for germination.
Step 4: Planting the Seeds
After the stratification period, it’s time to plant your seeds.
- Prepare Pots or Seed Trays: Fill pots or seed trays with well-draining potting soil. You can mix in some perlite or sand to enhance drainage.
- Plant the Seeds: Make small holes in the soil, about 1 inch deep, and place one seed in each hole. Cover the seeds lightly with soil.
- Water Lightly: Gently water the soil to settle it around the seeds. Be careful not to overwater, as this can lead to rot.
Step 5: Providing Optimal Growing Conditions
Grapes thrive in warm, sunny environments. Here’s how to create the ideal conditions for your seeds:
- Light: Place your pots or trays in a location that receives plenty of indirect sunlight. If you’re starting indoors, a south-facing window is ideal.
- Temperature: Aim for a consistent temperature between 70-85°F (21-29°C). If necessary, use a heat mat to maintain warmth.
- Humidity: Cover the pots with plastic wrap or a clear lid to create a humid environment, which will help with germination. Be sure to ventilate occasionally to prevent mold.
Step 6: Caring for Seedlings
Once your seeds begin to germinate, it’s crucial to provide the right care:
- Watering: Keep the soil consistently moist but not soggy. As the seedlings grow, you may need to water more frequently.
- Thinning: Once seedlings have a few true leaves, thin them out by removing the weakest ones. This ensures that the remaining plants have enough space and resources to thrive.
- Transplanting: When seedlings reach about 6 inches tall and have several leaves, transplant them into larger pots or directly into your garden, depending on the climate.
Step 7: Preparing for Transplanting
If you decide to move your seedlings outdoors:
- Choose the Right Location: Grapes prefer full sun (at least 6-8 hours a day) and well-draining soil. Consider a site with a trellis or fence for future support.
- Harden Off Seedlings: Before transplanting, gradually acclimate your seedlings to outdoor conditions. Start by placing them outside for a few hours each day, increasing the time over a week.
Step 8: Caring for Mature Plants
Once transplanted, your grape plants will require ongoing care:
- Watering: Newly planted grapes need regular watering, especially during dry spells. Once established, they are fairly drought-resistant.
- Fertilization: Use a balanced fertilizer every 6-8 weeks during the growing season. Organic compost can also enhance soil fertility.
- Pruning: Prune your grapevines annually to maintain shape and encourage new growth. Remove any dead or overcrowded branches.
- Pest and Disease Management: Monitor your plants for common pests like aphids and spider mites. Organic treatments, such as neem oil, can be effective. Keep an eye out for diseases like powdery mildew and apply appropriate treatments.
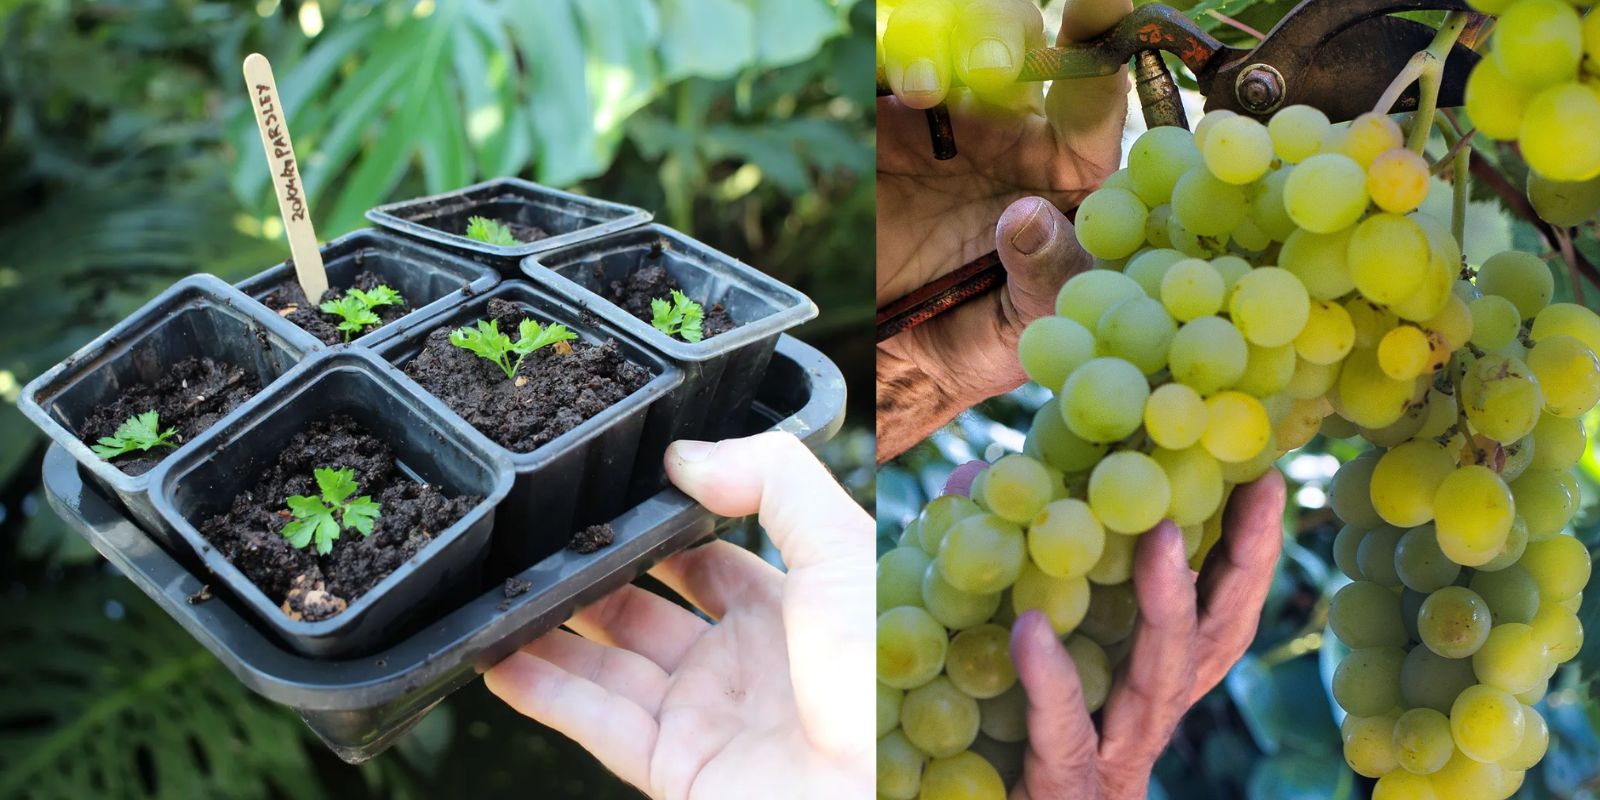
Step 9: Harvesting Your Grapes
After a few years of care, your grapevines will begin to produce fruit. Here’s how to know when they’re ready for harvest:
- Color Change: Mature grapes will change color based on the variety, typically turning from green to deep purple, red, or black.
- Texture: Ripe grapes should feel slightly soft when pressed.
- Taste: The best way to know if your grapes are ripe is to taste them!
- Harvesting: Use scissors or pruning shears to cut bunches from the vine. Be gentle to avoid damaging the plant.
Conclusion
Growing grapes from seeds can be a rewarding and enriching experience for gardeners. With patience and the right techniques, you can cultivate your own grapevines and enjoy delicious fruit for years to come. Whether you’re growing table grapes for fresh snacking or wine grapes for winemaking, this journey will deepen your connection to nature and the gardening process.
So, gather your seeds and get started today! Share your progress and tips with the gardening community using hashtags like #GrapeGrowing #HomeGarden #FromSeedToHarvest #GardeningTips. Happy gardening!