
Gardening doesn’t have to take up a lot of space or require a big yard. With a little creativity and a plastic bottle, you can grow a continuous supply of fresh onions at home. This ingenious, eco-friendly method is perfect for urban dwellers and those looking to reduce waste while enjoying a sustainable harvest. Here’s how to turn an everyday plastic bottle into a compact onion garden.
Why Grow Onions in a Plastic Bottle?
Onions are a versatile kitchen staple, used in countless dishes worldwide. Growing them at home ensures a steady supply of fresh green onion shoots or small bulbs for cooking. Using a plastic bottle as a planter makes this method:
- Space-Saving: Ideal for apartments, small balconies, or countertops.
- Eco-Friendly: Repurpose plastic waste while reducing your carbon footprint.
- Low-Maintenance: Onions are hardy and require minimal care, making them perfect for beginners.
What You’ll Need
Before you start, gather these materials:
- A Large Plastic Bottle: Choose a 5-liter bottle or larger for better yield.
- Fertile Soil: Use well-draining potting soil enriched with organic compost.
- Onion Bulbs or Sets: Small onions or bulb sets work best for this method.
- A Sharp Knife or Scissors: For cutting holes in the bottle.
- Water and a Spray Bottle: To maintain the right moisture level.
Step-by-Step Guide to Growing Onions in a Plastic Bottle
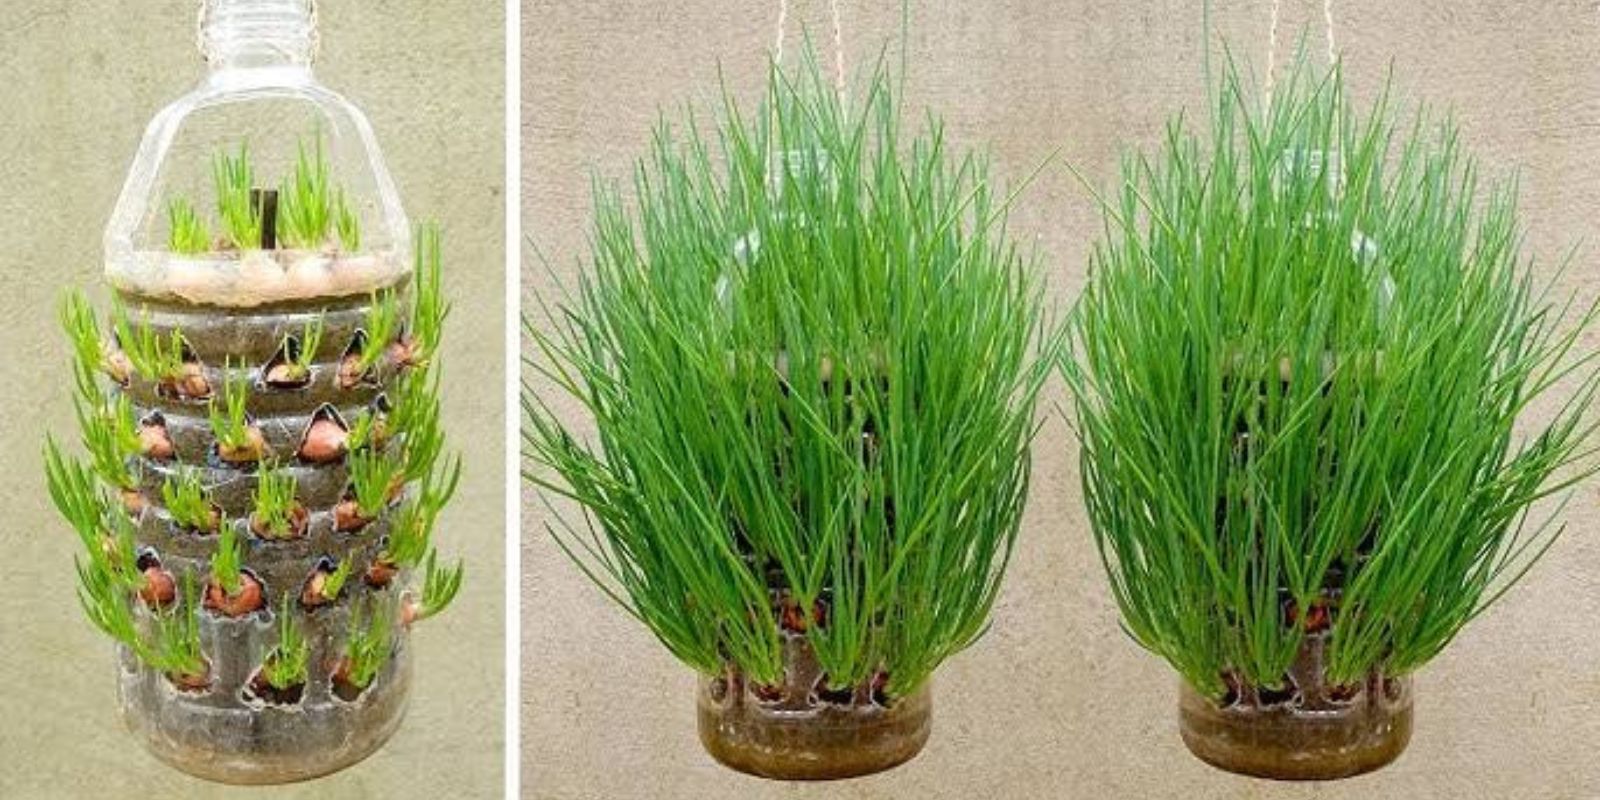
1. Prepare the Plastic Bottle
Start by washing and drying the bottle thoroughly to remove any residue. Then:
- Cut off the top of the bottle to create an open container for filling with soil.
- Make small holes (approximately 2 inches in diameter) around the sides of the bottle. Space the holes evenly for proper ventilation and planting.
2. Create the First Soil Layer
Fill the bottom of the bottle with 2–3 inches of fertile soil. Ensure the soil is slightly moist but not soggy.
3. Insert Onion Bulbs
Take small onion bulbs or sets and insert one bulb into each hole, with the pointed side facing outwards. This will ensure the green shoots grow outward through the holes.
4. Layer Soil and Bulbs
Add another layer of soil, covering the base of the inserted bulbs. Continue the process:
- Add soil.
- Insert bulbs into the next set of holes.
Repeat until the bottle is filled, leaving 2–3 inches of space at the top for watering.
5. Water the Onions
After planting, water the soil thoroughly until it feels like a damp sponge. Avoid overwatering, as onions prefer well-drained soil.
6. Place in Indirect Sunlight
Position the bottle in a location that receives at least 6–8 hours of indirect sunlight daily. A windowsill, balcony, or well-lit kitchen counter works well.
7. Monitor Growth
Within a few days, you’ll notice green shoots emerging through the holes. These shoots can be harvested as needed.
Tips for Healthy Onion Growth
- Maintain Proper Moisture:
Onions need consistently moist soil but dislike soggy conditions. Water sparingly but regularly, and use a spray bottle to avoid overwatering. - Fertilize Occasionally:
If you want a more robust yield, apply a balanced, water-soluble fertilizer every 2–3 weeks. Be careful not to over-fertilize, as onions are sensitive to high nitrogen levels. - Prune for Air Circulation:
Trim any yellowing leaves to ensure good airflow, which helps prevent diseases. - Rotate the Bottle:
Turn the bottle occasionally to ensure all sides receive equal sunlight, promoting even growth. - Replenish Bulbs as Needed:
Once a bulb stops producing green shoots, replace it with a fresh one to keep the cycle going.
Benefits of Growing Onions This Way
- Continuous Harvest: Green onion shoots can be snipped regularly without disturbing the bulbs.
- Compact Gardening: Perfect for tight spaces, this method takes up minimal room.
- Eco-Friendly: Repurpose waste materials and contribute to sustainable living.
- Cost-Effective: With basic materials, you can enjoy fresh onions year-round at a fraction of store prices.
Common Challenges and Solutions
- Overwatering:
Issue: Excess water can lead to root rot.
Solution: Use a bottle with adequate drainage holes and water sparingly. - Lack of Sunlight:
Issue: Onions may grow slowly or produce weak shoots.
Solution: Ensure the bottle gets 6–8 hours of light daily or supplement with a grow light. - Pest Problems:
Issue: Occasionally, pests like aphids may appear.
Solution: Use organic pest control methods, such as neem oil or insecticidal soap.
Harvesting Onions
One of the joys of this method is the ability to harvest continuously. Snip the green shoots as they reach 6–8 inches tall. These shoots can be used in salads, soups, or as garnishes. If you prefer to harvest the full bulb, wait until the tops dry out and the bulbs have matured fully inside the bottle.
Why This Method is a Game-Changer
Plastic bottle gardening is not just a space-saving technique; it’s also a fantastic way to introduce sustainable practices into your lifestyle. By turning everyday waste into a thriving garden, you contribute to reducing landfill waste and promoting eco-conscious habits.
Conclusion
Growing onions in a plastic bottle is a practical, innovative, and rewarding way to enjoy fresh produce at home. This method combines simplicity, sustainability, and creativity, making it ideal for gardeners of all skill levels. Whether you live in a small apartment or have limited outdoor space, this technique proves that anyone can grow their food.
Ready to grow your endless supply of onions? Share your progress and tips in the comments below! Let’s inspire more people to take up sustainable gardening.
#PlasticBottleGardening #GrowOnionsAtHome #SustainableLiving #UrbanGardening #DIYGardenHacks