
Introduction
Garlic is not just a culinary staple; it’s also an easy-to-grow crop that can be cultivated indoors or in small spaces. Whether you’re an urban gardener or simply love sustainable DIY projects, growing garlic in a plastic bottle is a creative and eco-friendly way to enjoy fresh, homegrown garlic. This method not only repurposes waste materials but also allows you to grow garlic without a traditional garden. Here’s a step-by-step guide to help you master this simple yet effective technique.
Why Grow Garlic in a Plastic Bottle?
Growing garlic in a plastic bottle offers several benefits:
- Space-efficient: Perfect for small apartments or balconies.
- Eco-friendly: Reuses plastic bottles, reducing waste.
- Convenient: Easy to manage, with no weeding required.
- Year-round cultivation: Allows you to grow garlic indoors regardless of the season.
Materials You’ll Need
Before you begin, gather these materials:
- A large, clean plastic bottle (2-5 liters recommended)
- Sharp scissors or a knife
- Nutrient-rich potting soil
- Compost or organic fertilizer
- Garlic cloves (preferably organic)
- Watering can or spray bottle
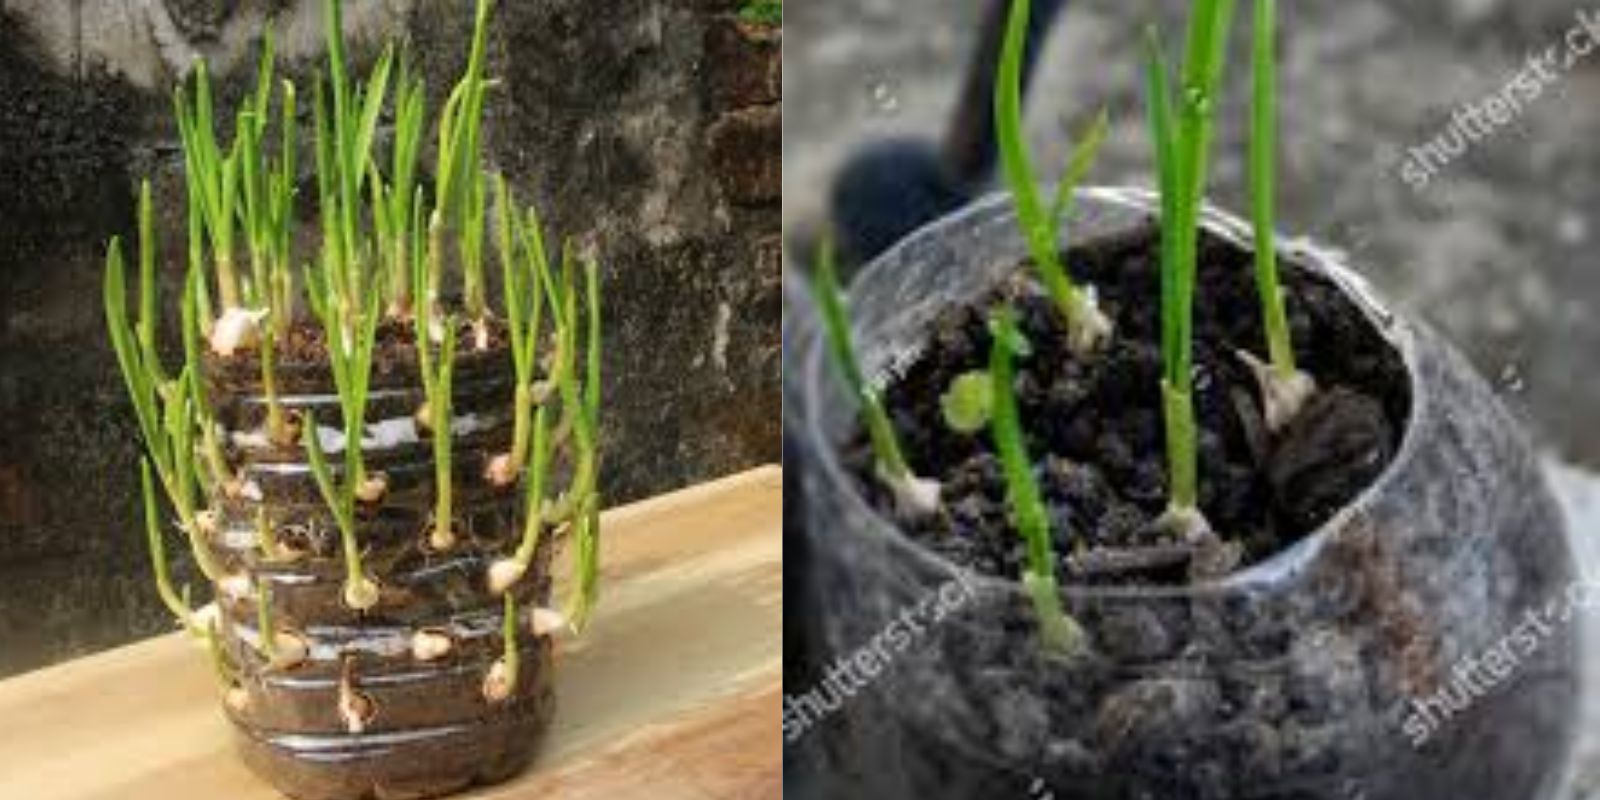
Step 1: Prepare the Plastic Bottle
- Clean and Dry: Wash the plastic bottle thoroughly to remove any residues. Allow it to dry completely.
- Cut the Holes:
- Use sharp scissors or a knife to cut evenly spaced holes around the bottle, approximately 2 inches wide.
- The holes should be large enough for the garlic cloves to sprout through but small enough to hold the soil inside.
- Leave the top open for airflow and the bottom intact to hold soil and water.
- Drainage: Poke small holes at the bottom of the bottle to ensure proper drainage.
Step 2: Prepare the Garlic Cloves
- Select Healthy Cloves: Use fresh, firm garlic cloves for planting. Avoid any that are soft or showing signs of decay.
- Peel and Soak: Peel off the outer layers and soak the cloves in water overnight. This encourages faster sprouting.
Step 3: Fill the Bottle with Soil
- Layer the Soil: Start by filling the bottle with potting soil up to the first row of holes.
- Add Compost: Mix in a small amount of compost or organic fertilizer to provide essential nutrients.
Step 4: Plant the Garlic Cloves
- Insert Cloves:
- Place one clove in each hole with the pointed side facing outwards.
- Ensure the flat root end is buried in the soil.
- Add More Soil: After inserting the cloves in the first row of holes, add more soil and repeat the process until all rows are filled.
- Top Layer: Once all the holes are filled with cloves, add soil to the top of the bottle to ensure proper root coverage.
Step 5: Water and Position
- Water Lightly: Use a watering can or spray bottle to moisten the soil. Be careful not to overwater, as garlic prefers well-drained soil.
- Place in Sunlight: Position the bottle in a sunny location, such as a windowsill or balcony. Garlic needs at least 6-8 hours of sunlight daily.
Step 6: Care for Your Garlic
- Watering Schedule: Water when the topsoil feels dry to the touch, typically once every few days.
- Fertilizing: Every 3-4 weeks, add a small amount of organic fertilizer to promote growth.
- Check for Pests: Although garlic is pest-resistant, keep an eye out for any signs of fungal diseases.
Step 7: Harvesting Your Garlic
- Wait for Maturity: Garlic takes about 4-6 months to mature. You’ll know it’s ready when the green leaves turn yellow and begin to dry out.
- Harvest:
- Gently remove the garlic bulbs through the holes or by cutting open the bottle.
- Brush off excess soil and allow the bulbs to cure in a cool, dry place for 1-2 weeks.
Tips for Success
- Choose the Right Garlic: Softneck garlic varieties are ideal for container gardening.
- Rotate the Bottle: If your setup receives uneven sunlight, rotate the bottle weekly to ensure all cloves grow evenly.
- Reuse Soil: After harvesting, the soil can be rejuvenated with compost and used for your next planting cycle.
Benefits of This Method
Growing garlic in a plastic bottle is not only an innovative gardening technique but also a sustainable practice that helps reduce waste. This method is:
- Budget-friendly: Minimal investment with high yields.
- Educational: A great way to introduce kids to gardening and sustainability.
- Convenient: Requires little maintenance compared to traditional gardening.
Conclusion
By following this simple and space-saving method, you can grow fresh, organic garlic at home while repurposing plastic waste. Whether you’re an experienced gardener or a curious beginner, this DIY project is both rewarding and environmentally friendly.
Ready to grow your garlic garden? Give it a try and share your experience with us! 🌱🧄
#DIYGardening #GrowGarlic #UrbanGardening #EcoFriendlyLiving #SustainableGardening