
Growing fresh herbs at home is an increasingly popular trend for gardeners of all experience levels, and mint is a particularly easy herb to grow. Mint is a versatile and aromatic plant that can be used in a variety of recipes, from refreshing drinks to delicious dishes. However, for those who live in urban environments or have limited gardening space, finding ways to grow mint can seem challenging.
One creative solution is using recycled plastic bottles to create a hanging garden. Not only does this method save space, but it also helps the environment by repurposing plastic bottles that would otherwise end up in landfills. In this article, we’ll guide you through a simple DIY project that will allow you to grow fresh mint using recycled plastic bottles, transforming your outdoor or indoor space into a beautiful, fragrant mint garden.
Why Grow Mint?
Mint is an incredibly hardy and versatile herb that thrives in a variety of growing conditions. It’s easy to grow in pots, hanging gardens, or garden beds, and it doesn’t require a lot of attention once established. Mint is also an excellent herb for beginners due to its resilience and ability to thrive in less-than-ideal soil conditions.
Mint is not only useful in cooking but is also prized for its medicinal benefits. It has soothing properties that help with digestion and can be used in teas or as a refreshing ingredient in homemade drinks, like mojitos or mint lemonade. With mint’s many uses, having a fresh supply right outside your door is a major perk for any gardener.
The Benefits of Using Recycled Plastic Bottles
Recycling plastic bottles for gardening has a number of environmental and practical benefits. Here are just a few reasons why using plastic bottles to create a hanging garden for mint is a fantastic idea:
- Space-Saving Solution: By using plastic bottles to create hanging planters, you free up valuable space, especially if you live in an apartment or have a small garden. Hanging planters can be placed anywhere, from balconies to windowsills or on your kitchen countertop.
- Eco-Friendly: Repurposing plastic bottles reduces waste and helps keep plastic out of landfills, making it an environmentally responsible choice.
- Cost-Effective: You can reuse plastic bottles that you would otherwise throw away, so this DIY project requires little to no cost.
- Portable: Hanging planters can be moved easily, allowing you to adjust their location for optimal sunlight or to protect the plants during extreme weather conditions.
- Better Drainage: When you use plastic bottles with holes for drainage, the water can flow freely, helping prevent root rot and ensuring your mint plants stay healthy.
Now that we know why mint is a great herb to grow and why using recycled plastic bottles is a smart choice, let’s get started on the step-by-step process of creating your own mint hanging garden.
Materials Needed for the DIY Project
Before you begin, gather the following materials:
- Recycled Plastic Bottles: You’ll need a few clean, empty plastic bottles. Choose bottles that are large enough to hold soil and a few mint cuttings. Water bottles, soda bottles, or juice bottles work well for this project.
- Potting Soil: High-quality potting soil ensures good drainage and proper nutrients for your mint plant. Avoid using garden soil, as it may be too heavy and could cause the water to drain poorly.
- Mint Cuttings: You can either take mint cuttings from an existing mint plant or purchase some from a garden center.
- Sharp Knife or Scissors: You will need a sharp knife or scissors to cut the plastic bottles.
- Twine, Wire, or Hooks: Use these materials to hang your plastic bottles once they are prepared.
- Drill or Nail (Optional): If you’d prefer to create drainage holes using a nail or small drill, you can use this tool instead of a knife.
Step-by-Step Instructions
Follow these steps to create your very own mint hanging garden:
Step 1: Gather and Prepare the Bottles
Start by collecting several clean, empty plastic bottles. Depending on how many mint plants you want to grow, gather enough bottles for each one. Choose bottles that are sturdy and at least 16-20 ounces in size. Larger bottles are preferable as they offer more room for the roots to grow.
Step 2: Cut the Bottles
Use a sharp knife or scissors to cut the bottles in half. For each bottle, you’ll use the top half as the planter and the bottom half as a water catcher. To make this easier, start by cutting around the middle of the bottle.
Once you’ve cut the bottle, you can discard the bottom part or repurpose it for other uses, such as as a tray for catching excess water.
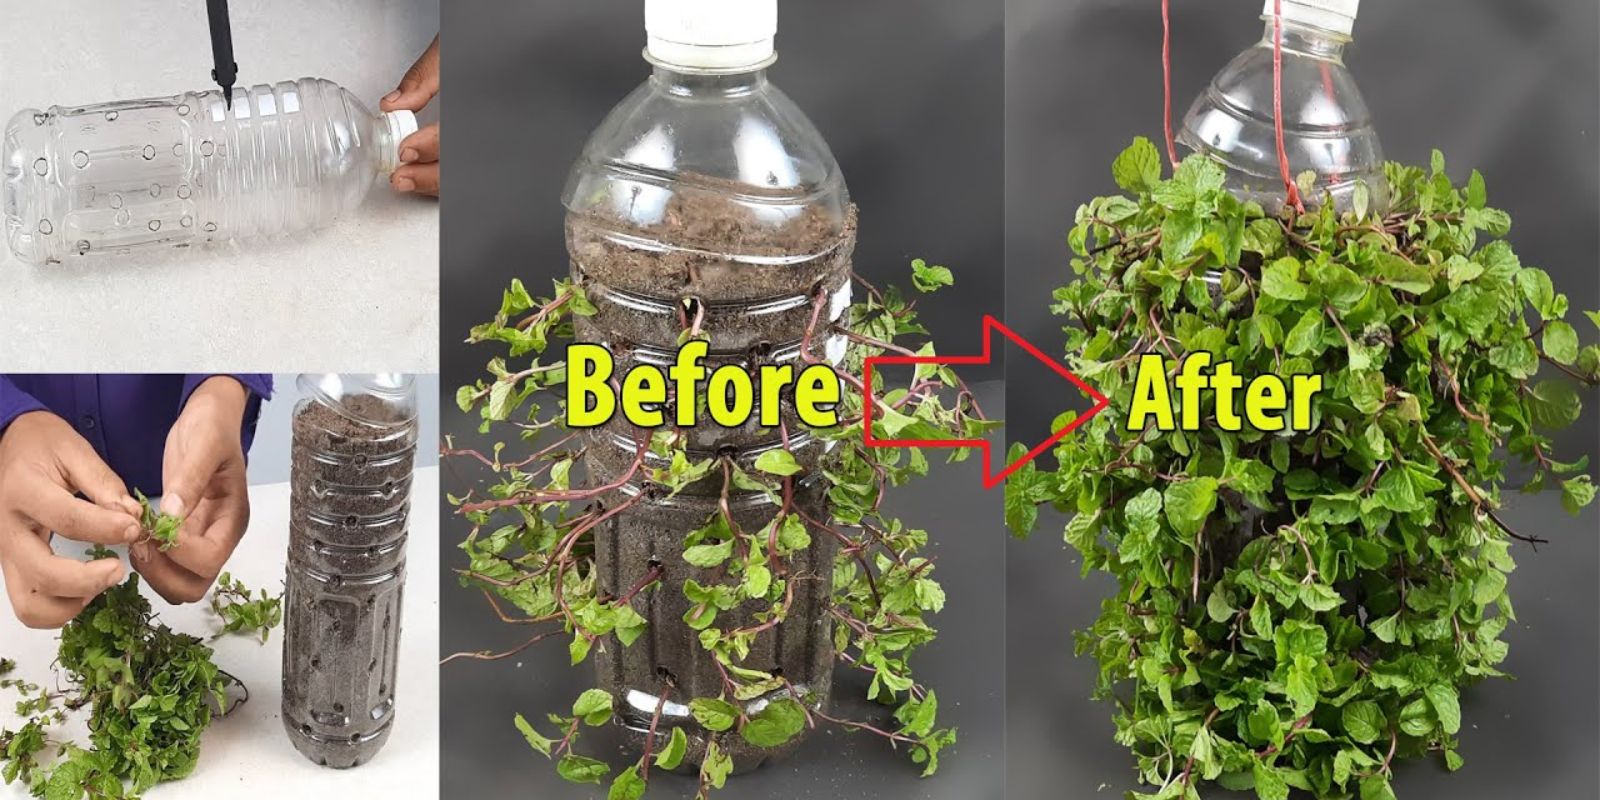
Step 3: Create Drainage Holes
Mint plants require well-draining soil to grow properly. In the bottom of the top half of the bottle (the part that will hold the soil), use a sharp knife, drill, or nail to create several small drainage holes. This will allow excess water to escape and prevent waterlogging, which can lead to root rot.
If you’re using smaller bottles, you can drill or punch 3-4 holes; larger bottles may need 5-6 holes. Just make sure that water can easily drain away from the plant’s roots.
Step 4: Add Potting Soil
Once your bottle is prepared with drainage holes, fill it about two-thirds full with high-quality potting soil. Make sure to leave some space at the top for the mint cuttings and to avoid the soil spilling over when you water the plant.
Use your fingers to gently pack the soil down, but be careful not to compact it too much, as mint roots need some room to breathe.
Step 5: Plant the Mint Cuttings
Take your mint cuttings and trim them to about 4-6 inches long, making sure they have at least one or two leaves on the stem. Remove any leaves from the bottom part of the stem, and then insert the cuttings into the soil of your plastic bottle planter.
Push the cutting into the soil about 1-2 inches deep, ensuring the stem is well-covered. You can plant multiple cuttings in each bottle if you prefer a fuller planter, but make sure there’s enough space for each plant to grow.
Step 6: Water and Hang
After planting the mint, water the soil gently to moisten it. Make sure not to overwater, as the drainage holes will help excess water escape. Place the plastic bottle planter in a location that receives partial to full sunlight, such as a sunny windowsill or balcony.
Now, it’s time to hang the bottles. Use twine, wire, or hooks to attach your mint planters to a hanging location. You can hang them from a hook in your kitchen, on a balcony railing, or even in a vertical garden arrangement. If you have several planters, consider creating a beautiful hanging mint garden by using a combination of different-sized bottles.
Step 7: Care and Maintenance
Your hanging mint garden should require minimal care. However, here are some tips to help your mint thrive:
- Water regularly: Keep the soil moist, but not soggy. Mint prefers slightly moist conditions but does not like standing water. Check the soil every few days to ensure it’s not drying out.
- Prune frequently: Mint grows quickly and can become invasive. Trim the plants regularly to encourage bushier growth and prevent them from overtaking their container. You can use the fresh leaves for teas, recipes, or even as a garnish.
- Sunlight: Mint plants thrive in areas with plenty of sunlight, but they can also tolerate partial shade. Just make sure your hanging garden gets at least a few hours of sunlight each day.
Conclusion: A Simple, Sustainable Way to Grow Fresh Mint
Using recycled plastic bottles to grow fresh mint is a simple and sustainable way to add herbs to your home or garden, especially if you’re limited on space. Not only will you have a fresh supply of mint for all your culinary needs, but you’ll also be doing your part for the environment by repurposing plastic waste. Plus, growing your own mint can be a fun and rewarding DIY project that adds beauty and functionality to any space.
So, gather your materials and get started on this hanging garden project today! You’ll have fresh mint growing in no time, all while contributing to a greener planet.
Hashtags: #MintGarden #UpcycledGarden #EcoFriendlyGardening #SustainableLiving #RecycledPlanters #UrbanGardening #DIYPlantProjects #GardeningOnABudget