
Anise, also known as Pimpinella anisum, is a popular herb prized for its fragrant seeds that taste like licorice. Not only is anise a culinary gem, but it’s also known for its medicinal properties and beautiful, delicate white flowers. With its manageable size and simple growing requirements, it can be cultivated in small spaces, making it an ideal candidate for pot gardening. If you’ve been wanting to grow your own spices at home, anise is a fantastic place to start. Here’s everything you need to know about growing anise in pots from seed to spice!
Why Grow Anise at Home?
Before we dive into the step-by-step guide, let’s look at why growing anise at home is a great idea.
- Versatile Spice: Anise seeds are commonly used in baking, cooking, and even beverages. Its sweet, aromatic flavor enhances many dishes.
- Medicinal Benefits: Anise is used in herbal medicine for its digestive, anti-inflammatory, and antifungal properties. Growing your own ensures you have a fresh supply for teas and remedies.
- Attractive Plant: Beyond its utility as a spice, anise is an aesthetically pleasing plant with delicate, feathery leaves and umbrella-shaped clusters of white flowers. It adds a decorative element to your home or garden.
- Easy to Grow in Pots: Anise has relatively simple care needs, making it easy to grow in containers for those with limited space. It doesn’t require constant maintenance or specific conditions, so it’s perfect for beginners.
Now that you know why growing anise is worth it, let’s move on to the practical steps for growing this aromatic plant in pots.
Step 1: Selecting the Right Pot and Soil
Choosing the right container and soil mix is crucial for healthy plant growth.
- Container Size: Anise requires a deep pot, at least 12 inches deep, to accommodate its long taproot. The width should be about 8-12 inches to allow enough space for the roots to spread.
- Drainage: Ensure the pot has adequate drainage holes. Anise doesn’t like standing water, and poor drainage can lead to root rot.
- Soil Mix: Use a light, well-draining potting mix. You can enhance the soil by mixing in organic compost for added nutrients. Anise thrives in slightly acidic to neutral soil with a pH between 6.0 and 7.0.
Step 2: Sowing Anise Seeds
Anise is best grown from seeds, as it doesn’t transplant well. Here’s how to get started:
- When to Plant: Sow anise seeds in early spring after the last frost has passed. Anise needs warm soil temperatures (around 70°F or 21°C) to germinate.
- Planting Depth: Sow the seeds about 1/4 inch deep into the soil. If you’re using a larger pot, plant several seeds, spaced 6 inches apart, to allow room for each plant to grow.
- Watering: After sowing, water the soil gently to moisten it. Keep the soil consistently moist until the seeds germinate, which usually takes about 7-10 days.
Step 3: Sunlight and Positioning
Anise loves full sunlight and requires at least 6 hours of direct sunlight each day.
- Best Location: Place the pot in a sunny spot, like a balcony, patio, or windowsill that gets plenty of light. The more sun anise receives, the better it will grow and produce flavorful seeds.
- Indoors or Outdoors: Anise can be grown indoors if you have a sunny windowsill or under grow lights. However, it tends to grow more robustly outdoors in natural sunlight.
Step 4: Watering and Care
Anise is relatively low-maintenance but requires regular watering and a few care tips to thrive.
- Watering Frequency: Water the plant regularly, keeping the soil moist but not waterlogged. Anise prefers consistent moisture, especially during its growing period. However, be careful not to overwater.
- Mulching: You can add a layer of mulch around the plant to help retain soil moisture and keep the roots cool.
- Fertilizing: Anise doesn’t require heavy feeding, but adding a balanced organic fertilizer once a month can boost growth. Too much fertilizer can result in excessive foliage and fewer seeds, so keep it light.
Step 5: Thinning and Pruning
Once your anise seedlings have grown a few inches tall, it’s time to thin them out and manage their growth.
- Thinning: If you’ve planted multiple seeds in one pot, thin them out to ensure each plant has enough room to grow. Leave the strongest seedlings and gently remove the weaker ones.
- Pruning: Anise generally doesn’t need much pruning, but you can pinch off the tips of the plant to encourage bushier growth. This will also help the plant focus its energy on seed production rather than excessive foliage.
Step 6: Flowering and Pollination
Anise plants will start to produce flowers after a few months of growth.
- Flowering: The white, umbrella-shaped flowers of the anise plant will begin to bloom in the summer. These flowers are not only beautiful but also attract beneficial pollinators like bees.
- Pollination: Pollinators will help with seed formation. If you’re growing anise indoors, you may need to hand-pollinate the flowers using a small brush or cotton swab to transfer pollen between them.
Step 7: Harvesting Anise Seeds
The most exciting part of growing anise is the seed harvest. This typically occurs about 100 days after planting.
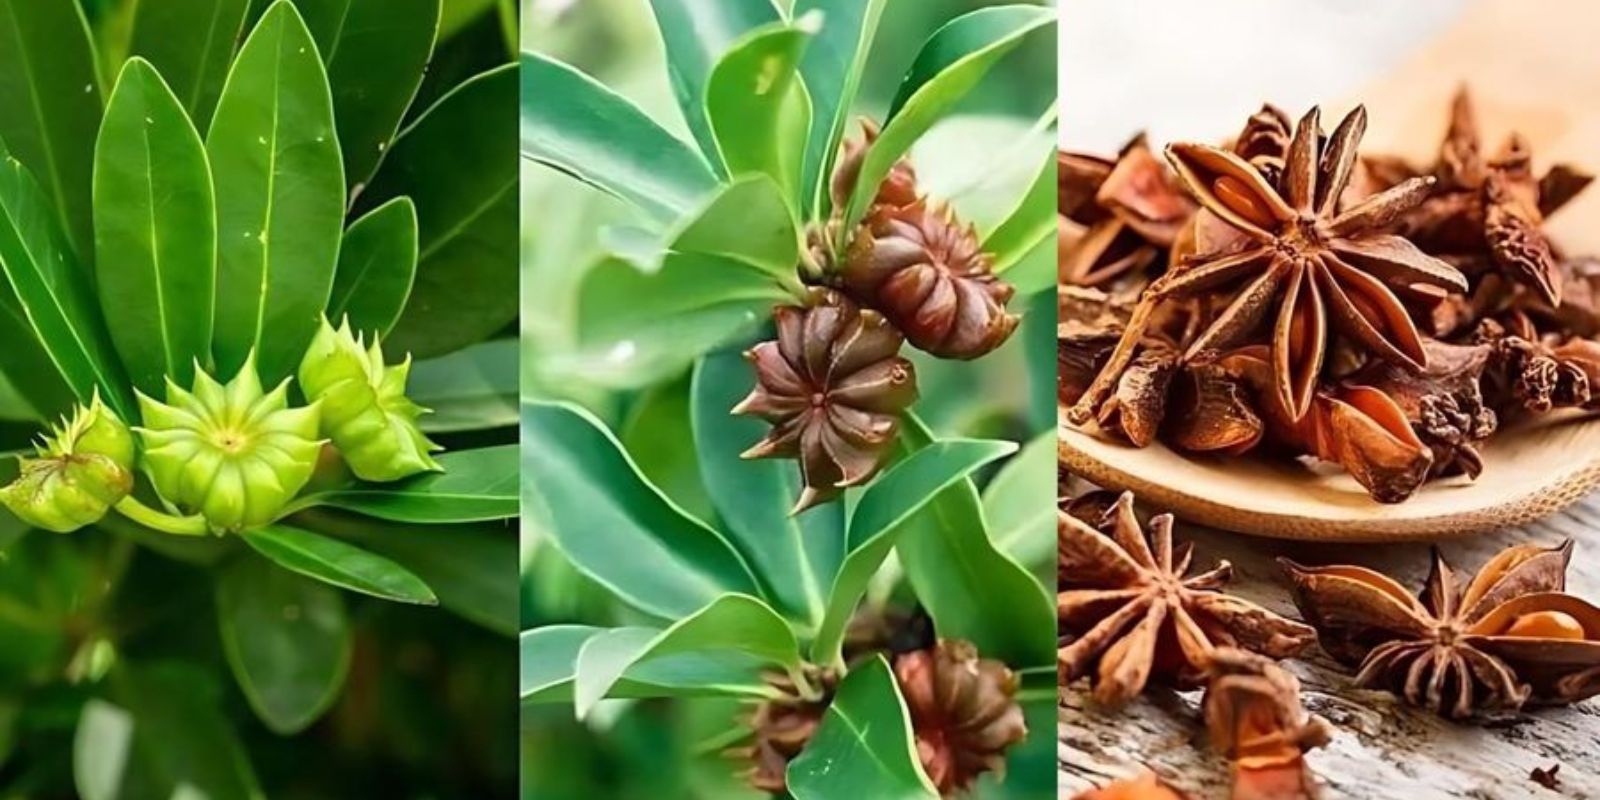
- When to Harvest: Anise seeds are ready to be harvested once the flowers have turned brown and dry. The seeds should be a light brown color and easy to remove from the flower heads.
- Harvesting Method: To harvest the seeds, cut the entire flower head from the plant and place it in a paper bag. Allow the seeds to fully dry in the bag for a week. Afterward, shake the bag to release the seeds from the flowers.
- Storage: Store the dried anise seeds in an airtight container. They can be used for cooking, baking, or planting for the next growing season.
Common Problems and Solutions
While anise is relatively easy to grow, it can encounter a few issues:
- Pests: Aphids and spider mites may occasionally attack anise plants. You can use insecticidal soap or neem oil to deter these pests.
- Diseases: Fungal diseases like powdery mildew can occur in humid conditions. Ensure proper air circulation around the plant and avoid overwatering.
- Poor Seed Production: If your anise plant produces a lot of leaves but few seeds, it could be due to over-fertilization. Stick to a light feeding schedule to encourage seed production.
Enjoying Your Anise Harvest
Now that you’ve successfully grown anise, it’s time to put it to good use!
- Culinary Uses: Anise seeds are commonly used in breads, cookies, and teas. You can also use the seeds in savory dishes, such as stews and curries, to add a sweet, licorice-like flavor.
- Medicinal Uses: Brew the seeds into a tea to help with digestion or relieve bloating. Anise has long been used as a natural remedy for coughs and colds.
Conclusion
Growing anise at home in pots is a rewarding and simple way to add fresh, aromatic spices to your culinary and medicinal toolkit. Whether you’re a seasoned gardener or a beginner, this guide offers all the steps you need to cultivate anise successfully. Now, it’s your turn—start planting and watch your fragrant spice garden thrive!
“Have you ever grown anise before? Share your gardening experiences and tips with us!”
#GrowYourSpices #AnisePlant #UrbanGardening #SpiceGardenGoals #OrganicHerbs #HomeGardening #DIYHerbGarden #LicoriceFlavors