
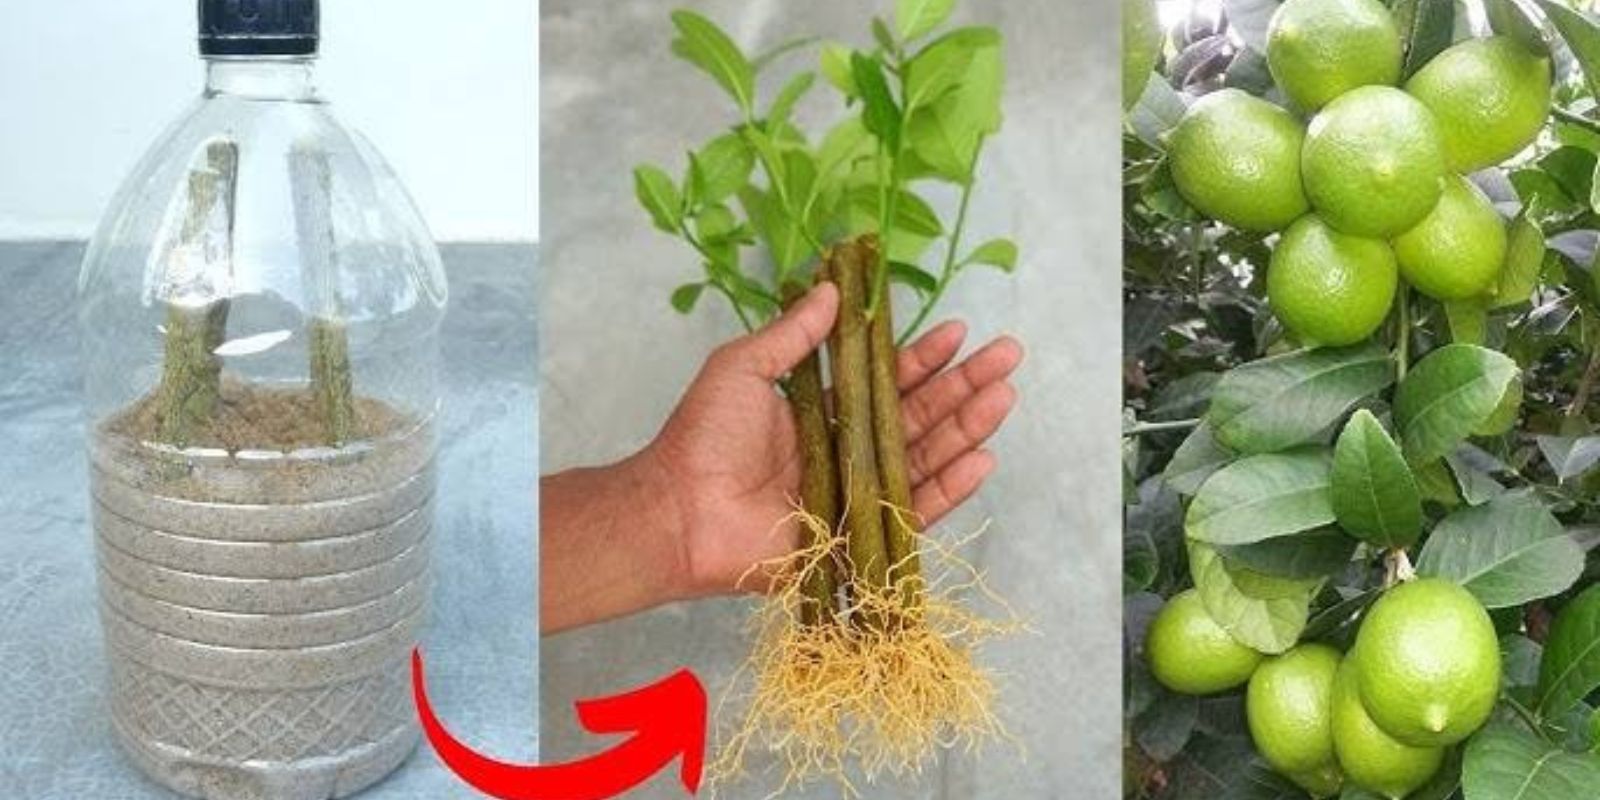
If you’ve ever dreamt of having your very own lemon tree, you’re in luck! Growing lemon trees from cuttings is one of the simplest ways to propagate your own fruit-bearing tree right at home. Whether you live in a sunny climate or want to bring a little bit of citrus joy to your indoor garden, propagating lemon trees from cuttings is a highly rewarding and efficient method. In this detailed guide, we’ll walk you through each step to ensure your success in growing healthy and fruitful lemon trees. So grab your gardening gloves, and let’s get started!
Why Grow Lemons from Cuttings?
Before diving into the step-by-step process, it’s important to understand why growing lemons from cuttings is an excellent method of propagation. While growing lemon trees from seeds is an option, it can take years for the tree to reach maturity and start bearing fruit. In contrast, taking cuttings from a healthy lemon tree gives you a much faster and more reliable route to success. The new tree will inherit the same traits as the parent tree, ensuring you grow a high-quality lemon tree with all the benefits of the original.
Growing from cuttings also ensures that your new tree is disease-resistant and adapted to your specific growing conditions. Additionally, lemon trees grown from cuttings have the potential to fruit within 2 to 3 years, while seed-grown trees can take up to 5 years or more to start producing fruit.
Step 1: Gather the Right Materials
The first step in propagating your lemon tree from cuttings is to gather all the necessary materials. Here’s a list of what you’ll need:
- Healthy lemon tree cuttings: Look for a healthy lemon tree (ideally 1 to 2 years old) from which you can take your cuttings. These should be about 6-8 inches long, and the stem should be firm and flexible, not too woody.
- Tissue paper or a damp cloth: This will help to keep the cuttings moist during the rooting process.
- Plastic bags or clear plastic containers: These will create a humid environment, which is critical for root development.
- Potting mix: Use a well-draining potting mix to transplant your cuttings once they’ve rooted.
- A small pot: To transplant the rooted cuttings.
Having everything on hand before you begin ensures a smooth process and helps you avoid unnecessary delays.
Step 2: Prepare the Cuttings
Once you’ve gathered your materials, it’s time to prepare your cuttings. Select a healthy, disease-free branch from your parent lemon tree. It should be about 6-8 inches long and have at least two or three leaves on it. The cuttings should not be too old and woody, as they won’t root as easily. Instead, focus on taking semi-hardwood cuttings—these are between the soft, green growth and older, woody branches.
Here’s how to prepare the cutting:
- Use clean, sharp scissors or pruning shears to make a clean cut at a slight angle, just below a leaf node (the point where a leaf meets the stem). This helps ensure that the cutting is fresh and has a better chance of rooting.
- Remove any leaves from the lower half of the cutting to prevent them from touching the soil and decaying, which could lead to rot.
- Trim the top leaves slightly to reduce water loss during the rooting process. This is especially important if you’re propagating during warmer months when the cuttings are more likely to dry out.
By preparing your cuttings properly, you’ll increase their chances of rooting successfully.
Step 3: Wrap with Tissue Paper to Keep Moist
The next step is to keep your cuttings hydrated. Moisten a piece of tissue paper or a clean cloth with water. Gently wrap it around the base of the cutting, where the roots will eventually form. The moisture will help maintain humidity, which is essential for rooting.
Ensure that the tissue paper is not too wet—just enough moisture to keep it damp without dripping. The goal is to maintain consistent moisture levels around the cutting, which encourages root development while preventing the cutting from drying out.
Step 4: Create a Humid Environment
Creating a humid environment is one of the most important factors for successful propagation. Once your cuttings are wrapped in tissue paper, place them inside a clear plastic bag or a plastic container with a lid. This will trap moisture and heat, mimicking the conditions of a greenhouse.
Here are some tips for maintaining humidity and temperature:
- Place the plastic bag or container in a warm, bright location, but avoid direct sunlight. Direct sun could cause the cuttings to overheat and dry out.
- Monitor the humidity levels by checking the bag or container daily. If the inside feels dry, lightly mist the cuttings with water to keep the environment humid.
The goal is to maintain warmth and humidity without letting the cuttings become too soggy, which could cause them to rot.
Step 5: Monitor Growth and Root Development
After you’ve set up your cuttings in the humid environment, it’s time to wait and watch for root development. Be patient! This can take anywhere from a few weeks to a couple of months, depending on the conditions.
During this time, keep an eye on the cuttings to check for the following signs:
- Root growth: The cuttings should begin to form roots after a few weeks. Gently tug on the cutting to check for resistance—if it resists, it means the roots are growing.
- New leaf growth: As the roots develop, you may start to see new growth from the top of the cutting. This is another sign that the cutting is rooting successfully.
It’s important to be patient during this process. You don’t want to rush it or disturb the cuttings too much, as they need time to establish roots.
Step 6: Transplant into Pots
Once your lemon cuttings have rooted and begun to show new growth, it’s time to transplant them into pots. Gently remove the cuttings from the plastic bag or container, and carefully check the roots. If they’re healthy and well-formed, it’s time to plant your cuttings into a small pot with well-draining potting mix.
Here’s how to transplant your rooted lemon cuttings:
- Prepare the pot: Choose a small pot (about 4 to 6 inches in diameter) and fill it with a well-draining potting mix.
- Plant the cutting: Dig a small hole in the center of the pot and place the cutting in, making sure the roots are spread out.
- Press the soil gently around the base of the cutting to ensure good soil contact with the roots.
After transplanting, water the newly potted cutting lightly to settle the soil around the roots. Make sure not to overwater, as this can cause the roots to rot. Place the pot in a warm, sunny location but keep it out of direct sunlight until the plant is established.
Step 7: Care for New Plants
Now that your lemon cutting is established in a pot, it’s time to care for your new plant. Here are some important tips for growing your lemon tree:
- Watering: Keep the soil consistently moist, but not soggy. Water the plant deeply whenever the top inch of soil feels dry to the touch.
- Sunlight: Lemon trees thrive in bright, indirect sunlight. If you’re growing the tree indoors, ensure it gets at least 8 hours of sunlight per day. A south-facing window is ideal.
- Fertilizing: Feed your lemon tree with a balanced, slow-release fertilizer every few months during the growing season. This will help promote healthy growth and fruit production.
- Pruning: As the tree grows, prune it regularly to maintain a bushy, compact shape. Cut back any dead or unhealthy branches to keep the tree healthy.
With proper care, your lemon tree will begin to grow stronger and more vibrant, eventually producing fruit!
Conclusion: Successfully Grow Lemon Trees from Cuttings
Growing lemon trees from cuttings is an easy and cost-effective way to enjoy fresh, homegrown lemons. By following these simple steps—gathering materials, preparing the cuttings, wrapping them with tissue paper, creating a humid environment, monitoring growth, transplanting into pots, and providing proper care—you’ll have your own thriving lemon tree in no time.
Propagating lemon trees from cuttings can be a fun and rewarding gardening project. Whether you’re a beginner or an experienced gardener, you’ll find that the effort is well worth it when you harvest your first batch of juicy, homegrown lemons. Happy gardening!
Are you ready to start growing your own lemon tree from cuttings? Follow this guide and start your gardening journey today! 🍋🌱 #LemonTree #PlantPropagation #HomeGrownLemons #GardeningTips #DIYGardening #SustainableGardening #LemonLove