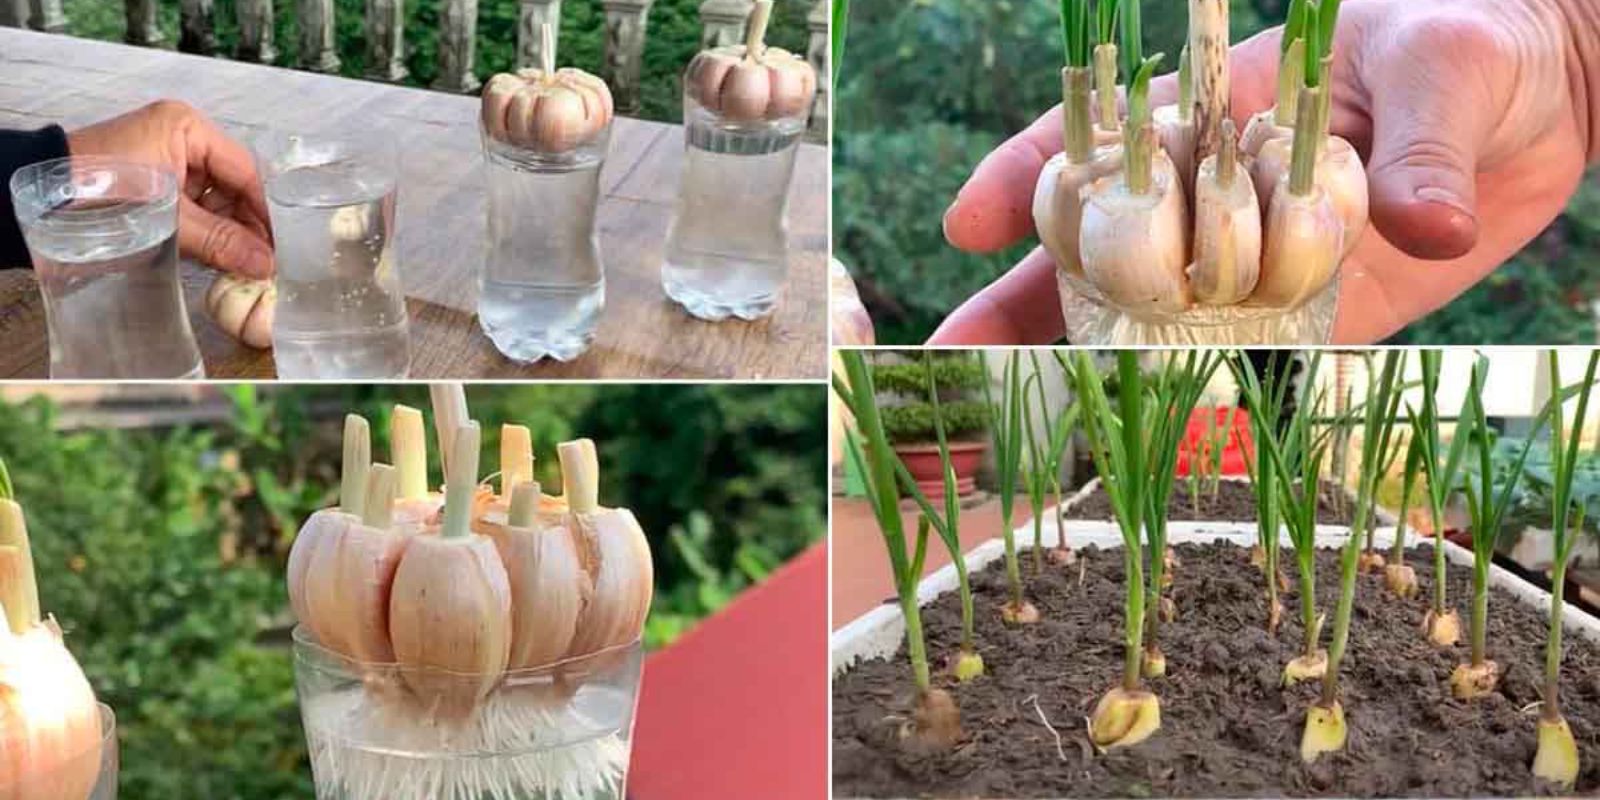
Garlic is a kitchen staple and a beloved ingredient in cuisines worldwide. But did you know that you can grow garlic right at home, even if you don’t have soil or a garden? Growing garlic in water is an incredibly easy and fascinating way to cultivate this flavorful herb while adding a touch of greenery to your living space. Whether you’re looking for fresh garlic greens or simply want to enjoy the joy of watching plants grow, this method is perfect for beginners and seasoned gardeners alike.
Why Grow Garlic in Water?
Growing garlic in water offers several advantages:
- Space-Saving: It’s an ideal option for small spaces or apartments.
- Low Maintenance: No need to worry about soil, fertilizers, or weeds.
- Quick Results: You can see sprouting within a few days.
- Eco-Friendly: A great way to reuse leftover garlic cloves that might otherwise go to waste.
This guide will walk you through the step-by-step process of growing garlic in water, from selecting the right cloves to harvesting your greens.
Step 1: Choose the Right Garlic Cloves
The first and most crucial step is selecting the best garlic cloves for growing.
- Look for fresh, large cloves with no signs of mold or shriveling.
- If possible, choose organic garlic, as non-organic cloves may be treated with chemicals that inhibit sprouting.
- Separate the cloves from the bulb, but avoid peeling off their protective skin.
Tip: Save smaller cloves for cooking and reserve the largest ones for planting.
Step 2: Prepare Your Container
You don’t need fancy equipment to grow garlic in water—a simple glass, jar, or small container will do.
- Ensure the container is clean and transparent so you can monitor water levels and root growth.
- Fill the container with enough water to just cover the base of the garlic cloves. Avoid submerging them entirely, as this can cause rot.
Ideal Containers: Shot glasses, small mason jars, or shallow bowls work perfectly for this project.
Step 3: Position the Cloves Correctly
Place the cloves in the container with the pointed side facing up and the flat root end touching the water. This orientation is essential for proper sprouting and root development.
Step 4: Provide the Right Environment
Garlic cloves thrive in a sunny spot with indirect light. Place the container on a windowsill or countertop that receives natural light.
- Aim for 6-8 hours of light daily.
- Maintain a room temperature between 65°F and 75°F (18°C to 24°C).
Step 5: Change Water Regularly
To keep the cloves healthy and prevent mold or bacteria buildup, change the water every 2-3 days.
- Use room-temperature water to avoid shocking the cloves.
- Rinse the cloves gently before placing them back in fresh water.
Pro Tip: Adding a few drops of hydrogen peroxide to the water can help prevent microbial growth.
Step 6: Monitor Growth
Within a few days, you’ll notice tiny roots sprouting from the base of the cloves. Shortly after, green shoots will start to emerge from the top. These garlic greens are not only beautiful but also edible and packed with flavor.
- Week 1: Roots develop, and green shoots appear.
- Week 2-3: The greens grow taller and can be harvested.
Step 7: Harvesting Garlic Greens
The garlic greens are ready to be harvested when they are about 6-8 inches tall. Use clean scissors to snip the greens, leaving at least 2 inches so they can regrow.
- Add the greens to salads, soups, or as a garnish for a fresh garlic flavor.
Note: While growing garlic in water produces greens quickly, it is unlikely to yield full bulbs. For bulb production, garlic needs soil and several months of growth.
Optional Step: Transition to Soil
If you want to grow garlic bulbs, you can transplant the sprouted cloves into a pot or garden bed with soil.
- Choose nutrient-rich, well-draining soil.
- Plant the cloves with the green shoots above the soil line.
- Water regularly and provide full sun.
Common Challenges and Solutions
- Cloves Rotting in Water:
- Ensure only the root end touches the water.
- Change the water frequently to prevent bacterial buildup.
- Slow or No Growth:
- Use fresh, organic cloves.
- Provide adequate light and maintain optimal temperature.
- Foul Odor:
- Rinse the cloves and clean the container thoroughly.
The Benefits of Growing Garlic in Water
- Fresh Greens Anytime: Garlic greens are a delicious and nutritious addition to your meals.
- Educational Fun: This method is an excellent way to teach kids about plant growth.
- Sustainable Living: It’s a simple way to reduce food waste by using leftover garlic cloves.
Get Creative with Your Garlic Project
Growing garlic in water doesn’t just have to be a practical gardening activity—it can also be a decorative one!
- Arrange multiple cloves in a stylish jar or vase for a unique indoor garden.
- Use colored glass containers to add a pop of color to your windowsill.
Why You Should Try This Today
Growing garlic in water is a rewarding experience that requires minimal effort and resources. Whether you’re a gardening enthusiast or a beginner, this project is a great way to enjoy fresh greenery, learn about plant growth, and add a sustainable touch to your home.
Conclusion
Now that you know how easy it is to grow garlic in water, why not give it a try? This simple project will bring life to your kitchen or living space and reward you with fresh, flavorful garlic greens. Plus, it’s an excellent conversation starter and a fun way to experiment with hydroponic gardening.
Are you ready to grow your garlic? Share your progress or tips in the comments below! 🌱
Hashtags for Sharing Your Experience:

