
In the world of gardening, maintaining the right amount of moisture for your plants can be a daunting task, especially if you have a busy schedule or live in a hot climate. Overwatering can be just as detrimental as underwatering, leading to root rot or stunted growth. Thankfully, a DIY water reservoir for your planters can simplify this process and ensure your plants receive consistent hydration. In this comprehensive guide, we will walk you through the steps to create an efficient water reservoir system for your garden planters, providing you with the tools and knowledge to enhance your gardening experience.
Introduction
Watering your plants correctly is crucial for their health and growth. A DIY water reservoir system can save you time and effort while providing your plants with a steady supply of moisture. This simple yet effective solution is particularly useful for container gardening, where plants often rely entirely on you for their water needs. By building your own water reservoir, you can ensure that your plants get the optimal amount of water they need to thrive, reducing the need for daily attention and preventing common watering issues.
Materials Needed
Before you get started, gather the following materials:
- Plastic Container or Bucket: A large container that will act as the main reservoir for the water.
- Smaller Plastic Pot: A pot that will hold your plants and fit inside the larger container.
- Drill: For making holes in the containers.
- Plastic Tubing or Wick: To connect the water reservoir to the plant pot.
- Soil and Plants: For planting in your system.
Step-by-Step Instructions
Step 1: Gather Materials
Start by gathering all the necessary materials. You’ll need a plastic container large enough to hold a sufficient amount of water and a smaller pot that will fit inside it. The plastic tubing or wick will be used to transfer water from the reservoir to the plant pot.
Materials List:
- Large plastic container or bucket (capacity depends on the size of your planters)
- Smaller plastic pot (should fit inside the large container)
- Drill with appropriate drill bits
- Plastic tubing or wick
- Soil and plants for planting
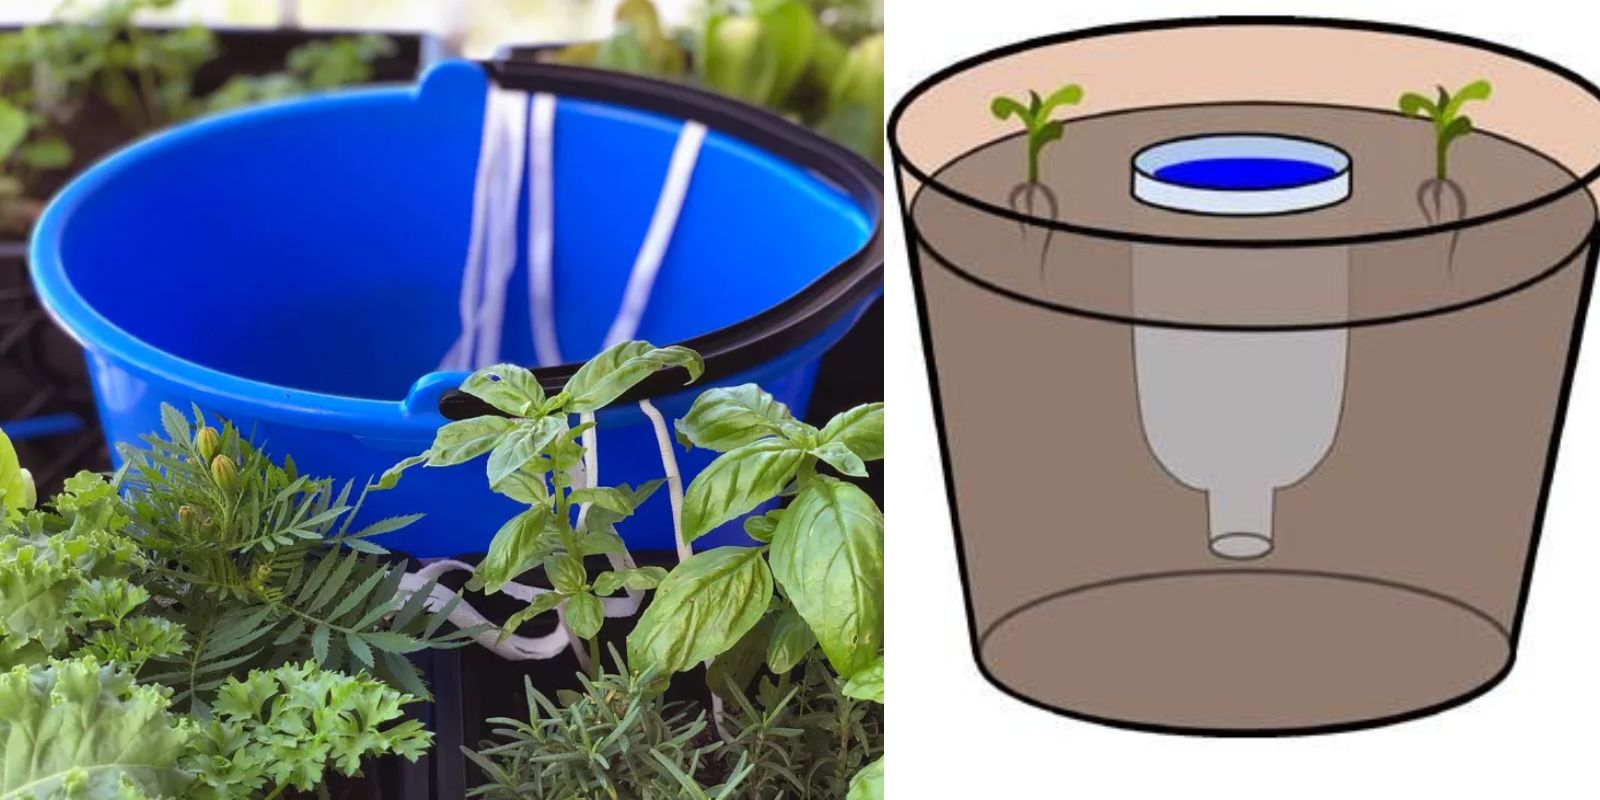
Step 2: Drill Holes
Use a drill to make holes in both the smaller plastic pot and the side of the larger container. The holes in the smaller pot should be placed in the bottom and should be large enough to allow water to pass through. The holes in the larger container should be positioned near the bottom, where the water will be drawn from.
Holes in Smaller Pot:
- Bottom: Create several holes to allow water to seep into the soil.
- Side: Optional, for additional drainage if needed.
Holes in Larger Container:
- Side: Drill a hole near the bottom for the tubing or wick to connect to.
Step 3: Install the Reservoir System
Place the smaller plastic pot inside the larger container. Ensure that the holes in the smaller pot align with the water reservoir below. Attach the plastic tubing or wick to the hole in the larger container, making sure it reaches the bottom of the smaller pot. The tubing or wick should be long enough to draw water up into the smaller pot where your plants will be planted.
Tubing/Wick Installation:
- Insert one end of the tubing or wick into the hole in the larger container.
- Ensure the tubing or wick extends down to the bottom of the container to access the water.
- Secure the tubing or wick in place if necessary.
Step 4: Add Water
Fill the larger container with water. The tubing or wick will draw water up into the smaller pot as needed, providing a steady supply of moisture to the plants. Be sure to check the water level periodically and refill the larger container as necessary.
Watering Instructions:
- Fill the larger container with water to a level where the tubing or wick is submerged.
- Monitor the water level and refill as needed to maintain a consistent supply.
Step 5: Plant and Monitor
Place your plants in the smaller pot, ensuring that the soil is well-moistened. The water reservoir will help maintain consistent moisture levels, reducing the need for frequent watering. Monitor your plants to ensure they are thriving and adjust the water level as needed.
Planting Instructions:
- Fill the smaller pot with soil and plant your chosen plants.
- Ensure the soil is evenly moist and well-drained.
- Observe plant growth and adjust water levels as needed.
Benefits of a DIY Water Reservoir
Creating a DIY water reservoir for your planters offers several advantages:
- Consistent Moisture: Ensures that plants receive a steady supply of water, reducing the risk of over- or under-watering.
- Reduced Maintenance: Minimizes the need for frequent watering, saving time and effort.
- Improved Plant Health: Promotes healthy root development and overall plant growth.
- Water Conservation: Helps to use water more efficiently, which is beneficial for both the environment and your water bill.
Tips for Success
- Use Quality Materials: Ensure that the plastic container and pot are durable and suitable for outdoor use.
- Adjust for Plant Size: Use appropriately sized containers and reservoirs based on the size and number of plants.
- Monitor Water Levels: Regularly check the water level in the larger container to prevent the reservoir from running dry.
- Maintain Cleanliness: Keep the reservoir system clean to prevent algae growth and other issues that could affect plant health.
Troubleshooting Common Issues
- Clogged Tubing/Wick: If the water flow is slow, check for clogs in the tubing or wick. Clean or replace as needed.
- Excessive Algae Growth: Prevent algae growth by covering the top of the larger container with a lid or dark material to block sunlight.
- Imbalanced Watering: Adjust the length of the tubing or wick to ensure even water distribution.
Conclusion
Building a DIY water reservoir for your planters is a practical and effective way to simplify plant care and ensure consistent moisture. By following these steps and incorporating the tips provided, you can create a reliable watering system that supports healthy plant growth and reduces the time spent on routine watering. Enjoy the benefits of a well-maintained garden with less effort, and watch your plants thrive with the help of your homemade water reservoir.
Get started on your DIY water reservoir today and transform your gardening routine! 🌿💧 #DIYPlanter #WaterReservoir #GardenHacks #EfficientWatering #GreenThumb #HomeGardening #PlantCare #SustainableLiving #GardeningTips #SmartGardening