
Introduction
For gardeners looking to simplify their plant care routine or conserve water, self-watering containers offer the perfect solution. These ingenious systems allow plants to absorb moisture as needed, reducing the risk of overwatering or underwatering. Whether you have a busy schedule, live in a hot climate, or simply want to grow healthier plants, creating DIY self-watering containers is a game-changer. This article will guide you through the benefits, materials, and step-by-step process to build your own self-watering garden setup.
Why Choose Self-Watering Containers?
- Consistent Hydration:
Plants absorb water as needed through capillary action, reducing stress caused by inconsistent watering. - Water Conservation:
Less water is wasted through evaporation or runoff, making it an eco-friendly choice for your garden. - Time-Saving:
No need to water your plants daily—simply refill the reservoir every few days or weeks. - Healthier Plants:
Prevent root rot, fungal diseases, and other issues caused by overwatering.
Materials You’ll Need
Before diving into the project, gather these materials:
- A large container (plastic bin, bucket, or tub)
- A smaller container to fit inside (or a planting insert)
- A wicking material (fabric, rope, or absorbent cloth)
- A PVC pipe or tubing for water refilling
- A drill or sharp tool for making holes
- Potting soil and plants of your choice
Step-by-Step Guide to Building a Self-Watering Container
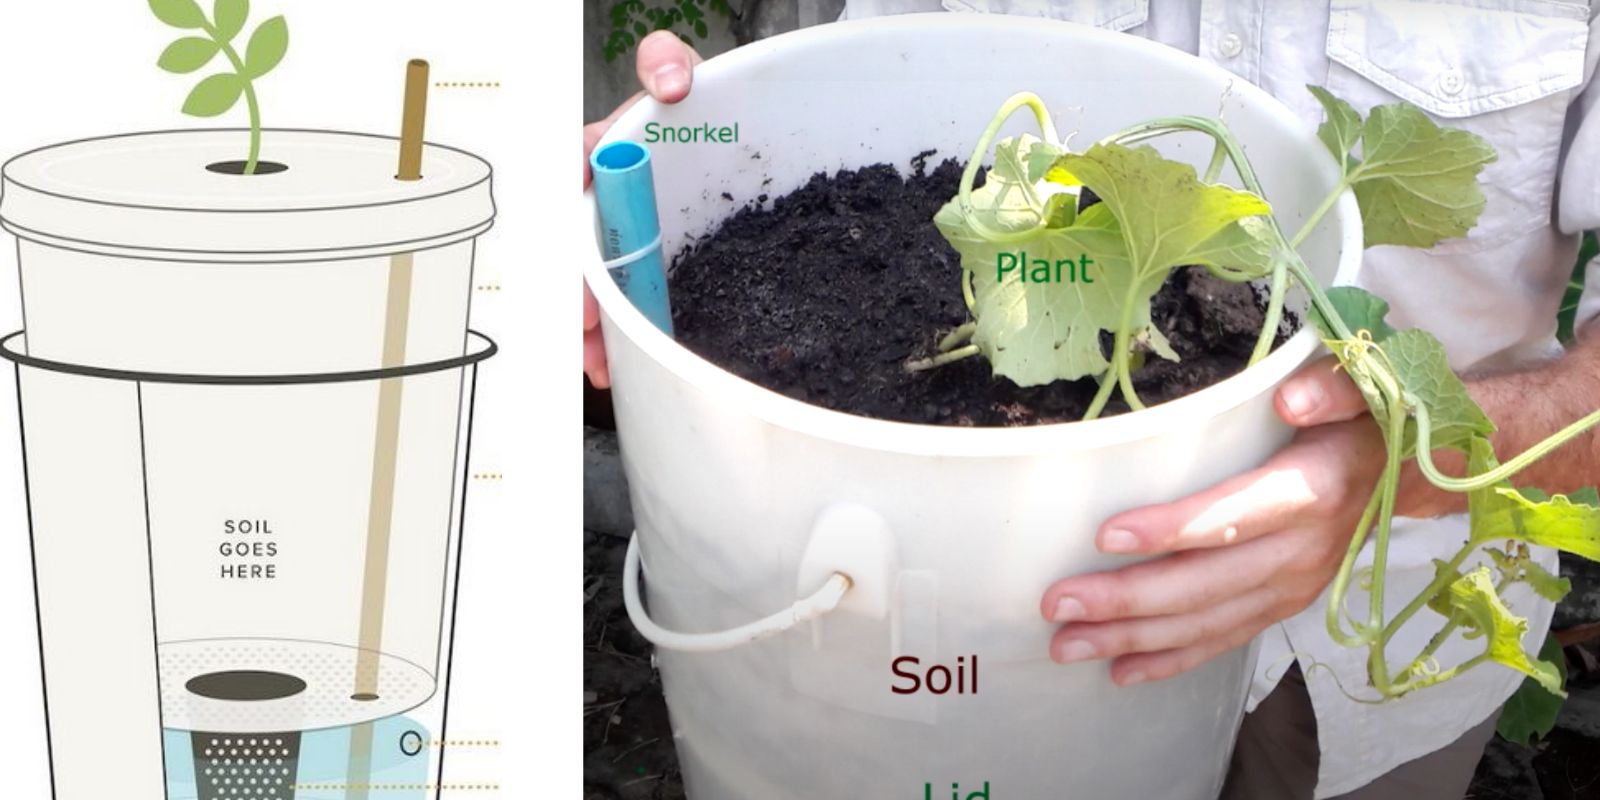
Step 1: Create the Water Reservoir
The water reservoir is the heart of a self-watering container. Choose a large container to act as the base. Drill a small overflow hole near the top of the reservoir to prevent overfilling.
Step 2: Add a Wicking System
Cut a hole in the smaller planting insert or container that will sit above the reservoir. Place your wicking material (such as fabric or rope) through the hole, ensuring it touches the water in the reservoir below. The wick will draw water upward to the soil.
Step 3: Install the Water Refill Tube
Attach a PVC pipe or similar tubing to one corner of the reservoir. This tube will allow you to refill the water easily without disturbing the plants. Ensure it reaches the bottom of the reservoir for efficient filling.
Step 4: Assemble the Container
Position the smaller container with the wick inside the larger container (reservoir). Ensure the wick is properly placed to transfer water to the soil.
Step 5: Add Soil and Plants
Fill the smaller container with high-quality potting soil, ensuring it’s lightly compacted around the wick for good contact. Plant your seeds or seedlings as you would in any regular pot.
Step 6: Fill the Reservoir and Monitor
Pour water through the refill tube until it reaches the overflow hole. Check the water level regularly and refill as needed.
Pro Tips for Success
- Use Lightweight Soil:
Choose soil designed for containers to avoid compaction, which can hinder water movement. - Monitor the Wick:
Ensure the wick stays in good contact with the soil and water; replace it if it wears out over time. - Choose Appropriate Plants:
Self-watering containers work well for vegetables, herbs, and flowers that prefer consistent moisture. - Consider Mulching:
Adding a layer of mulch on top of the soil helps retain moisture and reduces the frequency of reservoir refills.
Benefits of DIY Self-Watering Containers
- Ideal for Urban Gardens:
Perfect for balconies, patios, or small spaces, these containers allow you to grow plants without traditional garden beds. - Low Maintenance:
Great for vacationers or those with busy lifestyles, as they require less frequent watering. - Cost-Effective:
Recycle and repurpose household items like buckets, tubs, or old planters to create your self-watering system. - Environmentally Friendly:
Reduces water waste while supporting sustainable gardening practices.
Common Mistakes to Avoid
- Using Improper Wicking Materials:
Ensure the wick is absorbent enough to transfer water effectively. - Not Drilling an Overflow Hole:
Skipping this step can lead to waterlogging, harming plant roots. - Overfilling the Reservoir:
Always leave room for air circulation to prevent stagnant water and odors. - Choosing the Wrong Plants:
Some plants, like succulents, prefer drier soil and are not suitable for self-watering containers.
Engage with Your Garden Community!
Have you tried creating self-watering containers? Share your experiences, tips, or pictures of your thriving plants! Let’s inspire each other to grow smarter and greener. 🌿💧
#SelfWateringContainers #GardeningMadeEasy #EcoFriendlyGardening #DIYProjects #UrbanGardening