
Creating a raised garden bed is one of the most rewarding gardening projects you can undertake. Raised beds not only enhance the aesthetics of your garden but also improve soil quality, drainage, and accessibility. If you’re looking to start your gardening adventure or want to expand your existing garden, consider building your own raised garden bed using materials that are easy to find and budget-friendly. This guide will provide you with creative DIY ideas, step-by-step instructions, and tips to ensure your raised garden bed thrives.
Why Choose Raised Garden Beds?
Raised garden beds offer numerous benefits for gardeners, including:
- Improved Drainage: Elevated beds allow excess water to drain away more easily, reducing the risk of waterlogged roots and soil compaction.
- Enhanced Soil Quality: You have full control over the soil mix you use, enabling you to create the perfect growing environment for your plants.
- Easier Access: Raised beds make it easier to reach your plants, reducing the need to bend down or kneel, which is particularly beneficial for those with mobility issues.
- Pest Control: Elevated beds can deter some pests, and the design makes it easier to install barriers if needed.
- Extended Growing Season: The soil in raised beds warms up faster in the spring, allowing you to plant earlier and extend your growing season.
- Aesthetic Appeal: Raised beds can add a beautiful structure to your garden and can be designed to fit any landscape.
Materials for Your Raised Garden Bed
Before you get started, gather your materials. Here are some easy-to-find options:
1. Wooden Pallets
Why Use Pallets?
- Wooden pallets are often discarded by businesses, making them a cost-effective choice.
- They provide a rustic look and can be easily repurposed.
How to Use Them:
- Choose pallets that are in good condition, without cracks or excessive wear.
- Disassemble them carefully to create side panels, or use them whole by stacking them to the desired height.
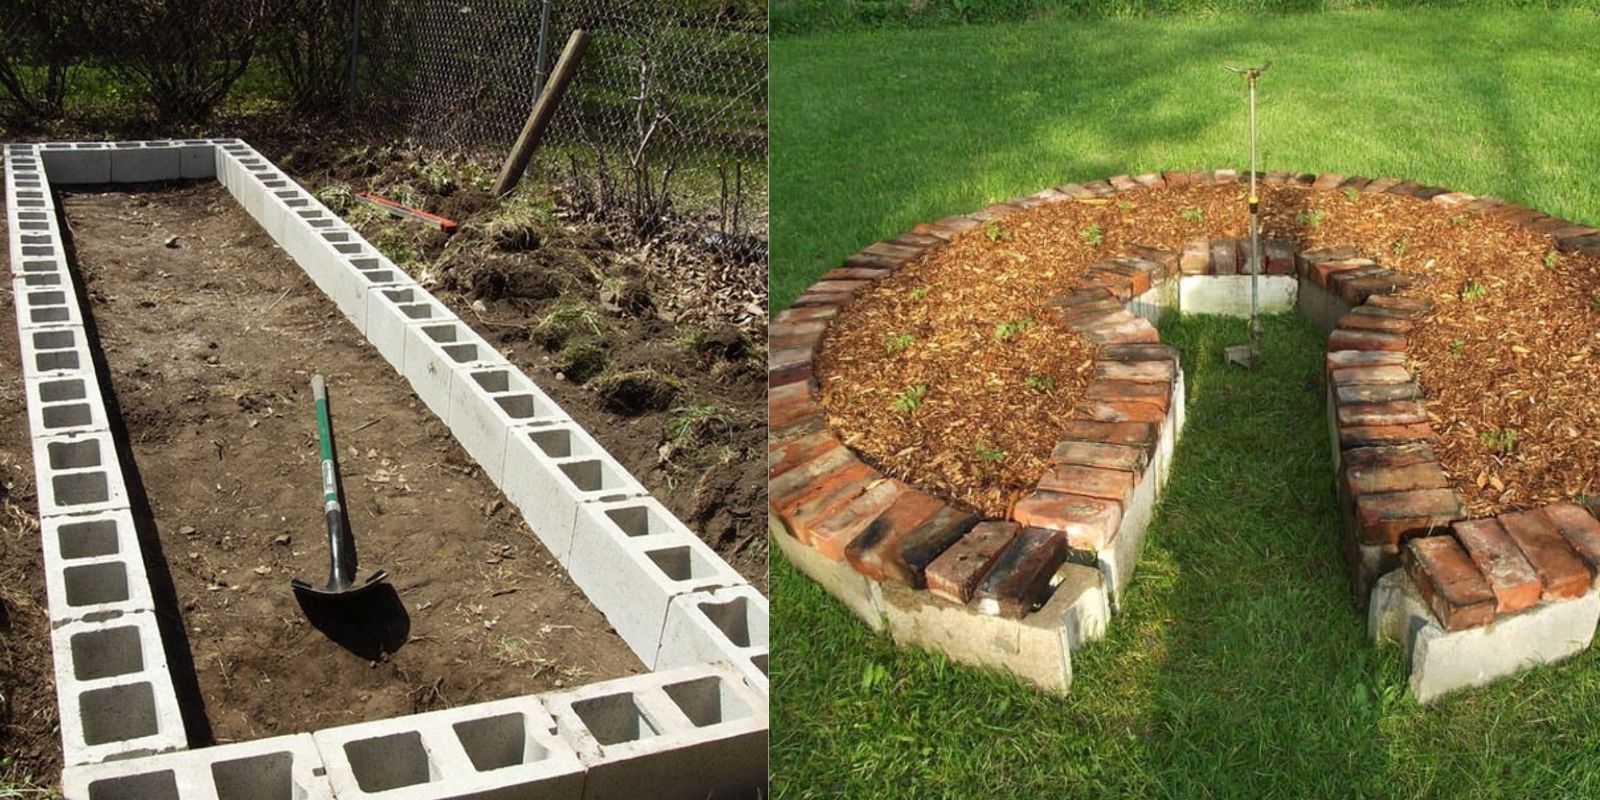
2. Cinder Blocks
Why Use Cinder Blocks?
- Cinder blocks are durable, inexpensive, and readily available at home improvement stores.
- They allow for excellent drainage and can be used creatively.
How to Use Them:
- Stack the blocks in a rectangular or square shape, leaving holes for planting if desired.
- You can even fill the holes with soil and plant herbs or flowers for added visual interest.
3. Old Tires
Why Use Tires?
- Old tires are often discarded and can be repurposed in creative ways.
- They are durable and can be stacked for height.
How to Use Them:
- Stack one or two tires and fill them with soil. You can paint them for added color or leave them as-is for a rustic look.
- Consider using tires in your garden as a whimsical touch.
4. Wooden Crates
Why Use Crates?
- Wooden crates are often available at local markets or stores and can be used to create small, portable raised beds.
How to Use Them:
- Simply place the crate on the ground, fill it with soil, and plant your desired seeds or seedlings.
- Crates are perfect for herbs or small vegetable gardens.
5. Recycled Lumber
Why Use Lumber?
- If you have leftover lumber from previous projects, it’s a great way to save money and reduce waste.
- Recycled wood is sturdy and can be cut to size.
How to Use It:
- Cut the lumber to your desired dimensions and construct a rectangular frame.
- Secure the corners with screws or nails, and ensure the structure is level.
Step-by-Step Instructions to Build a Raised Garden Bed
Now that you have your materials, follow these steps to create your raised garden bed:
Step 1: Choose Your Location
- Select a spot in your yard that receives at least 6-8 hours of sunlight each day.
- Ensure the area is level and has good drainage to prevent water from pooling.
Step 2: Prepare the Ground
- Clear the area of grass, weeds, and debris.
- If using wood, consider laying down landscaping fabric or cardboard to suppress weeds from growing up through your bed.
Step 3: Assemble Your Raised Bed
- Wooden Pallets: Stand them upright and secure the corners using screws or nails. You can use multiple pallets to achieve your desired height.
- Cinder Blocks: Stack them in the shape you want, ensuring they are level. Use construction adhesive if necessary to hold them in place.
- Old Tires: Stack them on top of each other and fill with soil, leaving the top tire exposed for planting.
- Wooden Crates: Position them side by side, and if you have multiple crates, secure them together using screws for stability.
- Recycled Lumber: Cut to size and create a rectangular frame, securing with screws or nails.
Step 4: Fill with Soil
- Use a quality soil mix, combining garden soil with compost and organic matter for improved fertility.
- Aim for a depth of at least 12-18 inches, depending on the types of plants you intend to grow.
Step 5: Plant Your Seeds or Seedlings
- Choose your favorite vegetables, herbs, or flowers. Consider companion planting for a thriving garden ecosystem.
- Follow planting instructions for each type of plant regarding spacing and depth.
Step 6: Water and Maintain
- Keep the soil consistently moist but not soggy, especially during the initial growth period.
- Add mulch on top to retain moisture and suppress weeds, and regularly check for pests or diseases.
Creative Design Ideas for Raised Garden Beds
- Tiered Raised Beds: Create a tiered effect with multiple levels for a stunning visual display. This design works well for herbs, flowers, or vegetables.
- Painted Beds: Add a pop of color to your garden by painting your raised bed in vibrant shades. Use non-toxic, water-based paint to ensure safety for your plants.
- Vertical Garden: Use a vertical design with shelves or trellises attached to the raised bed to grow climbing plants, such as peas or cucumbers, while maximizing space.
- Incorporate Seating: Design your raised bed to include built-in seating along one or more sides, making it a lovely gathering spot in your garden.
- Add Decorative Edging: Use stones, bricks, or other decorative materials to create an attractive border around your raised bed, enhancing its visual appeal.
Tips for Successful Raised Garden Beds
- Test Soil pH: Before planting, test the pH of your soil to ensure it’s suitable for the plants you want to grow. Most vegetables prefer a pH of 6.0 to 7.0.
- Rotate Crops: Practice crop rotation each year to prevent soil depletion and reduce the risk of pests and diseases.
- Consider Companion Planting: Some plants thrive when grown together. For example, plant marigolds alongside vegetables to deter pests.
- Mulch Regularly: Mulching helps retain moisture and suppress weeds, making it easier to maintain your garden bed.
- Water Wisely: Water your garden early in the morning or late in the afternoon to minimize evaporation. Consider using drip irrigation for efficient watering.
Conclusion
Building a raised garden bed using easy-to-find materials is a fantastic way to enhance your gardening experience. Not only do you gain control over your soil quality and drainage, but you also create a visually appealing space that can elevate your garden’s charm. With a little creativity and effort, you can have a thriving garden that provides fresh produce, beautiful flowers, or aromatic herbs.
Now is the perfect time to roll up your sleeves, gather your materials, and get started on your DIY raised garden bed project. Share your progress and results with fellow gardening enthusiasts using hashtags like #DIYGarden #RaisedGardenBed #GardeningIdeas #EcoFriendlyGardening. Happy gardening!