
Gardening enthusiasts and beginners alike are increasingly looking for alternative ways to grow their favorite plants. One such method, gaining popularity in both urban and rural settings, is hydroponics. Growing plants without soil is not only efficient but also space-saving, sustainable, and can yield healthier crops in a controlled environment. DIY hydroponics systems are easy to set up and maintain, even for those with minimal gardening experience. If you’re interested in growing vegetables, herbs, or fruits without the mess of soil, hydroponics may be your perfect solution.
In this article, we’ll explore the basics of hydroponics, the different types of hydroponic systems, and provide a step-by-step guide on how to set up your own DIY hydroponic system at home.
What is Hydroponics?
Hydroponics is a method of growing plants in a water-based, nutrient-rich solution, without the use of soil. In a hydroponic system, plants are grown in a medium such as perlite, clay pellets, or coconut coir, which supports their roots while allowing them to access water and nutrients directly. Unlike traditional gardening, which relies on soil to supply nutrients, hydroponic systems deliver nutrients directly to the roots, ensuring faster growth and higher yields.
Hydroponics is ideal for people living in apartments, small spaces, or places with poor soil quality. It’s also a sustainable way to grow food, as it uses up to 90% less water than traditional farming and eliminates the need for pesticides or herbicides.
The Benefits of Hydroponics
- Water Efficiency: Traditional farming methods use large amounts of water to irrigate crops. Hydroponics, however, uses a closed-loop system where the water is recirculated, drastically reducing water usage.
- Space-Saving: Hydroponic systems can be set up indoors or outdoors and are particularly suited for small spaces, like apartments or rooftops.
- Faster Plant Growth: Because plants get direct access to water and nutrients, they tend to grow faster than those planted in soil.
- Less Pesticide Use: With no soil, there’s less risk of pests and diseases, reducing the need for harmful chemicals.
- Higher Yields: Hydroponic systems often yield more produce per square foot than traditional gardening, making them ideal for small-scale urban farming.
Types of Hydroponic Systems
There are several types of hydroponic systems, each with its own benefits. Let’s take a look at some of the most common ones:
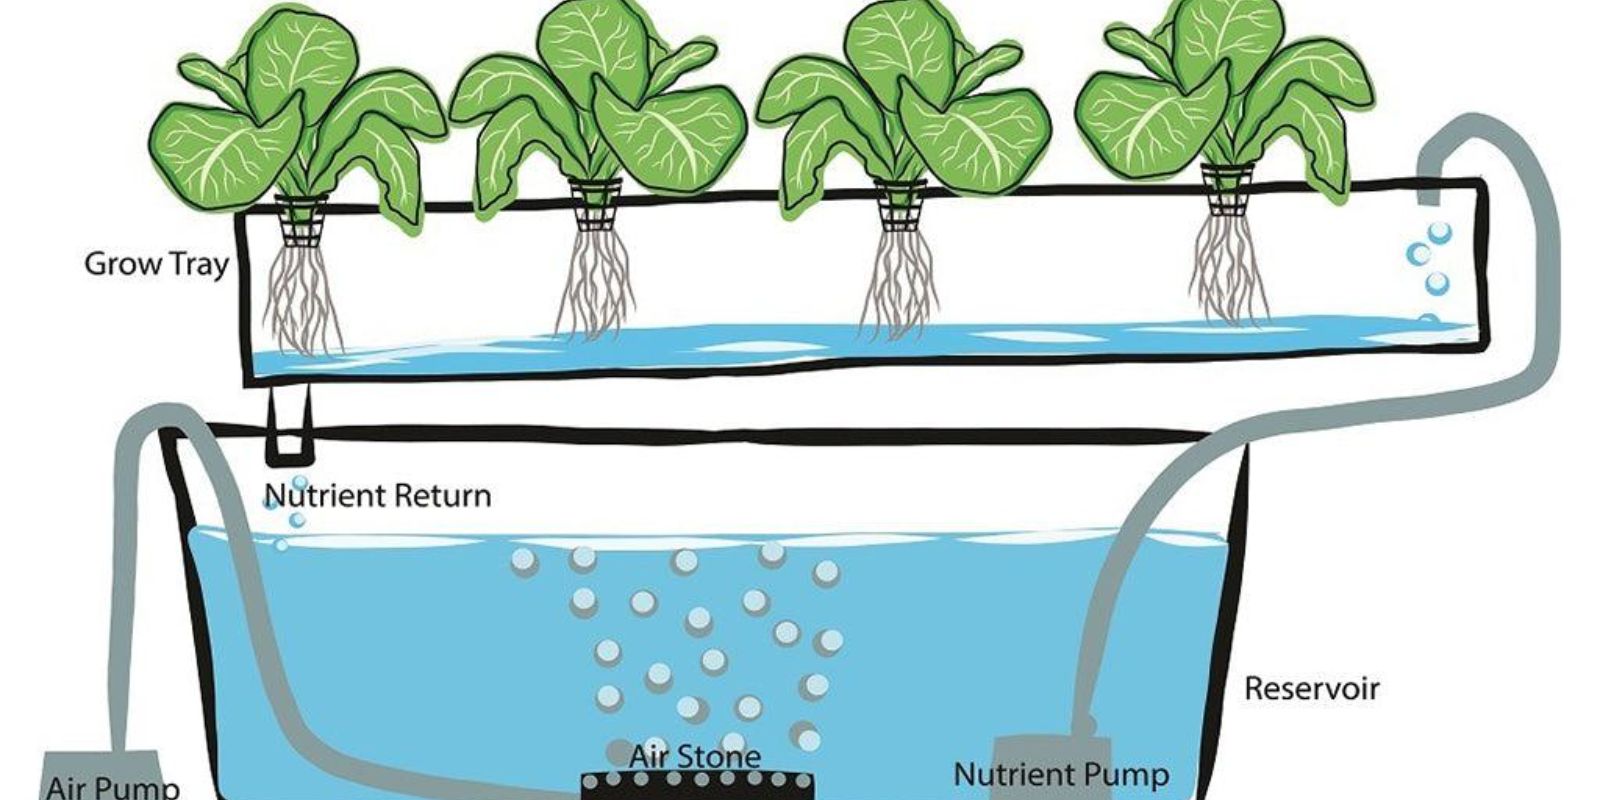
- Deep Water Culture (DWC): In a DWC system, plants are suspended in a nutrient-rich water solution. Air stones are used to oxygenate the water, providing plants with the necessary oxygen for root growth. This system is ideal for leafy greens like lettuce and herbs.
- Kratky Method: This passive system doesn’t require a pump or aerator. Instead, plants are placed in a water reservoir with their roots submerged. As the plants grow, the water level naturally decreases, allowing the roots to remain oxygenated. The Kratky method is perfect for beginners as it’s simple to set up and maintain.
- Wick System: This system uses a wick (such as a piece of rope) to draw the nutrient solution up from a reservoir to the plants. It’s one of the simplest hydroponic systems and works well for smaller, low-water plants like herbs or leafy greens.
- Nutrient Film Technique (NFT): In this system, a thin film of nutrient solution flows continuously over the roots of the plants, which are supported on a sloped channel. This method is ideal for plants that don’t need constant root immersion, such as tomatoes or cucumbers.
- Ebb and Flow System (Flood and Drain): This system works by periodically flooding the plant roots with nutrient solution and then draining the water back into a reservoir. This process provides plants with both nutrients and oxygen. It’s great for larger plants like strawberries and peppers.
Materials You Will Need for Your DIY Hydroponic System
Before you begin setting up your hydroponic garden, it’s important to gather the materials you will need. You don’t need to invest in expensive equipment — a DIY hydroponic system can be built with affordable and easy-to-find materials.
Basic Materials:
- Container or Reservoir: A large plastic container, tub, or tank will serve as your water reservoir.
- Net Pots: These small plastic pots will hold the plants in place while allowing the roots to grow down into the nutrient solution.
- Growing Medium: You’ll need an inert growing medium such as perlite, coconut coir, or hydroponic clay pellets. These mediums provide support for the plants and help retain moisture.
- Air Pump and Air Stones: In systems like DWC or Kratky, an air pump with air stones is essential for oxygenating the water.
- Nutrient Solution: You can purchase a pre-mixed hydroponic nutrient solution, or you can create your own by mixing water-soluble fertilizers with water.
- pH Meter: A pH meter is important to ensure that your nutrient solution is at the optimal pH level (typically between 5.5 and 6.5 for most plants).
- Grow Lights: If you’re growing indoors, you’ll need a source of artificial light to mimic sunlight for your plants.
Step-by-Step Guide: How to Set Up Your Own Hydroponic System
Now that you’re familiar with the different types of systems and the materials you’ll need, it’s time to set up your hydroponic system. Follow these simple steps to create your DIY hydroponic garden:
- Choose Your System Type: Decide which type of hydroponic system is best for you based on the space available and the type of plants you want to grow. For beginners, the Kratky method or Wick system is simple to set up and requires little maintenance.
- Set Up Your Reservoir: Find a container that will hold your nutrient solution. It could be a plastic tub, bucket, or any large, clean container. Fill it with water, leaving enough room for the plants and growing medium.
- Prepare Your Growing Medium: Choose a growing medium that will support your plants and hold moisture. You can purchase hydroponic media or create your own with materials like perlite, vermiculite, or coconut coir.
- Place Your Net Pots: If you’re using the Kratky, Wick, or DWC system, place your plants in net pots and fill them with the growing medium. Ensure the pots are securely positioned above the water level.
- Mix Your Nutrient Solution: Add hydroponic nutrients to the water, following the instructions on the packaging. Check the pH of your solution and adjust it to the ideal range (5.5 to 6.5) using a pH kit if necessary.
- Add Your Plants: Insert your seedlings or seeds into the net pots or containers. If you’re starting with seeds, be sure to wait until they have sprouted and grown their roots before placing them in the hydroponic system.
- Set Up Lighting: If you’re growing indoors, make sure your plants receive 12 to 16 hours of light daily. Use fluorescent, LED, or grow lights to provide the necessary light.
- Maintain Your System: Check the water level and nutrient solution regularly. Add more water or nutrients as needed. Keep an eye on the pH levels and adjust them to ensure optimal plant health.
- Harvest Your Crops: After a few weeks, your plants will begin to grow and produce leaves, flowers, or fruits, depending on the type of plant. Harvest the crops as they mature and enjoy the fruits of your labor!
Conclusion
Starting a hydroponic system at home is an exciting and rewarding project that can provide you with fresh, homegrown vegetables and herbs year-round. Whether you’re growing indoors or outdoors, hydroponics is an eco-friendly, space-efficient solution for urban gardening.
By following the steps outlined in this guide, you can create a functional and productive hydroponic garden in the comfort of your own home. Happy gardening, and enjoy your hydroponic harvest!
Motivation to Interact: Ready to grow your own hydroponic garden? Share your hydroponic setup with us and join the gardening revolution! 🌿💧 Let’s grow together!
#Hydroponics #GardeningAtHome #UrbanFarming #DIYGardening #HydroponicGarden #GrowYourOwn #SustainableLiving #IndoorGardening #HomeGarden #PlantLovers #ZeroWasteGardening