
A well-organized garden with plants growing upright on trellises and supports is not only visually appealing but also highly functional. Trellises and supports can help maximize space, improve air circulation, reduce pest problems, and make harvesting easier. The best part? You don’t have to spend a fortune on store-bought structures. With a little creativity and some basic materials, you can create your own DIY garden trellises and supports. In this article, we’ll explore a variety of ideas and provide step-by-step instructions to help you get started.
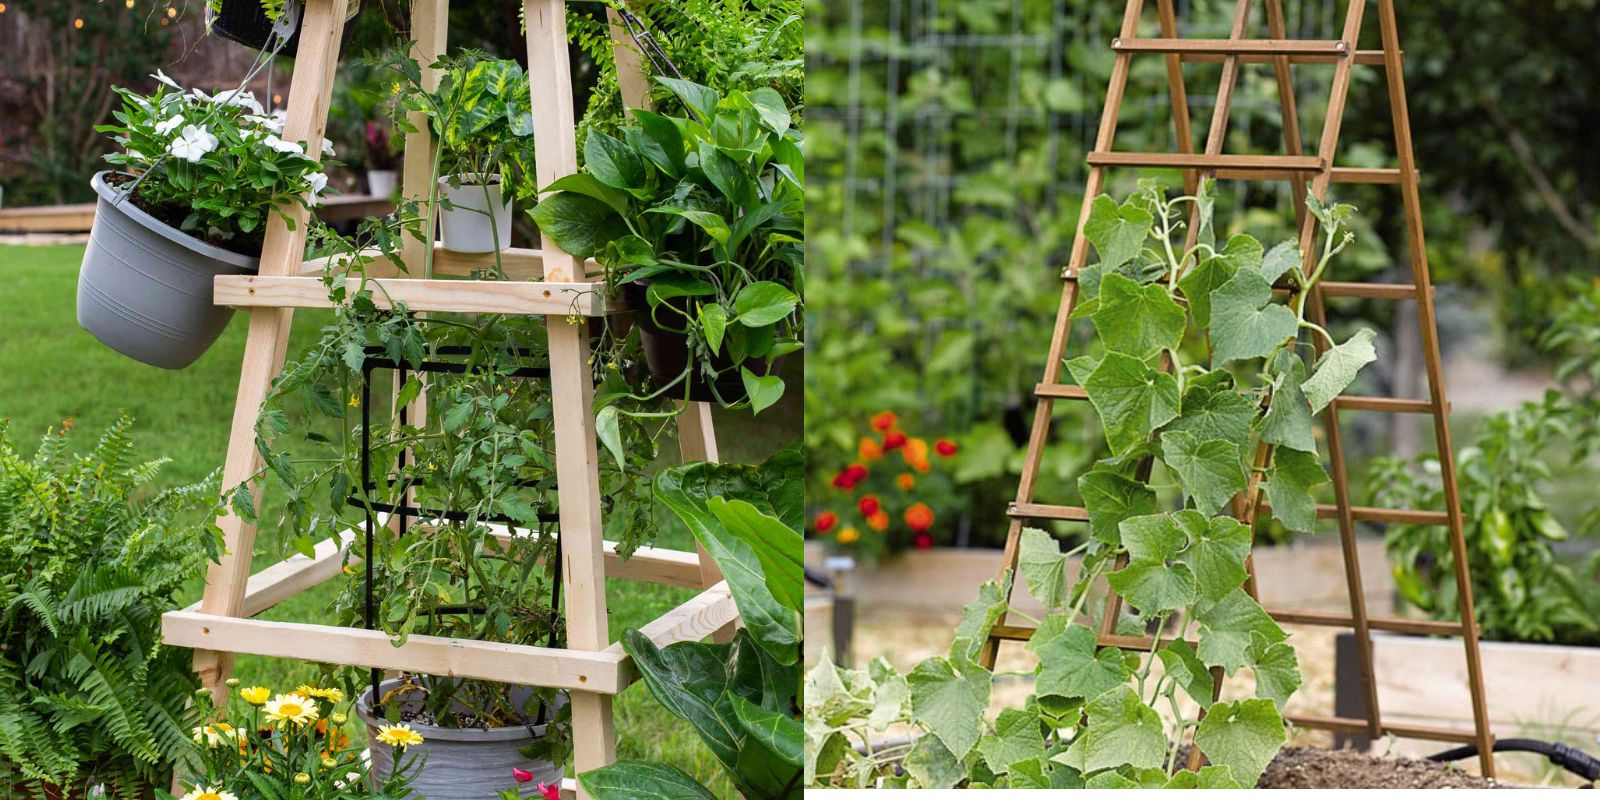
1. Classic A-Frame Trellis
The A-frame trellis is a sturdy and versatile structure that can support a variety of climbing plants, such as beans, cucumbers, and peas. It’s easy to build and can be customized to fit any garden size.
Materials Needed:
- 2 wooden boards (6-8 feet long)
- 4 shorter wooden boards (3-4 feet long)
- Galvanized screws
- Drill
- Jute or nylon twine
Instructions:
- Build the Frame: Start by forming the shape of an “A” with the two longer boards. Attach them at the top with a galvanized screw, leaving the base open. Repeat this step to create the second side of the A-frame.
- Add Crossbars: Attach the shorter boards horizontally across the open sides of the A-frame, spacing them evenly from top to bottom. These will serve as crossbars for additional support and to tie the twine.
- Attach Twine: Starting at the bottom, tie the twine to one crossbar, then stretch it across to the opposite crossbar, forming a zigzag pattern. Continue this until you reach the top.
- Position the Trellis: Place the A-frame trellis in your garden, ensuring it’s stable. Plant your climbing vegetables at the base, and guide the vines onto the twine as they grow.
Tip: Paint or stain the wood to add a decorative touch to your garden and protect the trellis from the elements.
2. Simple Bamboo Teepee Trellis
A bamboo teepee trellis is an excellent choice for growing beans, peas, or even tomatoes. It’s lightweight, easy to assemble, and adds a rustic charm to your garden.
Materials Needed:
- 6-8 bamboo poles (6-7 feet long)
- Twine or zip ties
- Garden stakes (optional)
Instructions:
- Form the Teepee: Gather the bamboo poles and arrange them in a circular pattern, with one end of each pole touching the ground. Leave a gap between the poles large enough for you to access the inside of the teepee.
- Secure the Top: Bring the tops of the poles together and tie them securely with twine or zip ties, forming a teepee shape.
- Stabilize the Poles: If the poles feel unstable, secure them to the ground with garden stakes or bury the ends slightly into the soil.
- Plant and Train: Plant your climbing plants around the base of the teepee and train the vines to grow up the bamboo poles.
Tip: For added stability, consider tying additional twine horizontally between the bamboo poles, creating a web-like structure for the vines to cling to.
3. Wire Mesh Panel Trellis
A wire mesh panel trellis is perfect for heavy vines like cucumbers, squash, and melons. This durable and robust support system can be easily constructed with wire mesh and wooden posts.
Materials Needed:
- Wire mesh panel (4×8 feet)
- 4 wooden posts (6 feet long)
- Galvanized staples or U-nails
- Post-hole digger or shovel
- Wire cutters
Instructions:
- Set the Posts: Dig two holes about 4 feet apart using a post-hole digger or shovel. Insert two wooden posts into the holes and fill them with soil to secure them. Repeat this for the other two posts, ensuring they align parallel to the first set.
- Attach the Mesh Panel: Position the wire mesh panel between the two sets of posts. Attach it securely to the posts using galvanized staples or U-nails. Make sure the panel is taut and evenly stretched.
- Trim the Mesh (if needed): Use wire cutters to trim any excess mesh that extends beyond the posts.
- Plant Your Vines: Plant your climbing vegetables at the base of the wire mesh trellis and guide the vines to grow through the mesh openings.
Tip: To prevent rust, opt for galvanized or vinyl-coated wire mesh, which will last longer and require less maintenance.
4. Upcycled Ladder Trellis
Repurposing an old wooden ladder as a garden trellis is an eco-friendly and cost-effective way to provide support for your climbing plants. The ladder’s rungs offer natural support for plants to climb.
Materials Needed:
- Old wooden ladder
- Sandpaper
- Paint or wood stain (optional)
- Outdoor sealant (optional)
Instructions:
- Prep the Ladder: If the ladder is old or weathered, use sandpaper to smooth out rough edges and remove any splinters. You can also paint or stain the ladder to give it a fresh look and protect it from the elements.
- Seal the Wood (optional): Apply an outdoor sealant to the ladder to enhance its durability, especially if it will be exposed to rain and sun.
- Position the Ladder: Place the ladder vertically in your garden, leaning it against a wall, fence, or sturdy post. Ensure it is stable and secure.
- Plant and Climb: Plant your climbing vegetables at the base of the ladder and train the vines to grow up the rungs. You can also use the rungs to hang small pots or baskets of trailing plants.
Tip: For added visual appeal, plant flowering vines like morning glories or sweet peas alongside your vegetables to create a beautiful and functional garden display.
5. DIY Cattle Panel Arch
A cattle panel arch is an impressive and functional structure that can support heavy vines and create a stunning garden entrance. This arch is perfect for growing pumpkins, gourds, or other large plants.
Materials Needed:
- Cattle panel (4×16 feet)
- 4 metal T-posts or rebar (6 feet long)
- Zip ties or metal clips
- Post driver or sledgehammer
Instructions:
- Set the T-Posts: Choose the location for your arch and drive two T-posts into the ground about 4 feet apart. Repeat this process for the other side, ensuring both sets of posts are aligned.
- Bend the Cattle Panel: Carefully bend the cattle panel into an arch shape by placing one end between the first set of T-posts and bending it until the other end reaches the second set of posts.
- Attach the Panel: Secure the cattle panel to the T-posts using zip ties or metal clips. Make sure the panel is tightly fastened and stable.
- Plant Your Vines: Plant your climbing vegetables or flowers at the base of the arch, guiding the vines to grow up and over the structure.
Tip: A cattle panel arch can be used to create a garden tunnel by placing multiple arches in a row. This not only maximizes vertical space but also creates a beautiful and functional walkway.
6. Rustic Log Trellis
For a more natural and rustic look, a log trellis is a great option. This trellis works well for lightweight vines like peas and beans and can be easily constructed using fallen branches or logs.
Materials Needed:
- 4-6 logs or large branches (5-6 feet long)
- Twine or jute rope
- Pruning saw (if needed)
Instructions:
- Select Your Logs: Choose straight logs or branches that are about the same thickness and length. If necessary, use a pruning saw to trim them to size.
- Build the Frame: Lay two logs parallel on the ground and place two more logs across them at right angles, forming a square or rectangular frame. Tie the corners securely with twine or jute rope.
- Add Vertical Supports: Attach additional logs vertically along the sides of the frame, tying them in place with twine. These supports will act as climbing guides for your plants.
- Install the Trellis: Place the log trellis in your garden, either standing upright or leaning against a wall. Plant your vines at the base and guide them to climb the structure.
Tip: Enhance the rustic charm of your log trellis by leaving the bark on the logs or using naturally curved branches for a more organic look.
Conclusion
DIY garden trellises and supports not only provide essential support for climbing plants but also add character and beauty to your garden. Whether you’re growing vegetables, flowers, or both, these creative and practical structures can help you make the most of your garden space. With the ideas and instructions provided, you can easily build your own trellises and supports, tailoring them to suit your garden’s specific needs and aesthetic. Embrace your creativity, and watch your garden thrive as your plants grow tall and strong on your custom-made trellises and supports.