
Urban gardening is becoming increasingly popular as more people are looking to grow their own food and plants in small spaces. Whether you live in an apartment, a townhouse, or a small urban home, creating a self-watering container garden is an excellent way to enjoy fresh vegetables, herbs, and flowers without the hassle of constant watering. Not only does this system conserve water, but it also ensures that your plants remain hydrated, even when you’re away or too busy to tend to them. This step-by-step guide will show you how to create your own self-watering urban container garden that is both easy to maintain and productive.
What is a Self-Watering Container Garden?
A self-watering container garden is a system that ensures your plants receive consistent moisture, which is crucial for their growth. These containers typically consist of a water reservoir at the bottom and a wick or capillary action to draw water up into the soil. This setup allows the soil to stay moist for longer periods without the need for daily watering. Self-watering containers are perfect for urban dwellers who may not have the time or the resources to water plants regularly.
Benefits of a Self-Watering Urban Container Garden
- Water Conservation: Self-watering systems reduce water waste by efficiently using the water stored in the reservoir, delivering it directly to the plant roots.
- Low Maintenance: Once set up, these containers need minimal attention. The water reservoir provides a steady supply, and you won’t have to worry about over-watering or under-watering your plants.
- Perfect for Small Spaces: Self-watering containers can be placed on balconies, patios, rooftops, or even windowsills, making them ideal for people with limited gardening space.
- Healthy Plants: Consistent moisture is key for healthy plant growth, and self-watering systems provide that. This leads to better fruit production, healthier foliage, and stronger root systems.
- Saves Time: You won’t need to spend a lot of time watering your plants every day. Instead, you can focus on other gardening tasks, like pruning and harvesting.
Materials You’ll Need
Before you start, gather the following materials:
- Containers: Choose containers that are large enough for your plants. Plastic bins, old buckets, ceramic pots, or any container that can hold soil and water will work. Be sure the container has a drainage hole.
- Smaller Container or Water Reservoir: This will sit inside the larger container to hold the water. It should be smaller in size but large enough to hold enough water for your plants.
- Cotton or Nylon Rope (Wick): This will act as the conduit for water to travel up from the reservoir to the soil.
- Drill or Hole Punch: You’ll need a tool to make drainage holes in your containers.
- Potting Soil: A well-draining potting mix will allow the water to flow through while providing the nutrients your plants need.
- Pebbles or Gravel: This is used to create a barrier between the soil and the water reservoir to prevent the soil from becoming waterlogged.
- Plastic Wrap or Plastic Liner (optional): If your container does not have a hole at the bottom, you can line the bottom with plastic to create a waterproof barrier.
- Scissors or Knife: These tools are needed to cut the wick to the right length.
Step-by-Step Instructions to Create Your Self-Watering Container Garden
1. Choose Your Containers
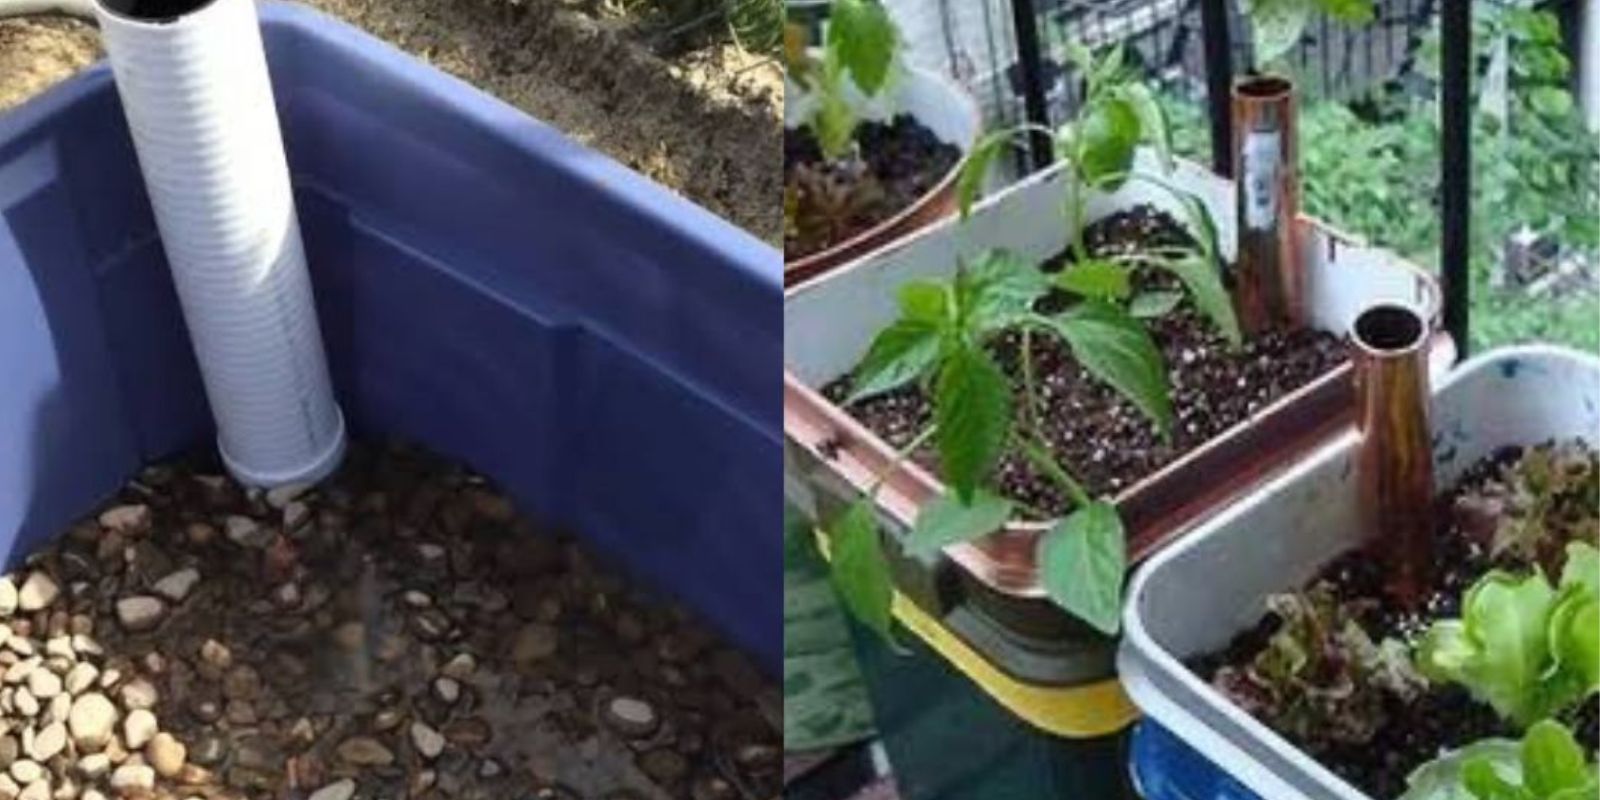
The first step in creating a self-watering container garden is selecting the right containers. You’ll need one large container that holds the soil and a smaller container that will sit inside the large one to hold the water. The smaller container should not touch the soil directly. If your large container doesn’t have a drainage hole, you’ll need to create one or use a plastic liner to create a waterproof barrier at the bottom.
The larger container should be wide and deep enough for the types of plants you want to grow. It should also allow for good airflow to prevent mold and mildew.
2. Prepare the Water Reservoir
Now that you have your containers, it’s time to prepare the water reservoir. The smaller container will sit inside the larger container, leaving space at the bottom for water storage. Drill several small holes in the smaller container to allow the water to wick up into the soil. These holes will also allow excess water to drain out if needed.
Fill the bottom of the larger container with a layer of gravel or pebbles to create a space for the water to sit. This will prevent the soil from becoming too saturated. The water reservoir needs to be at least 2–4 inches deep, depending on the size of the container and the types of plants you plan to grow.
3. Create the Wick System
The wick system is a crucial part of the self-watering setup. It draws water from the reservoir and delivers it up to the plant roots. Use a cotton or nylon rope for the wick. The rope should be long enough to reach from the bottom of the water reservoir to the top of the soil.
Thread the wick through the holes in the smaller container, and make sure one end of the wick is placed inside the water reservoir. The other end should be buried in the soil. This will allow the water to travel from the reservoir up into the soil, keeping the soil moist and your plants hydrated.
4. Layer the Soil
Once the wick system is in place, it’s time to add soil. Fill the large container with a well-draining potting mix, leaving a few inches of space at the top. The soil should cover the wick and completely surround the small container that holds the water.
The soil should not be compacted. Leave some room for air to circulate around the roots. Gently pat the soil down to remove any large air pockets, but be careful not to press too hard.
5. Add Plants to the Container
Now that the container is ready, it’s time to plant your garden. Choose plants that are suited for container gardening and self-watering systems, such as herbs, lettuce, spinach, tomatoes, or flowers like petunias and marigolds. Plant your seedlings or seeds according to their specific planting instructions, ensuring that the roots have enough space to grow.
When planting, make sure the wick system is buried deep enough in the soil to ensure it can draw water effectively. The wick should never be exposed to the air.
6. Water and Maintain the System
After planting, water your new garden thoroughly to ensure the soil is evenly moist. Fill the water reservoir, and the wick system will begin to draw water up into the soil. Check the water level regularly and top it off as needed. You can also add a layer of mulch on top of the soil to help retain moisture and keep the soil cool.
Make sure the plants are getting enough light. Most vegetables and herbs require at least 6 hours of sunlight per day, while flowers may require a bit more or less depending on their species. Keep the container in a location where it can receive the appropriate amount of sunlight.
7. Monitor and Harvest
Once your self-watering urban container garden is up and running, the maintenance is minimal. Simply check the water level regularly, prune your plants as needed, and remove any dead or yellowing leaves. As your plants grow, keep an eye on them to make sure they are getting the proper nutrients and water they need.
The best part about a self-watering container garden is that it will continue to provide fresh herbs, vegetables, or flowers for you to enjoy with minimal effort. Harvest your plants when they are ready, and continue to monitor the health of the garden to ensure it thrives year-round.
Conclusion
Creating a self-watering urban container garden is an excellent way to grow your own food in small spaces. By following these simple steps, you can set up a water-efficient system that keeps your plants hydrated and healthy with minimal effort. This approach is ideal for busy city dwellers who want to enjoy the benefits of homegrown plants without the constant watering. With the right materials and a little creativity, your self-watering garden will be thriving in no time!
Get Started Today!
Start your self-watering urban container garden today and see how easy it can be to grow your own food at home! 🌿 #UrbanGardening #SelfWateringGarden #ContainerGardening #SustainableLiving #GreenThumb #GardeningMadeEasy #CityGardening