
Composting is a powerful way to recycle organic waste, enrich soil, and reduce your environmental footprint. With a “compost in a bottle” experiment, you can create a mini ecosystem that demonstrates the natural process of decomposition. This project is ideal for kids, gardening enthusiasts, or anyone curious about how waste can transform into nutrient-rich compost.
In this article, we’ll dive into the step-by-step process of creating compost in a bottle, explore the science behind it, and discuss its benefits for both education and the environment.
What Is Composting?
Composting is the process of breaking down organic materials like food scraps, leaves, and yard waste into nutrient-rich soil. Microorganisms, fungi, and insects work together to decompose this material, converting it into humus—a key ingredient for healthy gardens and plants.
This experiment simulates the composting process on a small scale, allowing you to witness the transformation while learning about sustainability.
Why Choose a Bottle for Composting?
A plastic bottle serves as a clear, compact, and convenient container for observing the composting process. It’s a perfect tool for teaching children or experimenting in small spaces. Plus, repurposing a plastic bottle aligns with the eco-friendly theme of reducing, reusing, and recycling.
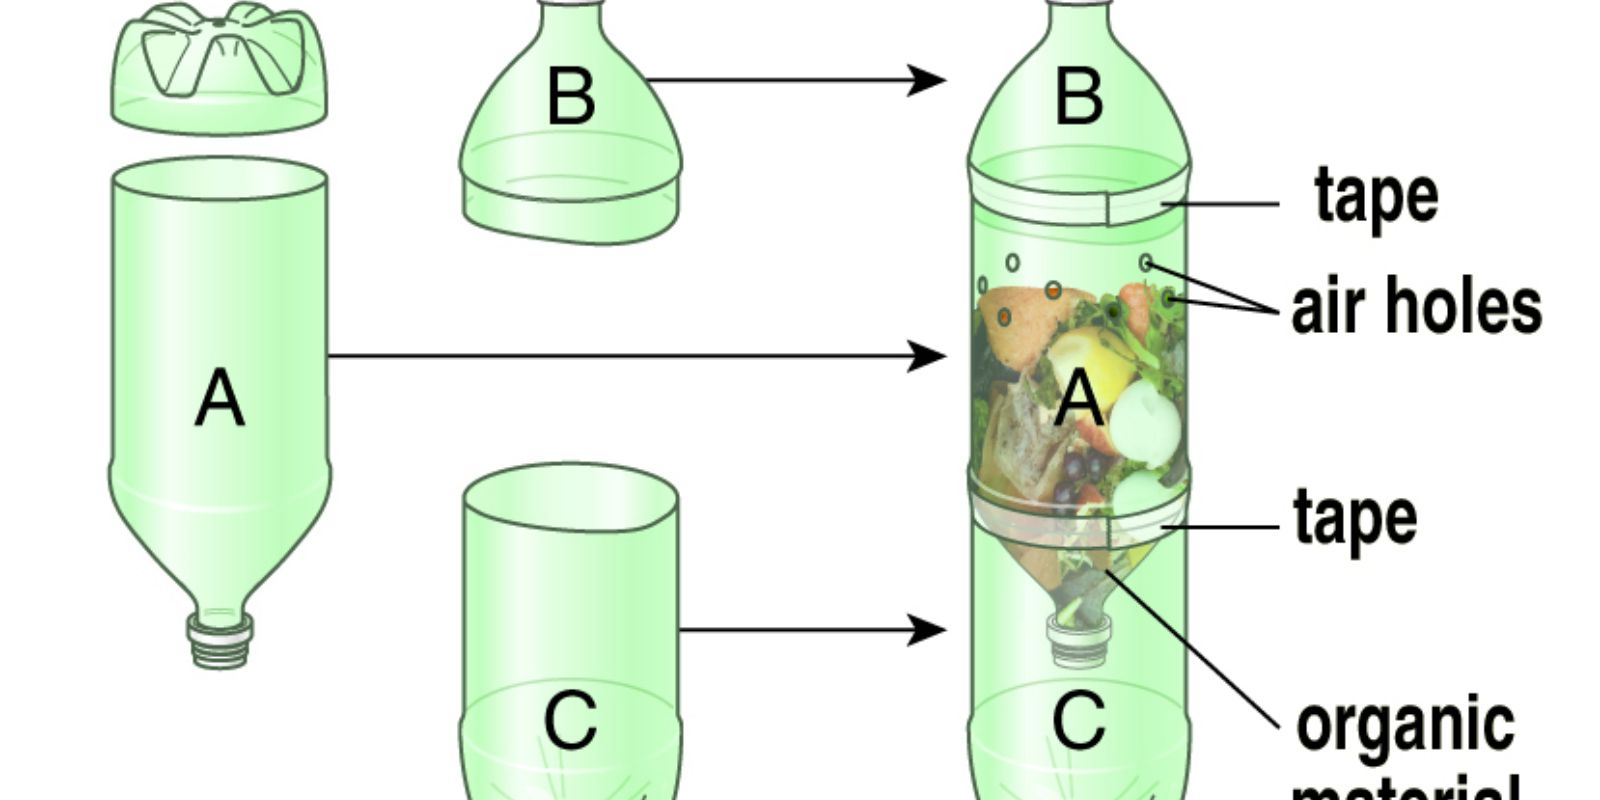
Materials Needed for Compost in a Bottle
Before starting, gather the following supplies:
- A clear 2-liter plastic bottle (or similar size).
- Scissors or a craft knife.
- Organic materials such as fruit peels, vegetable scraps, coffee grounds, shredded paper, or leaves.
- Garden soil or compost starter.
- A spray bottle with water.
- A breathable material (e.g., paper towel or mesh) to cover the top.
- Rubber bands or tape to secure the cover.
Step-by-Step Guide to Creating Compost in a Bottle
Step 1: Prepare the Bottle
- Rinse the plastic bottle thoroughly and remove any labels.
- Use scissors or a craft knife to cut off the top, leaving enough space to create an open container for layering materials.
- Poke small holes in the bottom of the bottle to allow excess moisture to drain.
Step 2: Start Layering
- Add a layer of soil or compost starter to the bottom of the bottle. This provides the necessary microorganisms to kickstart decomposition.
- Follow with a thin layer of organic waste, such as vegetable scraps or shredded paper.
- Alternate layers of soil and organic material, ensuring each layer is evenly spread.
- Avoid adding meat, dairy, or oily foods as they can attract pests and slow decomposition.
Step 3: Moisten and Cover
- Lightly mist the contents with water using the spray bottle. Composting materials should be moist but not soaking wet.
- Cover the bottle’s opening with a breathable material and secure it with a rubber band or tape. This keeps pests out while allowing airflow.
Step 4: Place and Monitor
- Position the bottle in a warm, sunny spot to accelerate the composting process.
- Turn or stir the contents every few days to aerate the materials and distribute moisture evenly.
Step 5: Observe the Changes
- Over the course of 4–6 weeks, watch as the materials break down into dark, crumbly compost.
- Notice how the volume of materials decreases as decomposition progresses.
- Discuss or document the changes to understand the role of microorganisms in composting.
The Science Behind Composting
Composting relies on the activity of decomposers—bacteria, fungi, and insects that consume organic matter and convert it into nutrient-rich soil. These organisms thrive in environments with:
- Carbon: Found in dry, brown materials like paper or leaves.
- Nitrogen: Found in green materials like fruit and vegetable scraps.
- Water: Necessary for microbial activity.
- Airflow: Oxygen helps break down materials efficiently.
Balancing these elements ensures a healthy composting environment. Too much water can cause foul odors, while too little air slows the process.
Benefits of Composting in a Bottle
1. Educational Value
This experiment provides a hands-on opportunity to learn about decomposition, waste management, and the importance of soil health. It’s an excellent way to introduce children to sustainability concepts.
2. Eco-Friendly Practice
By composting, you divert organic waste from landfills, reducing greenhouse gas emissions like methane. Even a small-scale project like this contributes to a greener planet.
3. Promotes Gardening
Finished compost can be added to potted plants, garden beds, or outdoor soil, enriching the ground with essential nutrients.
Tips for Success
- Chop It Small: Smaller organic pieces break down faster.
- Avoid Overwatering: Too much moisture can lead to anaerobic conditions and foul odors.
- Be Patient: Composting is a natural process and may take several weeks.
Beyond the Bottle: Expanding Your Composting Skills
Once you’ve mastered composting in a bottle, consider scaling up your efforts with a backyard compost pile, worm composting (vermiculture), or a compost tumbler. Each method has unique advantages, and expanding your composting practice further reduces your environmental footprint.
Interactive Call to Action
Now it’s your turn! Gather your materials and start your compost in a bottle experiment today. Share your progress, photos, and lessons learned with the gardening community online.
🌱 “What surprises did you discover while composting? Let’s grow greener together!”
#CompostInABottle #EcoFriendlyLiving #GardeningForKids #SustainableScience #DIYComposting