
Daffodils are a delightful sign of spring, lighting up gardens with their bright and cheerful blooms. However, many gardeners face a common question once the daffodils stop flowering: What should be done after the blooming phase to ensure healthy growth next season? Proper post-bloom care is essential to guarantee that daffodils return stronger and more vibrant year after year. In this guide, we’ll dive into the crucial steps needed to care for your daffodils after they bloom, ensuring that your garden remains filled with flourishing flowers for seasons to come.
Understanding the Bloom Cycle of Daffodils
Before diving into post-bloom care, it’s important to understand the life cycle of daffodils. Daffodils are perennial bulbs, meaning they go through an annual cycle of blooming, followed by a period of dormancy. After blooming in early spring, the plant’s energy shifts from the flowers to the leaves and bulbs. During this phase, the green leaves play a crucial role in gathering nutrients and sunlight, which are stored in the bulbs for the next growing season.
After the bloom, the key is to help the daffodil bulbs gather as much energy as possible. This energy is what fuels next year’s flowers, so giving your daffodils the right care is essential for abundant blooms in the future.
1. Deadheading: Removing Spent Blooms
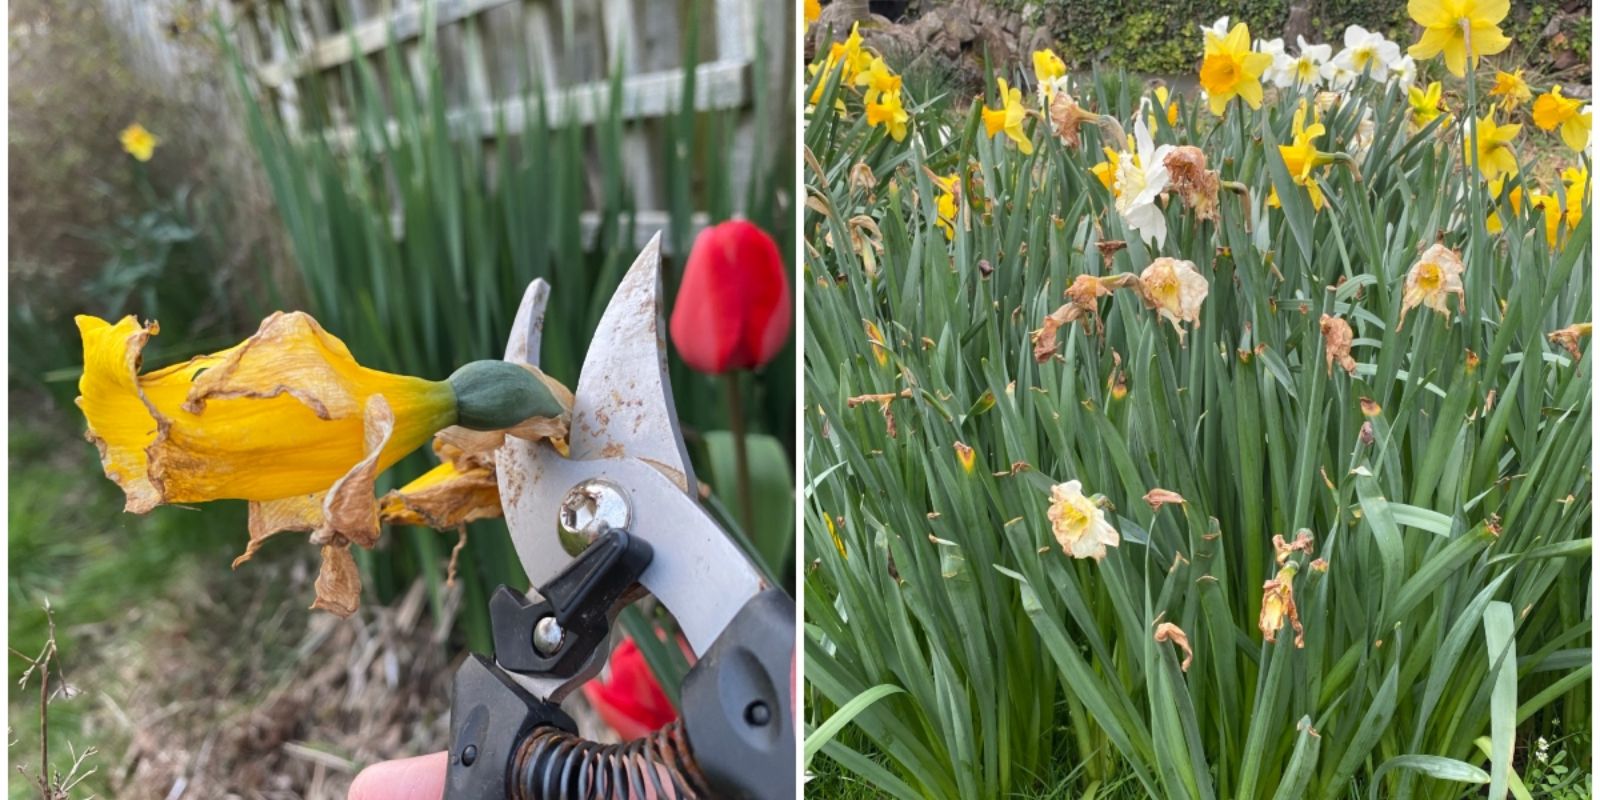
The first and most important step in post-bloom care is deadheading. Deadheading is the process of removing faded or spent flowers from the plant. As soon as the flowers begin to wilt, it’s time to remove them. The reason behind this is that if you leave the old flowers on the plant, the daffodil will start putting its energy into producing seeds rather than storing nutrients in the bulb.
How to Deadhead Daffodils:
- Use sharp scissors or pruning shears to cut the flower stalks just below the bloom.
- Be careful not to remove the green foliage during this process, as the leaves are essential for photosynthesis and feeding the bulb.
Deadheading also helps keep the garden looking neat and tidy. By removing the faded blooms, you prevent the plant from developing seed pods, which can detract from the overall aesthetic of your garden.
2. Allow the Leaves to Die Back Naturally
One of the most common mistakes gardeners make is cutting back the foliage too soon. After deadheading, it’s crucial to allow the leaves to remain on the plant for at least six to eight weeks after blooming. The green foliage is the plant’s way of collecting sunlight and converting it into energy through photosynthesis. This energy is stored in the bulb and will fuel next year’s flowers.
Why You Shouldn’t Cut the Leaves Early:
Cutting the leaves while they are still green can prevent the plant from gathering enough energy to produce strong blooms the following season. While it may be tempting to tidy up the garden by removing the foliage early, patience is key to ensuring long-lasting health for your daffodils.
Instead, wait until the leaves naturally turn yellow or brown and start to wither. At this point, the plant has completed its energy-gathering process, and the foliage can be cut back to ground level without harming next year’s growth.
3. Continue Watering
After your daffodils have bloomed, it’s important to continue providing them with water until the foliage dies back. Although the flowers are no longer present, the leaves are still actively absorbing water and nutrients to fuel the bulb’s development.
Watering Tips Post-Bloom:
- Keep the soil moist, but not waterlogged, during this period.
- Water the plants regularly, especially in dry conditions, to ensure the bulbs have access to enough moisture to stay healthy.
- Once the leaves die back, you can reduce watering, as the bulbs enter a period of dormancy.
Consistent watering ensures that the bulbs remain healthy and well-nourished, setting the stage for vigorous growth in the next season.
4. Fertilize for Future Growth
Fertilizing your daffodils after they have bloomed can provide them with the extra nutrients needed to grow strong and healthy bulbs for the next year. The key is to use a balanced, slow-release fertilizer that provides a steady supply of nutrients over time.
How to Fertilize Daffodils Post-Bloom:
- Apply a slow-release bulb fertilizer immediately after the flowers fade.
- Follow the package instructions for the appropriate amount and application method.
- Focus on phosphorus-rich fertilizers, as phosphorus helps with root and bulb development.
- Avoid fertilizers with too much nitrogen, as this can promote excessive foliage growth at the expense of flower production.
A well-timed fertilization will help your daffodils recharge after their blooming season, ensuring strong growth and healthy flowers in the following year.
5. Mulch in the Fall
As the growing season comes to an end, it’s time to start thinking about protecting your daffodil bulbs for the winter. One of the best ways to do this is by applying a layer of mulch over the bulbs in late fall. Mulch helps insulate the bulbs from freezing temperatures, while also preventing weeds from competing with your daffodils for nutrients.
How to Mulch Daffodils:
- Spread a layer of mulch (about 2-3 inches thick) over the area where your bulbs are planted.
- Use organic mulch, such as shredded leaves, straw, or bark chips, to provide extra nutrients to the soil as the mulch breaks down.
- Mulching not only protects the bulbs but also helps retain moisture in the soil, promoting healthy root development during the winter months.
Mulching is a simple step that can significantly improve the chances of your daffodils returning stronger in the spring.
6. Dividing and Transplanting
Over time, daffodil bulbs can become crowded, which may reduce their ability to produce large, healthy blooms. If you notice that your daffodils are producing fewer flowers or the bulbs seem tightly packed, it may be time to divide and transplant them.
How to Divide Daffodils:
- Wait until the foliage has died back completely before digging up the bulbs.
- Gently lift the bulbs from the soil using a garden fork, being careful not to damage them.
- Separate the bulbs, making sure each new section has roots attached.
- Replant the bulbs in a well-drained, sunny location, spacing them about 6 inches apart to give them room to grow.
Dividing daffodil bulbs every 3-5 years helps ensure that they have enough space to thrive, resulting in more abundant blooms.
7. Be Patient
Finally, remember that gardening is a practice in patience. While you may not see the immediate results of your post-bloom care, trust that your efforts are contributing to a healthier and more productive garden in the long run. By providing your daffodils with the care they need after blooming, you’re investing in future seasons filled with vibrant, colorful flowers.
Conclusion
Caring for daffodils after blooming is an essential part of maintaining a beautiful and thriving garden. By deadheading spent blooms, allowing the foliage to die back naturally, watering consistently, fertilizing for future growth, and mulching for winter protection, you’ll help your daffodils return stronger and more vibrant each year. With a little patience and care, your daffodils will reward you with stunning blooms season after season.
Motivating Sentence:
“Keep your garden thriving year after year by giving your daffodils the post-bloom care they deserve! 🌼 #DaffodilCare #GardeningTips #BulbCare #SpringFlowers #GardenSuccess”