
Alocasia plants, with their striking foliage and dramatic appearance, have become a favorite among indoor plant enthusiasts. Known for their lush, glossy leaves and bold, architectural shapes, these tropical beauties can brighten any space. However, buying an Alocasia plant can be expensive, especially if you’re looking for a rare variety. An excellent solution for plant lovers who want to multiply their collection is propagating Alocasia through corms. This method is straightforward, cost-effective, and rewarding.
In this comprehensive guide, we will walk you through the process of Alocasia propagation with corms, including step-by-step instructions, tips, and helpful advice to ensure your success. Whether you’re a beginner or an experienced plant grower, this guide will help you grow new Alocasia plants from the corms of an existing plant.
Understanding Alocasia Corms
Before diving into the propagation process, it’s essential to understand what corms are and how they play a role in Alocasia growth. Corms are underground storage organs that store nutrients and energy to support the plant’s growth. They are similar to bulbs and tubers but differ in their structure and method of growth.
In an Alocasia plant, the corm is the part of the plant that remains in the soil, allowing the plant to survive through periods of dormancy or unfavorable growing conditions. The corms will sprout new shoots during the growing season, creating new plants. This natural process makes corms an ideal starting point for propagation.
Why Propagate Alocasia with Corms?
Propagating Alocasia with corms offers several benefits:
- Cost-Effective: Growing new plants from corms is much cheaper than buying a new Alocasia.
- Faster Growth: Unlike propagating through seeds or cuttings, using corms results in quicker growth and an almost immediate jumpstart to your new plant.
- Multiplying Rare Varieties: If you have a rare or unique Alocasia variety, using corms is an excellent way to multiply your plant collection without seeking out expensive new plants.
- Increased Success Rate: Corm propagation has a higher success rate compared to other methods, such as leaf or stem cuttings, because the corm is already a part of the plant’s growth system.
Step-by-Step Guide to Propagate Alocasia with Corms
Now that you understand the importance of corms and why they’re ideal for propagation, let’s go over the step-by-step process. Follow these easy instructions to propagate your own Alocasia plants.
1. Choose a Healthy Alocasia Plant
The first step in propagation is selecting a healthy Alocasia plant that has mature corms. You want to choose a plant that has a well-established root system and shows no signs of disease or rot. If you don’t already own an Alocasia plant, you can purchase one or use a mature plant that is ready for propagation.
Look for a plant that has several visible corms at the base, as these are the ones you’ll be working with. Ideally, choose a plant that has outgrown its current pot, as this is a sign that it’s ready for division.
2. Remove the Plant from Its Pot
Once you have selected a healthy Alocasia plant, carefully remove it from its pot. Gently loosen the soil around the edges of the pot and slide the plant out. Take your time during this step to avoid damaging the corms or roots.
You may need to tap the sides of the pot to loosen the plant if it’s stuck. Be cautious not to pull too hard on the plant, as this could break or harm the corms.
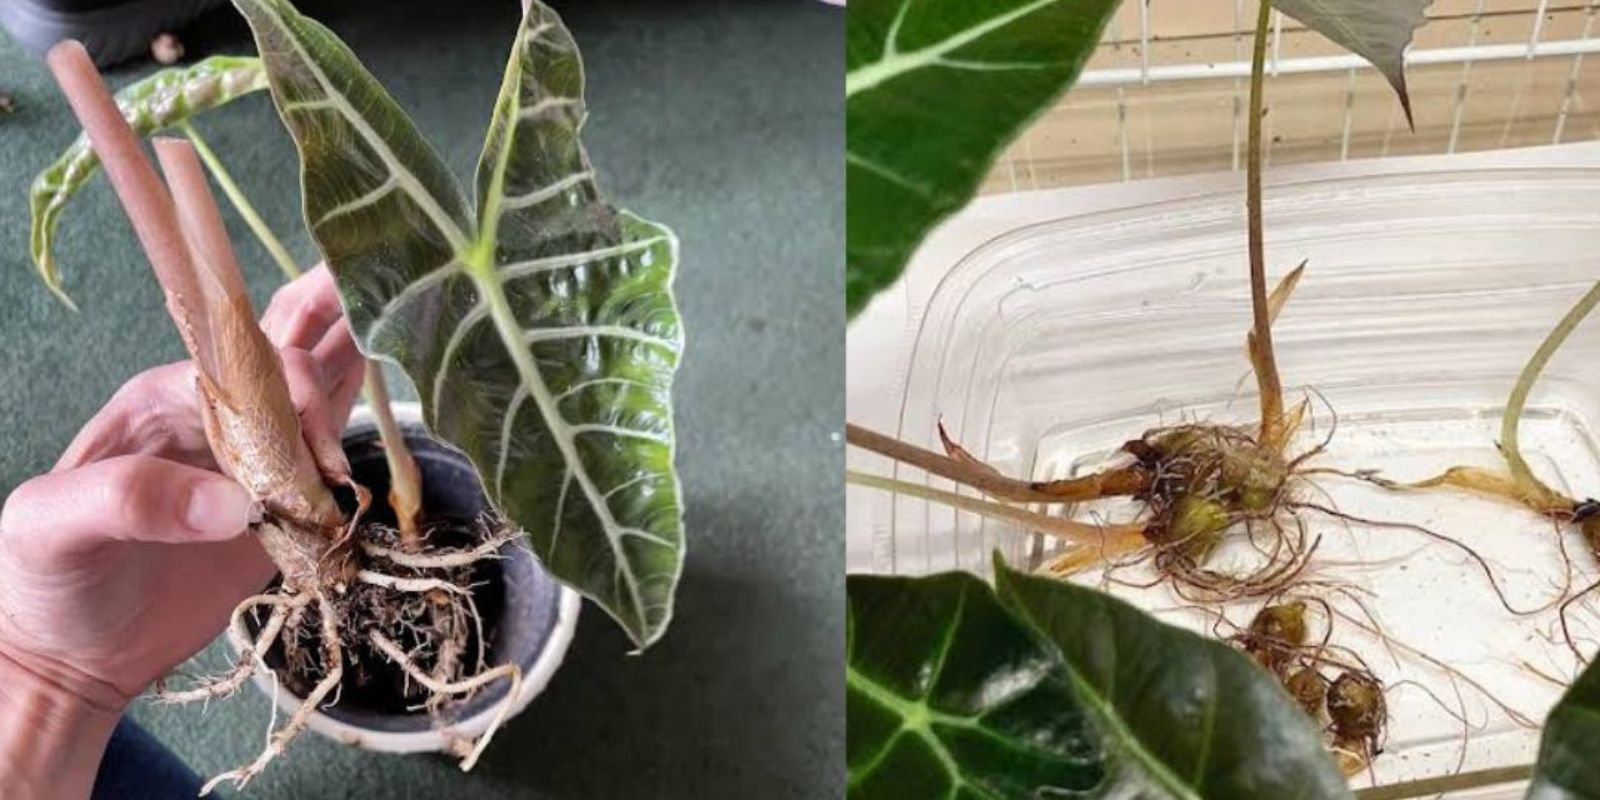
3. Clean and Separate the Corms
Once you’ve removed the plant, you should see several corms attached to the main stem. Carefully separate the corms from the main plant by gently tugging them apart. Be sure to handle the corms with care, as they can be fragile. If needed, you can use a sharp, sterilized knife to separate any corms that are tightly bound together.
Rinse the corms gently under lukewarm water to remove any excess soil or debris. This will help you inspect the corms for any signs of damage, rot, or disease. It’s essential to work with healthy corms to ensure successful propagation.
4. Inspect the Corms for Health
After cleaning, examine the corms closely. Healthy corms should be firm, plump, and free of any mold, rot, or discoloration. If any corms appear soft, mushy, or have dark spots, discard them, as they are unlikely to grow into healthy plants.
Each corm will typically produce one new plant, but some may have multiple buds or shoots, which can result in multiple plants from one corm.
5. Allow Corms to Dry
Before planting the corms, allow them to dry out for 24 to 48 hours. This helps prevent fungal infections or rot from developing when the corms are placed in the soil. Lay the corms out in a cool, dry area away from direct sunlight, and let them air-dry.
This step is essential, so be patient. While drying, the corms will form a protective callus over any cuts or damaged areas, which helps them heal and prevents water from being absorbed too quickly once they are planted.
6. Prepare the Planting Medium
Now that your corms are ready for planting, prepare a well-draining soil mix. Alocasia plants require a soil mixture that drains quickly and doesn’t retain too much moisture, which can lead to root rot. You can either use a cactus or succulent potting mix, or create your own mix by adding perlite, sand, or bark to regular potting soil.
Ensure the pot has drainage holes to allow excess water to escape. This is crucial for maintaining the health of the corms and preventing waterlogging.
7. Plant the Corms
Next, plant the corms in small pots, about 2 inches deep. Make sure the corm is placed with the bud or shoot facing upwards. Gently cover the corm with soil, but don’t pack the soil too tightly. You want the soil to be loose and airy to allow proper root growth.
Water the soil lightly to moisten it, but be careful not to overwater. The corms should not be sitting in water, as this could cause them to rot.
8. Provide Optimal Growing Conditions
After planting the corms, place the pots in a warm, bright location with indirect sunlight. Alocasia plants thrive in temperatures between 65°F to 75°F (18°C to 24°C), so keep your propagating plants in a warm, humidity-friendly environment.
You can increase humidity by placing the pots in a shallow tray filled with water and pebbles or using a humidity dome to cover the plants. Make sure the pots are not sitting directly in the water, as this can lead to root rot.
9. Care for Your New Alocasia Plants
Over the next few weeks, your corms should begin to sprout new growth. Once the shoots appear, continue to care for the young plants by providing them with regular watering, bright but indirect sunlight, and consistent temperatures. Avoid overwatering, as this can lead to fungal growth or rot.
As the new plants grow, you can slowly introduce them to more direct light. Be patient, as it may take a few months before the plants are large enough to be repotted into bigger containers.
Troubleshooting Tips for Successful Corm Propagation
While propagating Alocasia with corms is relatively simple, there are a few common issues you may encounter:
- Rotting Corms: If your corms begin to rot, it’s often a sign of overwatering or using a soil mix that doesn’t drain well. Make sure to use a well-draining mix and avoid watering too frequently.
- No Growth: If the corms don’t sprout, it could be due to insufficient warmth or humidity. Ensure your plants are in a warm, humid environment and are getting enough indirect light.
- Pests: Alocasia plants can attract pests like aphids or mealybugs. Keep an eye on your plants and treat them with an organic insecticide if necessary.
Conclusion
Propagating Alocasia with corms is a fantastic way to multiply your plants without spending a lot of money. By following the steps outlined in this guide, you’ll be able to grow healthy new Alocasia plants that will thrive in your home. Whether you want to expand your collection or share beautiful plants with friends and family, corm propagation is a simple and effective method that can lead to long-term success.
Start propagating your Alocasia corms today, and enjoy the beauty of these striking plants for years to come!