
Introduction:
As we move towards more sustainable and water-conscious gardening practices, drip irrigation has become a popular choice for many home gardeners and landscapers. This efficient system delivers water directly to the roots of your plants, minimizing water waste and maximizing plant health. Whether you’re growing vegetables, nurturing a flower garden, or maintaining shrubs and trees, a drip irrigation system is a highly effective solution that conserves water and ensures consistent hydration. In this comprehensive guide, we’ll walk you through the step-by-step process of installing a drip irrigation system in your yard, including planning, gathering materials, and ensuring optimal performance.
Why Choose Drip Irrigation?
Before diving into the installation process, it’s important to understand why drip irrigation is a smart investment for your garden. Traditional overhead watering methods, such as sprinklers, often result in water loss due to evaporation, runoff, and uneven distribution. Drip irrigation solves these problems by:
- Delivering water directly to the soil at the root zone.
- Reducing water waste by preventing evaporation and runoff.
- Promoting healthier plant growth through consistent moisture levels.
- Saving time and effort by automating watering schedules with the use of a timer.
- Conserving water, which is beneficial for the environment and your water bill.
With these advantages in mind, let’s move on to the installation process.
Step 1: Plan the Layout of Your Drip Irrigation System
The first step in installing your drip irrigation system is to create a well-thought-out plan. Walk around your garden or yard and determine where the system will be most beneficial. Make note of the following:
- Areas that need irrigation, including garden beds, individual plants, shrubs, and trees.
- The distance between your water source and the areas to be watered.
- Any elevation changes in your garden that may affect water pressure.
Sketch out a simple plan of your yard or garden, marking the areas where you’ll run the drip lines. This plan will help you calculate how much tubing, connectors, emitters, and other materials you’ll need.
Step 2: Gather the Necessary Materials
Once you’ve planned your layout, it’s time to gather the materials. A typical drip irrigation system consists of the following components:
- Main tubing: This serves as the backbone of the system and carries water from the source to different areas of the garden.
- Emitters: These are the small devices that release water at a slow, steady rate. Emitters can vary in flow rates depending on the needs of your plants.
- Connectors: You’ll need tees, elbows, and straight connectors to guide the tubing through your garden layout.
- End caps: These are used to close off the end of each tubing line.
- Pressure regulator: A pressure regulator ensures that the water pressure remains consistent throughout the system, preventing damage to the tubing or uneven watering.
- Filter: A filter keeps debris out of the tubing and emitters, ensuring smooth operation.
- Timer: A timer attached to your outdoor faucet or garden spigot automates the watering schedule.
- Stake pins or landscape staples: These are used to secure the tubing in place on the ground.
- Mulch: Mulching over the tubing helps protect it from UV rays and hides it for a cleaner appearance.
You can find these materials at most garden centers or hardware stores, and they are often available in convenient kits.
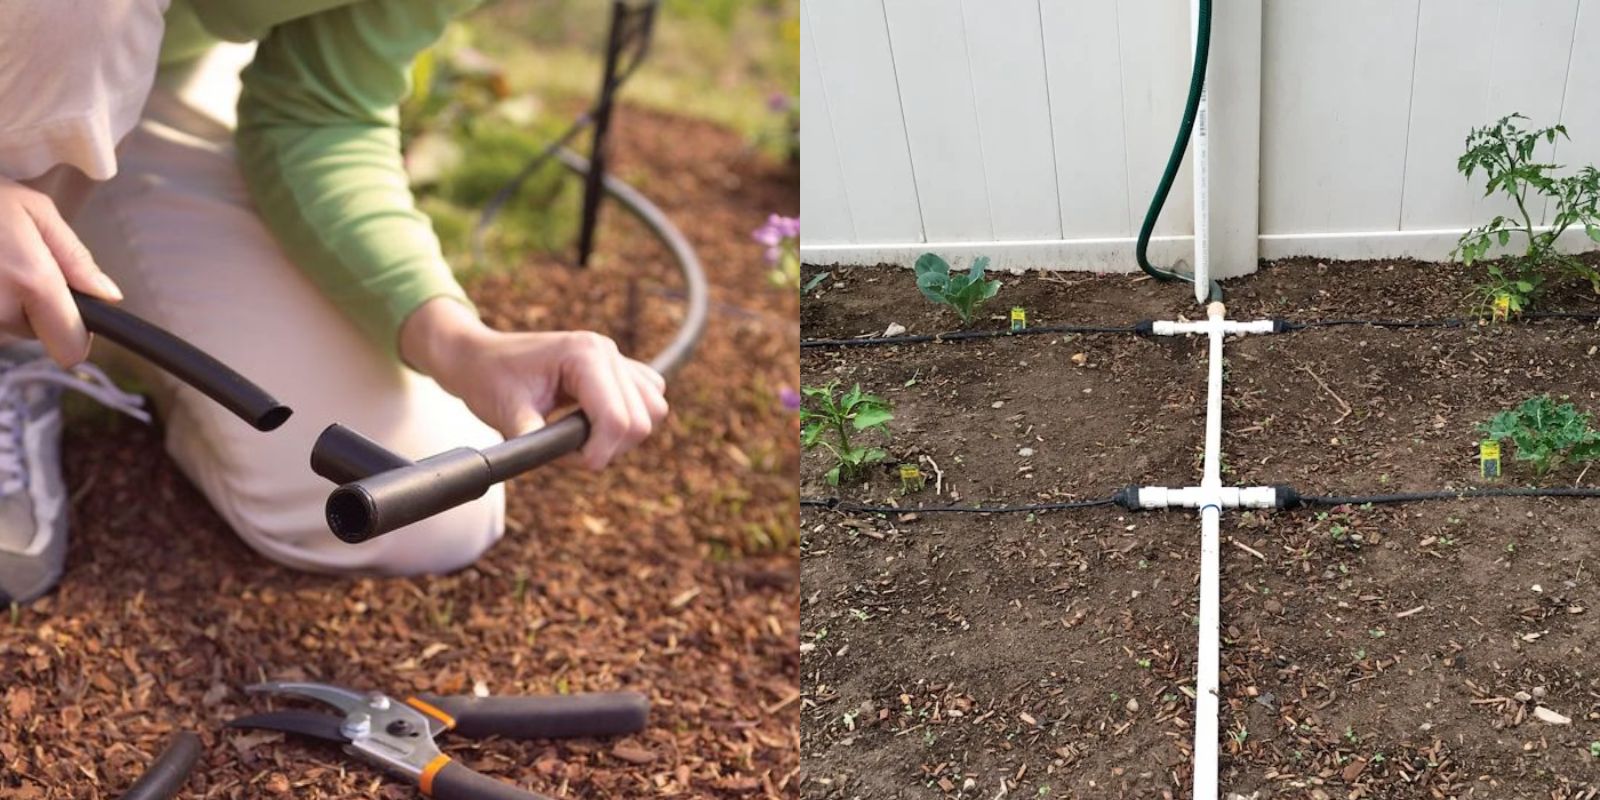
Step 3: Install the Main Tubing
With your materials in hand, it’s time to install the main tubing. Start at the water source, such as an outdoor faucet or garden spigot. Attach a filter, pressure regulator, and timer to the faucet. Then, connect the main tubing to the pressure regulator.
Lay the main tubing along the garden or yard areas you want to irrigate, following the plan you sketched earlier. Use stake pins or landscape staples to secure the tubing in place every few feet to prevent it from shifting. When you reach an area where you need to turn the tubing, use an elbow connector to make clean turns around corners. If you need to split the tubing into two or more directions, use a tee connector.
Step 4: Attach the Emitters
Once the main tubing is installed, you’ll need to attach the emitters to deliver water to your plants. There are several types of emitters to choose from, including:
- In-line emitters: These are installed directly into the tubing and allow water to drip at a set rate.
- End-of-line emitters: These are attached at the end of smaller micro-tubing lines and direct water to individual plants.
- Soaker hoses: These are porous hoses that allow water to seep out slowly along their length, perfect for rows of plants or garden beds.
Using a hole punch tool, create small holes in the main tubing where you want water to drip. Insert the emitters into the holes and ensure they are securely attached. Space the emitters according to the water needs of each plant—closer for plants that require more water, and farther apart for drought-tolerant species.
Step 5: Connect the System to a Water Source
After placing the emitters, it’s time to connect the entire system to your water source. If you haven’t already, attach the pressure regulator, filter, and timer to your outdoor faucet. The pressure regulator helps ensure the water flows at a steady rate without over-pressurizing the tubing, while the filter keeps debris from clogging your emitters.
Once everything is connected, turn on the water to check for leaks and ensure the system is working properly. Check each emitter to see if it’s releasing water at the expected rate. If you notice any weak spots or leaks, make necessary adjustments to fix the issue.
Step 6: Test the System and Adjust as Needed
After connecting the system to your water source, let it run for a few minutes to ensure that all the components are working correctly. Walk around your garden and check that each emitter is delivering water to the intended plant or area. You may need to make slight adjustments to the flow rate by changing the type of emitters or repositioning them.
If you notice any dry areas, double-check the tubing and emitters for any blockages. On the other hand, if you find that water is pooling around certain plants, reduce the flow rate or move the emitter to a new spot.
Step 7: Cover the Tubing with Mulch
Once you’re satisfied with the system’s performance, it’s time to cover the tubing. Using mulch not only helps to retain soil moisture but also protects the tubing from the sun’s UV rays, which can cause it to degrade over time. Spread a layer of mulch over the tubing and around your plants, ensuring that the emitters are still exposed to deliver water efficiently.
Mulching also gives your garden a neat and tidy appearance, hiding the tubing and creating a more aesthetically pleasing landscape.
Step 8: Set the Watering Schedule
One of the greatest benefits of a drip irrigation system is its ability to automate your watering schedule. With a timer, you can program your system to water at specific times of the day, ensuring your plants receive consistent hydration even when you’re not home. It’s best to water early in the morning or late in the evening to minimize water loss through evaporation.
Adjust the frequency and duration of watering based on the season and the specific needs of your plants. During hot summer months, your plants may require more frequent watering, while in cooler seasons, you can reduce the watering time.
Conclusion: A Drip Irrigation System for a Greener, More Efficient Garden
Installing a drip irrigation system in your yard is an excellent way to save water, reduce effort, and ensure your plants thrive. This eco-friendly irrigation method is easy to install, requires minimal maintenance, and delivers water directly where it’s needed most. By following the steps outlined in this guide, you’ll be well on your way to creating a lush, healthy garden with minimal waste and maximum efficiency.
Whether you’re a beginner gardener or an experienced green thumb, a drip irrigation system will revolutionize the way you care for your plants. Plus, you’ll have more time to enjoy your garden, knowing that it’s being watered efficiently. Get started today and watch your plants flourish!
#DripIrrigation #EcoFriendlyGardening #WaterConservation #GardeningHacks #SustainableGardening #SmartGardening #GardenLife #RaisedBeds #DIYIrrigation #EfficientWatering