
Watering your plants is one of the most important aspects of gardening, yet it can also be one of the most inefficient. Overwatering can damage your plants, while underwatering can cause them to wither. Traditional watering methods often result in wasted water, especially during dry seasons or when you’re too busy to water regularly. Fortunately, there’s a simple solution: drip irrigation.
Drip irrigation is an efficient and sustainable method that delivers water directly to the roots of your plants, reducing waste and ensuring they receive the moisture they need to thrive. While there are many commercial drip irrigation systems available, they can be expensive. The good news is that you can easily create your own DIY drip irrigator using materials you likely already have at home—specifically, plastic bottles.
In this article, we will explore three creative ways to make a drip irrigator from a plastic bottle. These methods are simple, cost-effective, and environmentally friendly, making them ideal for gardeners of all levels.
1. Simple Hole Method: A Quick and Easy Solution
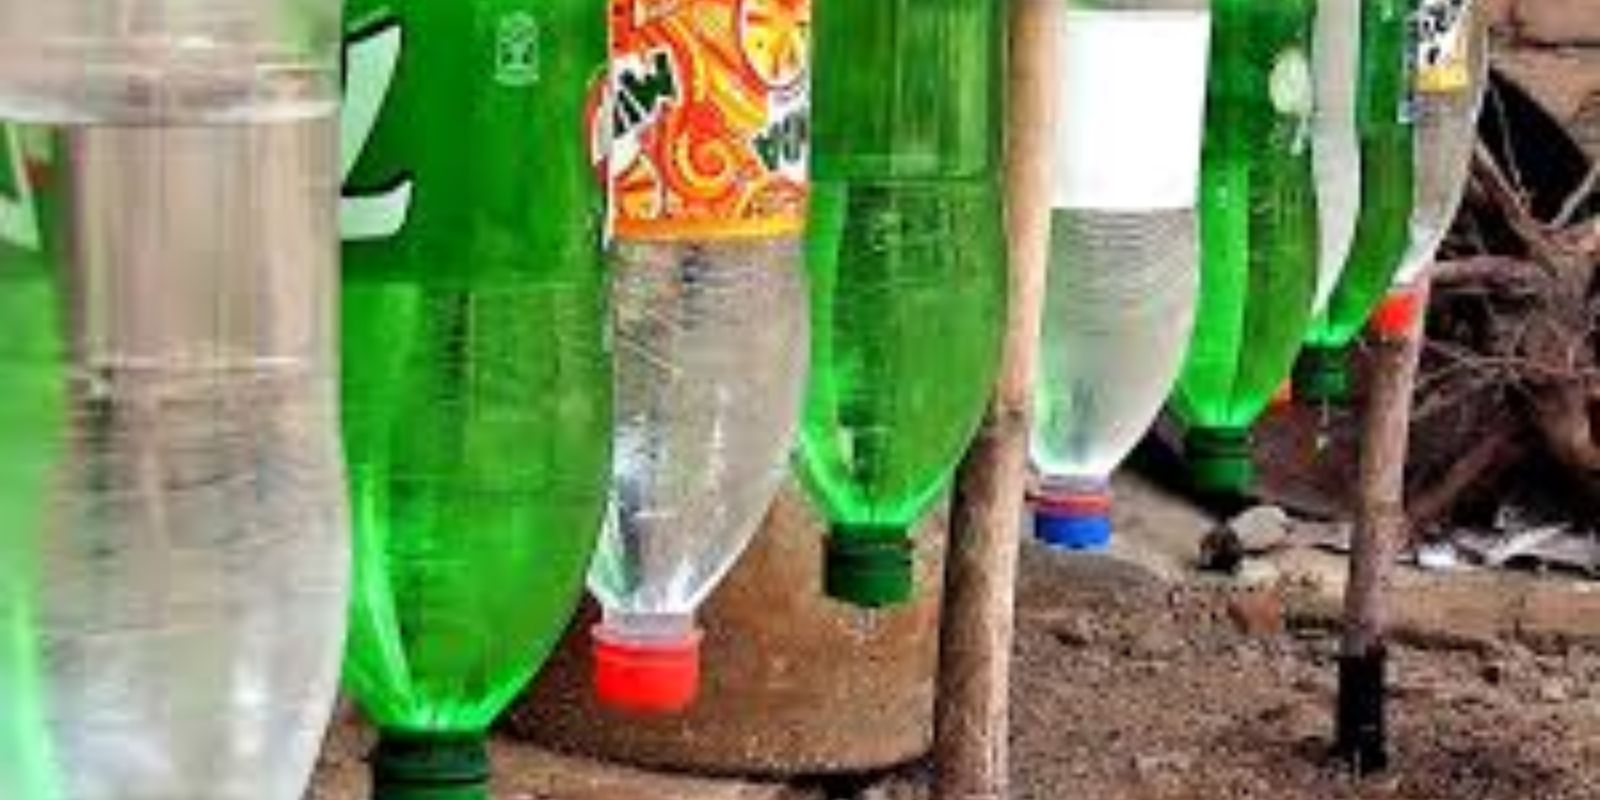
The simplest and most straightforward method for creating a drip irrigator from a plastic bottle is the hole method. This method involves creating small holes in the bottom of the bottle, which will allow the water to drip slowly into the soil, providing a steady, controlled amount of moisture to your plants.
Materials Needed:
- A plastic bottle (preferably a 1- or 2-liter bottle)
- A pin, needle, or small nail
- Scissors (optional)
Steps:
- Clean the Bottle: Start by thoroughly cleaning the plastic bottle. Remove any labels and ensure the inside is free of any residue.
- Poke Small Holes: Using a pin, needle, or small nail, poke several small holes in the bottom of the bottle. The number of holes you create will depend on how much water you want to release, but it’s important not to make them too large, as this will cause the water to flow too quickly.
- Fill the Bottle with Water: Once you’ve made the holes, fill the bottle with water.
- Place the Bottle Near the Plant: Position the bottle upside down next to the plant’s root zone. The water will slowly drip out through the holes, providing a consistent source of moisture to the plant’s roots.
- Monitor and Adjust: Check on the bottle periodically. If the water runs out too quickly, you can add more holes or use a smaller bottle for slower water release.
Benefits:
- Quick and easy to set up
- Requires minimal materials
- Ideal for smaller plants or container gardens
Pro Tip: To ensure the water drips at an even rate, bury the bottle slightly in the soil. This will also help prevent evaporation and keep the moisture closer to the roots.
2. Tube Drip Method: A More Controlled Solution
If you want a more controlled and precise way to direct water to your plants, the tube drip method is a great option. This method involves attaching a plastic tube to the neck of the plastic bottle, allowing you to direct the water exactly where it’s needed.
Materials Needed:
- A plastic bottle (any size)
- Plastic tubing (you can find this at most hardware stores or repurpose an old hose)
- Scissors or a sharp knife
- Duct tape (optional)
Steps:
- Cut the Tube: Cut a small section of plastic tubing that fits snugly into the neck of your plastic bottle. You don’t need the tubing to be very long, but it should be long enough to reach the base of your plant.
- Create a Hole for the Tube: Using scissors or a knife, carefully cut a small hole in the bottle’s cap just large enough to insert the end of the tubing. Be sure the hole is tight, so the tubing stays in place.
- Attach the Tube: Insert one end of the tubing into the hole in the bottle’s cap. You may want to use duct tape to secure the tubing in place if it doesn’t fit snugly.
- Position the Bottle: Place the bottle upside down near the plant, making sure the open end of the tube is directed toward the root zone. The tube will slowly release water directly to the plant’s roots as the bottle empties.
- Adjust Water Flow: If the water is dripping too quickly, you can use a smaller bottle or make the hole in the cap smaller. Alternatively, you can add additional small holes to the tube to slow down the flow.
Benefits:
- More precise control over water delivery
- Ideal for larger plants or multiple plants in a row
- The water is directed directly to the roots, minimizing evaporation
Pro Tip: To prevent the tubing from becoming clogged, you can add a small mesh or cloth filter over the end of the tube to catch any debris in the water.
3. Wick Method: The Passive Drip System
The wick method is one of the most passive and effective ways to use a plastic bottle for drip irrigation. By using a cotton wick or cloth, this method relies on capillary action to draw water from the bottle and deliver it directly to the plant’s roots.
Materials Needed:
- A plastic bottle (any size)
- Cotton string or a piece of cloth (something absorbent)
- Scissors
- A small drill or a hot needle (for making a hole in the bottle cap)
Steps:
- Prepare the Wick: Cut a piece of cotton string or cloth that is long enough to reach from the bottom of the bottle to the soil around your plant’s root zone. The wick should be thick enough to absorb and draw water, but not so thick that it becomes clogged.
- Make a Hole in the Cap: Using a small drill or a hot needle, carefully create a hole in the center of the bottle’s cap. The hole should be just big enough to thread the cotton string or cloth through.
- Thread the Wick: Thread one end of the cotton string or cloth through the hole in the cap. The other end should be positioned near the plant’s root zone, either buried in the soil or placed on the surface next to the plant.
- Fill the Bottle with Water: Fill the bottle with water and screw the cap back on. Place the bottle upside down next to your plant.
- Watch the Wick Do Its Job: As the water inside the bottle moves through the wick, it will slowly deliver moisture to the plant’s roots. This method works best when the wick has direct contact with the soil, allowing it to draw moisture as needed.
Benefits:
- Low maintenance and easy to set up
- Great for small container plants or potted plants
- Water is drawn into the soil as needed, preventing overwatering
Pro Tip: To enhance the wick’s effectiveness, you can soak the wick in water before using it. This will help the water move through the material more efficiently and start the process faster.
Why Plastic Bottle Drip Irrigators Are a Game-Changer for Your Garden
Using plastic bottles for drip irrigation is not only an eco-friendly and cost-effective solution but also a sustainable practice that helps conserve water and reduce waste. Here are a few reasons why you should consider using plastic bottle drip irrigators in your garden:
- Water Conservation: Drip irrigation minimizes water wastage by delivering water directly to the roots, reducing evaporation and runoff.
- Cost-Effective: Plastic bottles are inexpensive, and most gardeners already have them lying around, making this an affordable solution.
- Eco-Friendly: Reusing plastic bottles for gardening helps reduce plastic waste, which is a major environmental issue.
- Customizable: Each of the methods outlined above can be tailored to fit your specific gardening needs, whether you’re watering a single plant or an entire garden bed.
Conclusion: Make Your Garden Thrive with Plastic Bottle Drip Irrigators
Whether you’re a seasoned gardener or a beginner, these simple and effective plastic bottle drip irrigation methods are a fantastic way to ensure your plants stay hydrated while conserving water. By using materials you likely already have at home, you can create an efficient, sustainable watering system that benefits both your plants and the environment. So, why not give it a try?
With just a few simple tools and a bit of creativity, you can transform your garden into a thriving, water-efficient oasis. Start with one of these DIY drip irrigation methods today and watch your plants grow healthier and happier!
#GardeningHacks #DripIrrigationDIY #EcoFriendlyGardening #SustainableGardening #WaterConservation #DIYGardenProjects #PlasticBottleHacks #GardenSmart